Create Custom Images in Saturn Cloud
Before you get started creating your own custom image, it’s important to understand how images are built in Saturn Cloud.
When you create a custom image using the Saturn Cloud UI, you build it upon a base image.
Base images consist of the operating system and the minimum required code to achieve the full functionality of Saturn Cloud (for either CPU or GPU instances). They also contain packages to run the various workspaces (e.g., JupyterLab, RStudio) as well as the CUDA drivers necessary to interact with GPUs. They are designed to be as slim as possible so that they can load more quickly. You can see all of the base image definitions here.
After selecting the base image, you add packages and start scripts that define the rest of the custom image.

Create an Image Within Saturn Cloud
Note: In general we do not recommend storing confidential or proprietary information in Docker images. The Saturn Cloud pattern centers around layering Git repositories on top of docker images at run time. On Saturn Cloud Hosted, guarantees on the privacy of docker images are much weaker than they are on Saturn Cloud Enterprise.
To build your own image, select the Images tab from the left-hand menu in Saturn Cloud. From here, you’ll see the blue New button at the top right of the screen. Click this, and you’ll be taken to a form.
![]()
There, select Create an image using Saturn Cloud, and you will be presented with the following form:
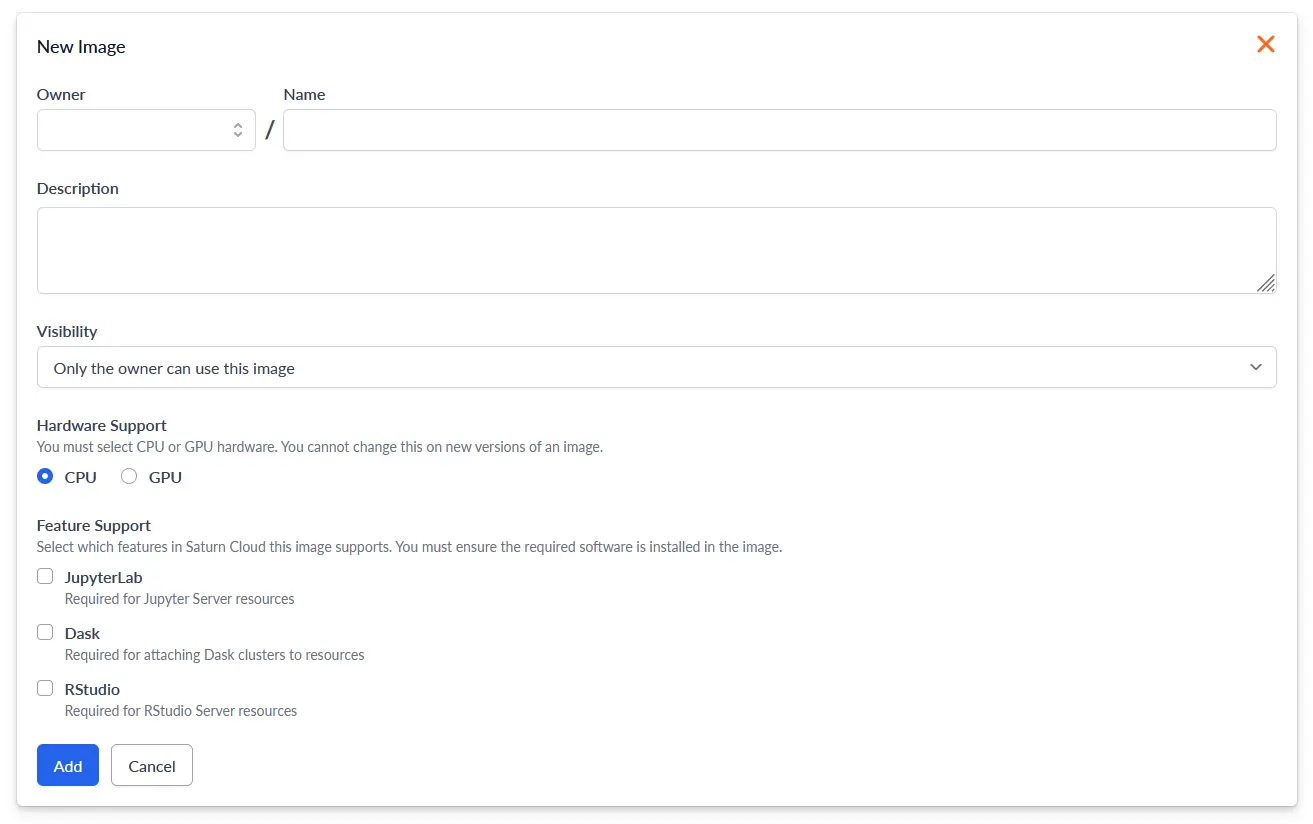
Options when creating an image within Saturn Cloud:
- Owner: The owner of the image – your account or a group.
- Name: The name that will be given to the image after creation.
- Description (optional): A brief informative description of the new image.
- Visibility: Whether the image can be used by only you, or by anyone in your organization.
- Hardware Support Whether the image will work on GPU or CPU instances – If you have not requested libraries specially designed for GPU computation, then CPU is usually the right choice.
- Feature Support Whether the image will work for Juypter or RStudio resources, and whether Dask will be supported (note - RStudio resources do not currently support Dask).
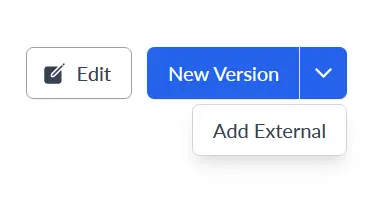
Click Add to create the new image. To finish customizing your image, you will next need to create a valid version. From the image’s page, click New Version in the top right.
![]()
From this page, you will be able to copy existing image configurations or create your own from scratch.
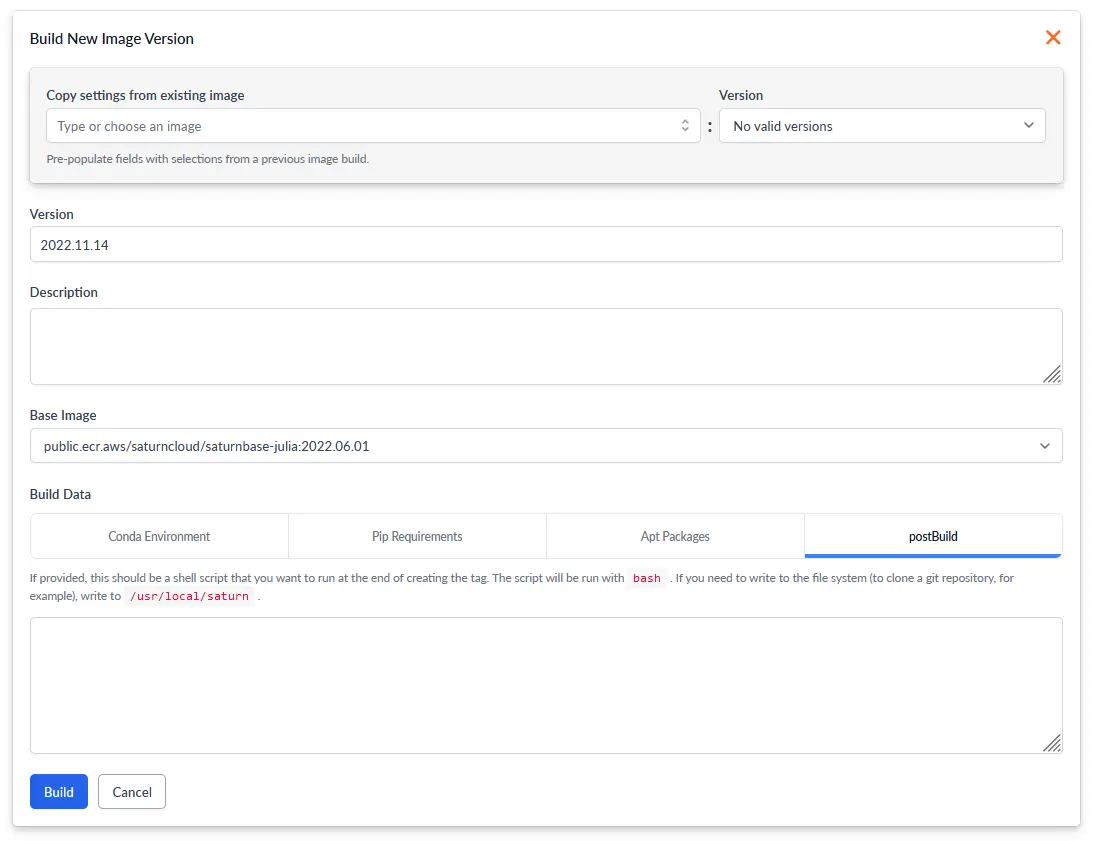
Options when creating an image version in Saturn Cloud:
- Copy settings from existing image (optional): This dropdown lets you load a configuration from an existing image, allowing you to automatically populate the form and make any desired modifications for your new build.
- Version: The label for your new image version. Versions are named by the date created by default.
- Description (optional): A brief informative description of the new version.
- Base Image: The existing image you are building the image upon. It could be a Saturn Cloud base image, Saturn Cloud standard image, or a custom image – If unsure, use the most recent Saturn Cloud standard image for GPU/CPU.
- Build Data: Saturn knows how to build images using a few configuration file types. More information is available on repo2docker.
- Conda Environment: Things you would add to an environment.yml file
- Pip Requirements: Things you would add to a requirements.txt file
- Apt Packages: A list of apt get packages
- postBuild: A bash script that is executed in your Docker container after everything else has been run
Note: If you have an existing conda environment that you use locally, you can run
conda env export –no-buildsto generate a YAML file. Paste the YAML file into text field under Conda Environment.
If you are instead importing an external environment from a host service such as Docker Hub or Amazon ECR, select Add External from the New Version dropdown menu. You will then be prompted to enter the image URI, version, and optional description.
Build the Image
Click Build after you have entered all the information, and your image will be built.
Starting with the base image, the image builder will install the following in this order:
- Apt packages
- Conda packages
- Pip packages
- postBuild commands
Note: Building your image may take some time, as all your packages and dependencies need to be downloaded and built to ensure the image will work!
After the image build is complete, your image is ready to use when creating a new resource.
