
Introduction
PyTorch is one of the popular open-source deep-learning frameworks in Python that provides efficient tensor computation on both CPUs and GPUs. PyTorch is also available in the R language, and the R package torch lets you use Torch from R in a way that has similar functionality to PyTorch in Python while still maintaining the feel of R.
PyTorch allows developers to build complex deep-learning models easily and quickly. Using PyTorch with GPU can significantly speed up the training and inference process, especially for large-scale models.
Using Docker, a containerization platform that allows developers to package and deploy their applications in a portable and scalable way, you can ensure that your PyTorch environment is consistent across different machines and operating systems.
This tutorial will walk you through the steps to install PyTorch on a GPU with Docker.
Don’t want to set up PyTorch with GPU support Locally?
With Saturn Cloud, you can use PyTorch on the cloud for free with GPU support.
Prerequisites
Before we start, you should have the following prerequisites:
- A machine with an NVIDIA GPU that supports CUDA 10.2 or higher.
- Docker 19.03 + installed on your machine
Installing GPU driver
First, create an environment where the host can use the GPU. If you already have the driver installed, skip this step.
This is an example of installation, so for reference
$ sudo add-apt-repository ppa:graphics-drivers/ppa
$ sudo apt update
$ sudo apt install ubuntu-drivers-common
$ sudo apt dist-upgrade
$ sudo reboot
$ sudo ubuntu-drivers autoinstall
$ sudo reboot
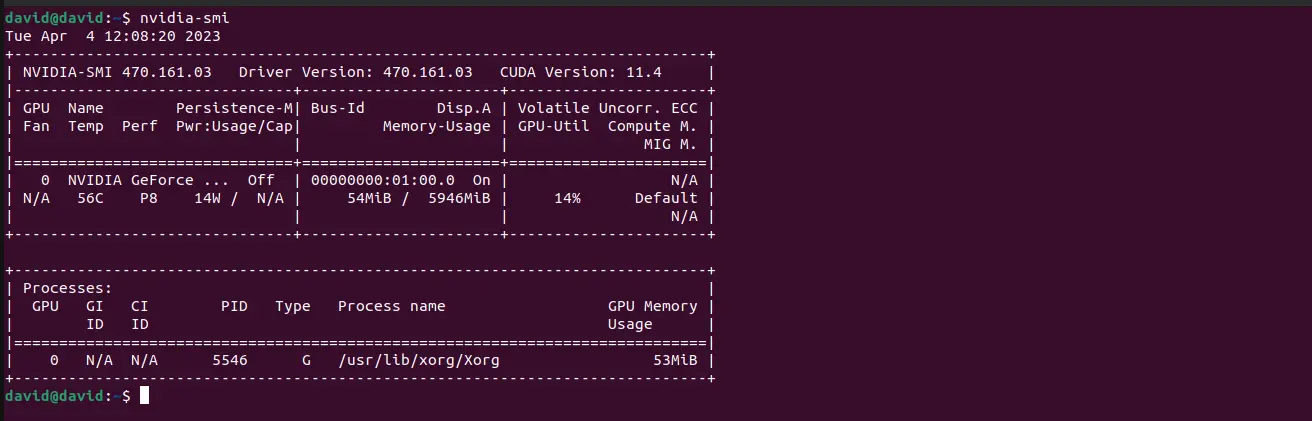
To test the installation, run:
nvidia-smi
And the output should be the driver version and memory usage.
Installing Nvidia Container Toolkit
Docker containers share your host’s kernel but bring their own operating system and software packages. This means they lack the NVIDIA drivers used to interface with your GPU. Docker doesn’t even add GPUs to containers by default, so a plain Docker run won’t see your hardware at all.
To get your GPU to work, you’ll have to install the drivers within your image and then instruct Docker to add GPU devices to your containers at runtime.
Before continuing with this Docker configuration, make sure you’ve got the Nvidia drivers working correctly by running nvidia-smi and you should see your GPU’s name, driver version, and CUDA version.
You’ll add NVIDIA Container Toolkit to your machine to enable your docker container to use your GPUs. This integrates into Docker Engine to automatically configure your containers for GPU support.
Setup the package repository and the GPG key:
$ distribution=$(. /etc/os-release;echo  $ID$VERSION_ID)
$ curl -s -L https://nvidia.github.io/nvidia-docker/gpgkey | sudo apt-key add -
$ curl -s -L https://nvidia.github.io/nvidia-docker/$distribution/nvidia-docker.list | sudo tee /etc/apt/sources.list.d/nvidia-docker.list
Install the nvidia-container-toolkit package (and dependencies) after updating the package listing:
sudo apt-get update
sudo apt-get install -y nvidia-container-toolkit
Now, configure the Docker daemon to recognize the NVIDIA Container Runtime:
sudo nvidia-ctk runtime configure --runtime=docker
Restart the Docker daemon to complete the installation after setting the default runtime:
sudo systemctl restart docker
At this point, the NVIDIA Container Toolkit is up and running, you’re ready to test its operation.
Docker with GPU
Docker doesn’t provide your system’s GPUs by default, you need to create containers with the --gpus flag for your hardware to show up. The nvidia/cuda images are preconfigured with the CUDA binaries and GPU tools.
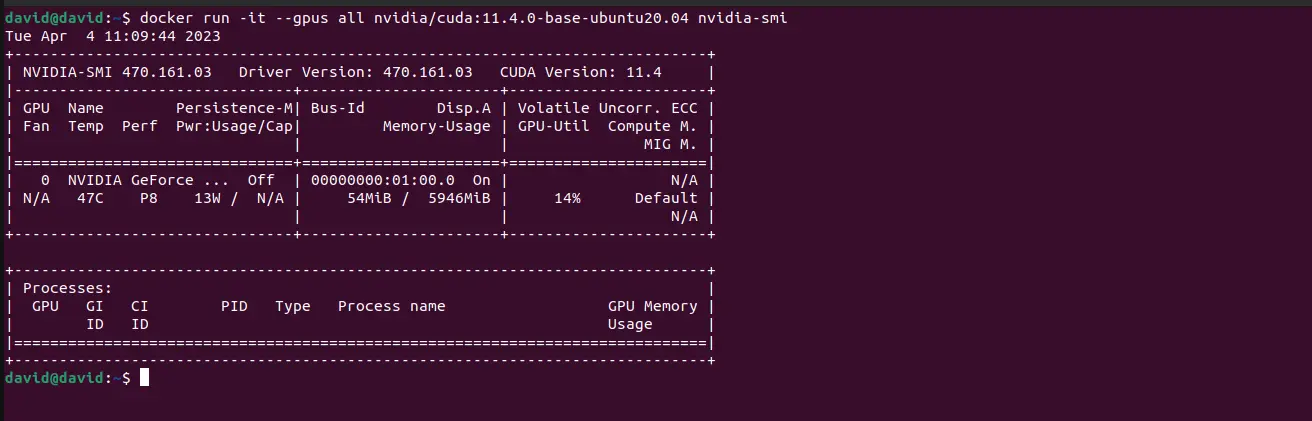
To check if Docker can access your GPU, start a container and run the nvidia-smi command.
The output should match what you saw when using nvidia-smi on your host. The CUDA version could differ depending on the toolkit versions on your host and your selected container image.
docker run -it --gpus all nvidia/cuda:11.4.0-base-ubuntu20.04 nvidia-smi
Output:
Setting up Pytorch with GPU Support
Pytorch provides several images in the Docker hub, which you can use by just pulling e.g docker pull pytorch/pytorch:latest .
But in some cases, you may want to build a custom PyTorch Docker image that includes additional dependencies or configuration options. This image can be shared across different platforms, making it easy to create reproducible PyTorch environments for development and production.
Step 1: Create a Dockerfile
To do this, you will start by creating a Dockerfile which will define the PyTorch environment. Create a file named Dockerfile and paste the following contents:
FROM nvidia/cuda:11.4.0-base-ubuntu20.04

# Set environment variables
ENV DEBIAN_FRONTEND=noninteractive

# Install system dependencies
RUN apt-get update && \
    apt-get install -y \
        git \
        python3-pip \
        python3-dev \
        python3-opencv \
        libglib2.0-0
# Install any python packages you need
COPY requirements.txt requirements.txt

RUN python3 -m pip install -r requirements.txt

# Upgrade pip
RUN python3 -m pip install --upgrade pip

# Install PyTorch and torchvision
RUN pip3 install torch torchvision torchaudio -f https://download.pytorch.org/whl/cu111/torch_stable.html

# Set the working directory
WORKDIR /app

# Set the entrypoint
ENTRYPOINT [ "python3" ]
In this Dockerfile, we start with the nvidia/cuda:11.4.0-base-ubuntu20.04 base image, which includes CUDA and cuDNN libraries. We then install system dependencies, including git, python3-pip, python3-dev, python3-opencv, and libglib2.0-0.
In some instances, you may have packages inside a requirements.txt file, you can copy it into the Docker image and when you build the image, they will get installed.
We then upgrade pip, and install PyTorch and torchvision using the official PyTorch whl files for CUDA 11.1.
We set the working directory to /app, and set the entrypoint to python3.
Step 2: Build the Docker image
You can build the Docker image by navigating to the directory containing the Dockerfile and running the following command:
# Create "pytorch-gpu" image from the Dockerfile
docker build -t pytorch-gpu . -f Dockerfile
The above command will build a Docker image named pytorch-gpu. The -t option is to allow you to give the image a name. The . means that the build context is the current directory and -f helps in pointing to the Dockerfile.
Step 3: Run the Docker Container
You have successfully built a Docker image, now you can run a container by executing the following command:
# Create and run a container from the above image
docker run --name pytorch-container --gpus all -it --rm -v $(pwd):/app pytorch-gpu
The above command will start a Docker container named pytorch-container using the pytorch-gpu image. The --gpus all option specifies that all available GPUs should be exposed to the container.
The -it option runs the container in interactive mode and attaches a terminal. The --rm option automatically removes the container when it exits. The -v option mounts the current directory as a volume inside the container at /app.
Verify PyTorch Installation
In PyTorch, the torch.cuda package has additional support for CUDA tensor types, which implement the same function as CPU tensors but utilize GPUs for computation.
The container is up and running, now you can verify that PyTorch is installed and running on the GPU.
To verify, run the following commands inside the container:
python3
The above command is to start the Python interpreter. Then, you can import PyTorch and check that it is running on the GPU:
# importing torch
import torch
# get index of currently selected device
torch.cuda.current_device() # returns 0 in my case
# get number of GPUs available
torch.cuda.device_count() # returns 1 in my case
# get the name of the device
torch.cuda.get_device_name(0) # 'NVIDIA GeForce RTX 3060 Laptop GPU' in my case
Conclusion
In this article, we discussed how to install PyTorch on the GPU with Docker, and through this, you create reproducible PyTorch environments that can be shared across different machines and platforms.


