
In this post, we show how to create a custom Docker container image for AWS SageMaker.
Introduction
The adoption of containers for cloud-native apps and Docker usage in particular has grown extremely robust.
According to the Docker Index report in 2020, there were 8 billion pulls in the month of November which was an increase from 5.5 billion a month the previous year. But July left that number in the dust, with 11 billion pulls.
On the other hand, AWS SageMaker is extremely popular for data science projects which need to be organized in the cloud. It provides a simple and transparent way to carry out ML development.
AWS SageMaker makes extensive use of Docker containers to allow users to train and deploy models. Docker technology allows developers and data scientists to be able to package their projects into standardized units that run consistently on any platform that supports docker.

When developing a model in AWS SageMaker, you can build custom Docker images for the training code and the inference code, or combine them into a single Docker image.
AWS SageMaker provides a great interface for running custom docker images on GPU instances. It handles starting and terminating the instance, placing and running the docker image on it, customizing the instance, stopping conditions, metrics, training data and hyperparameters of the algorithm.
In this tutorial, we are going to walk you through how to build custom Docker images for AWS SageMaker and then store them in Amazon Elastic Container Registry (Amazon ECR).
Building custom Docker images for AWS Sagemaker is easy with Saturn Cloud. Request a free demo to learn more. to enhance your cloud computing workflows and accelerate your data science projects.
Building Docker Container image
You may also be interested in: Create Docker Images with Conda and Poetry, Import Existing Docker Images
For us to build a docker container image, we first need to create a Dockerfile which includes the specifications needed to build a docker image for running your SageMaker processing job.
Then, we will build the container image using the Dockerfile that we have created.
Creating a Dockerfile
The Dockerfile describes the container image that we want to build. In simpler terms, we can think of it as describing the complete operating system installation of the system that we want to run.
Let us look at an example of creating a simple Docker file
# Make a docker folder
!mkdir -p docker
FROM ubuntu:20.04
FROM python:3.7-slim-buster

FROM tensorflow/tensorflow:2.3.0

MAINTAINER Amazon AI <[sage-learner@amazon.com](mailto:sage-learner@amazon.com)>
RUN apt-get update

RUN apt-get install -y git

RUN pip install --upgrade pip


# Here we get all python packages that you will need.


# Here we get all python packages that you will need.
RUN pip3 install pandas==0.25.3 scikit-learn==0.21.3


RUN pip install ipykernel && \

python -m ipykernel install --sys-prefix && \

pip install --quiet --no-cache-dir \

'boto3>1.0<2.0' \

'sagemaker>2.0<3.0'

# Set some environment variables. PYTHONBUFFERED keeps Python from
# buffering our standard output stream, which means that logs can be
# delivered to the user quickly.
# PYTHONDONTWRITEBYTECODE keeps Python from writing the .pyc files which are unnecessary in this case.

ENV PYTHONUNBUFFERED=TRUE
ENV PYTHONDONTWRITEBYTECODE=TRUE

COPY train.py /root/train.py
Below is our train.py script but you can replace it with your own custom scripts or include other files such as config files to enable connections with private PyPi repositories or other package management tools.
import tensorflow as tf
import os

mnist = tf.keras.datasets.mnist
(x_train, y_train), (x_test, y_test) = mnist.load_data()
x_train, x_test = x_train / 255.0, x_test / 255.0

model = tf.keras.models.Sequential([
tf.keras.layers.Flatten(input_shape=(28, 28)),
tf.keras.layers.Dense(128, activation='relu'),
tf.keras.layers.Dropout(0.2),
tf.keras.layers.Dense(10, activation='softmax')
])
model.compile(optimizer='adam',
loss='sparse_categorical_crossentropy',
metrics=['accuracy'])
model.fit(x_train, y_train, epochs=1)
model.evaluate(x_test, y_test)
After creating a Dockerfile, we will now build a local image using the following command while in the docker folder:
# Build docker image
docker image build -t <image_name> .

# Example using our dockerfile
docker image build -t custom-image .
Setting up installation folder
You need to create a folder on your local machine, and add the following files in that folder:
- The Dockerfile that you created in the previous step
- A file named
app-image-config-input.jsonwith the following content:
{
  "AppImageConfigName": "custom-tf2",
  "KernelGatewayImageConfig": {
    "KernelSpecs": [
      {
        "Name": "python3",
        "DisplayName": "Python 3"
      }
    ],
    "FileSystemConfig": {
      "MountPath": "/root/data",
      "DefaultUid": 1000,
      "DefaultGid": 1000
    }
  }
}
We set the backend kernel for this Dockerfile as an IPython kernel, and provide a mount path to the Amazon Elastic File System (Amazon EFS). Amazon SageMaker recognizes kernels as defined by Jupyter. For example, for an R kernel, set the Name in the preceding code to ir. You need to ensure that the Uid, Gid and kernel names match the kernel specs and user information in the Docker image.
- Create a file named
default-user-settings.jsonwith the following content. If you’re adding multiple custom images, just add them to the list ofcustom images.
{
  "DefaultUserSettings": {
    "KernelGatewayAppSettings": {
      "CustomImages": [
        {
          "ImageName": "custom-image",
          "AppImageConfigName": "custom-tf2"
        }
      ]
    }
  }
}
Storing AWS SageMaker Container Images
For AWS SageMaker to run a container image for training or hosting, it needs to be able to find the image hosted in the image repository, Amazon Elastic Container Registry (Amazon ECR).
Amazon Elastic Container Registry (Amazon ECR) is an AWS-managed container image registry service that is secure, scalable, and reliable. Amazon ECR supports private repositories with resource-based permissions using AWS IAM. This is so that specified users or Amazon EC2 instances can access your container repositories and images.
You can use the AWS Management Console, the AWS CLI, or the AWS SDKs to create and manage private repositories. You can also use those methods to perform some actions on images, such as listing or deleting them. These clients use standard AWS authentication methods.
Even though, you can use the Amazon ECR API to push and pull images.
To create a repository in Amazon ECR, follow the instructions in Creating a private repository in the Amazon ECR User Guide.
The three main steps to the process of storing Docker images to Amazon ECR are building locally, tagging with the repository location, and pushing the image to the repository.
To build the image locally, you use the following command as we had used it earlier;
# Command to build the image

docker image build -t <image_name>:<image_tag>```

# Example

docker image build -t custom-image:latest .
This will take instructions from the Dockerfile that we created earlier, and then build an image on your instance.
After building the image, we need to let our Docker instance know where to store the image so that AWS SageMaker can find it.
Using the following command, we will tag the image:
# command to tag the image

Docker image tag <image name> <repository name>:<image_tag>

# Command example

docker image tag custom-image:latest 513141394497.dkr.ecr.us-east-1.amazonaws.com/ecr-custom-image:latest
For the repository name, has the following structure:
# Example
513141394497.dkr.ecr.us-east-1.amazonaws.com/customsage
If we fail to tag the image with the repository name, Docker by default will upload the image to Docker Hub, and not Amazon ECR.
AWS SageMaker currently requires Docker images to reside in Amazon ECR, and to push an image to ECR, you must tag it with the registry hostname.
Amazon ECR images are private by default which is a good practice with Amazon SageMaker but if you want to share your AWS SageMaker publicly, you can find more information in the Amazon ECR User Guide.
Before we push our image to AWS ECR, we need to authenticate our docker CLI to our AWS ECR using the following command;
# Command
$ aws ecr get-login-password --region <REPOSITORY_REGION> | docker login --username AWS --password-stdin <REPOSITORY_URI>

# Command example with my region and repository
$aws ecr get-login-password --region us-east-1 | docker login --username AWS --password-stdin 513141394497.dkr.ecr.us-east-1.amazonaws.com
This command retrieves an authentication token using the GetAuthorizationToken API and then redirects it using the pipe (|) to the login command of the container client, the Docker CLI in my case. The authorization token is valid for 12 hours.
For the above command to execute successfully, you need to have AWS credentials stored in the credentials file and your IAM principal has to have the necessary permission.
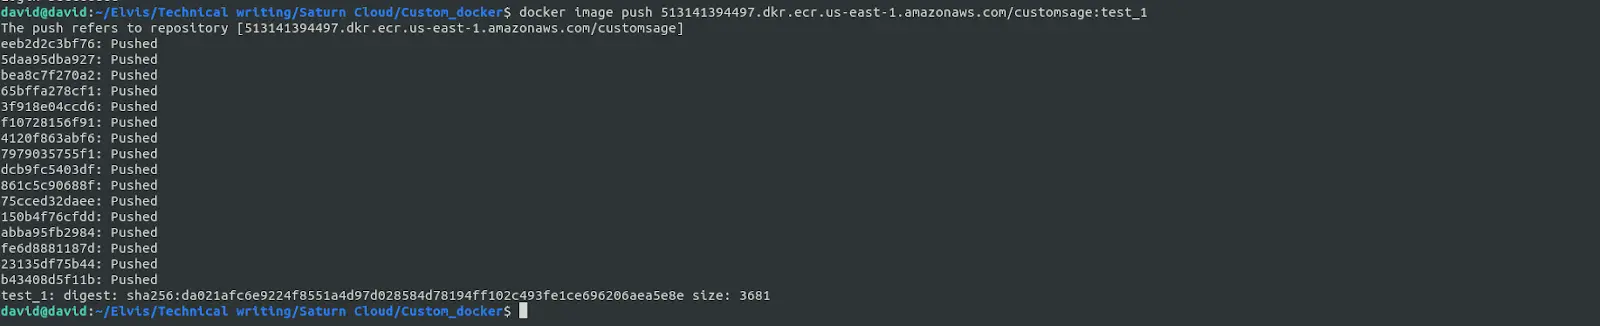
Finally, using the following, you will be able to upload the image to Amazon ECR, with the Region set in the repository name tag.
# Command
$docker image push <image_name[:tag]>

# example with my image
$ docker image push 513141394497.dkr.ecr.us-east-1.amazonaws.com/ecr-custom-image:latest
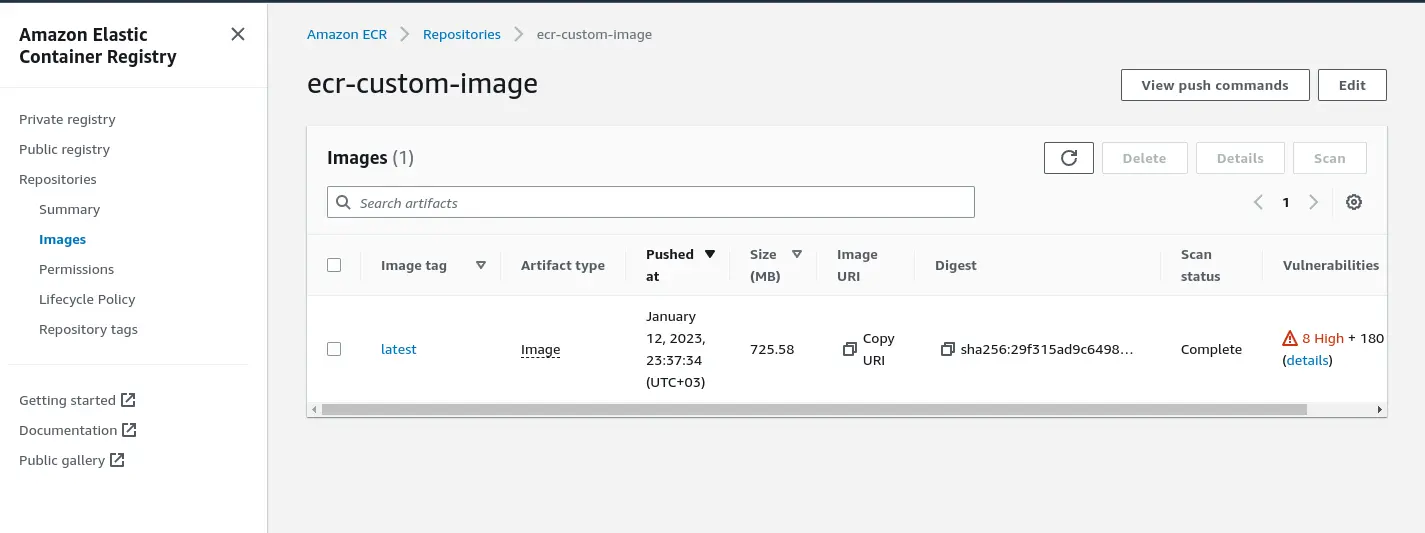
Now, we have successfully pushed our image to the private repository in AWS ECR.
And when we can check on our private repository in AWS ECR, we can be able to see our image, which means it was successfully pushed.
Attaching an Image to AWS SageMaker Studio
For us to be able to use the image, we need to attach the image to the studio domain. You can do this via Studio UI. In this case, the UI will handle creating the image and image version, and updating the domain with the attached image.
- On the AWS SageMaker console, go to Amazon SageMaker Studio.
On the control panel page, you are able to see the Studio domain provisioned, along with any user profiles that you have created.
Choose Images on the left panel, and then click Create Image.
Provide the Amazon ECR registry path for your docker image as you will be prompted. The path needs to be in the same region as the studio domain.
The ECR repository also needs to be in the same account as your Studio domain or cross-account permissions for Studio need to be enabled.
- Click Next, and enter the image properties as prompted.
For:
Image name, enter the name of the image.
Image display name, enter the name you want to be displayed.
Description, enter a label definition.
IAM role, choose the IAM role required by AWS SageMaker to attach ECR images to AWS SageMaker images on your behalf.
Additionally you can add a tag for your image.
EFS mount path, enter the path within the image to mount the user’s AWS Elastic File System (EFS) home directory.
- Select the type of the image and then hit the Submit button.
AWS SageMaker image store automatically the versions of your images, so you can Detach an image with all its versions, and Attach a new version. There is no limit to the number of versions per image or the ability to detach images.
Building custom Docker images for AWS Sagemaker is easy with Saturn Cloud. Request a free demo to learn more. to enhance your cloud computing workflows and accelerate your data science projects.
Conclusion
On a final note, AWS SageMaker provides prebuilt Docker images for its built-in algorithms and the supported deep-learning frameworks used for training and inference. In this blog, we discuss how you can build custom Docker images for SageMaker instances, use them for training and also store them in your private registry in AWS ECR, and then attach them to the AWS Sagemaker Studio domain.
You may also be interested in:


