Using SSH with AWS SageMaker and Ngrok
Amazon SageMaker is a fully managed machine learning service. With Amazon SageMaker, data scientists and developers can quickly and easily build and train machine learning models, and then directly deploy them into a production-ready hosted environment. It provides an integrated Jupyter authoring notebook instance for easy access to your data sources for exploration and analysis, so you don’t have to manage servers. (Sagemaker documentation)
All SageMaker content is organised under Sagemaker studio. To tap into Sagemaker’s capabilities, even the advanced once, you can do this through an easy to use visual, clickable AWS Sagemaker Studio graphic interface, which is a effectively a visual IDE.
How can you connect to AWS Sagemaker?
One of the ways that you can connect to AWS Sagemaker is through using the Console. But soon or later, you’ll need to use SSH to access notebook instances in AWS Sagemaker because maybe you’ll want to; - Copy your notebook over with scp - Connect to a remote debugger with Pycharm or VsCode when you get stuck - Access your Github repositories without leaving your private key lying around, accessible to anybody who has access to AWS console in your company. AWS does not support this functionality though it is very essential for any developer using AWS Sagemaker.
In this post, we will go over steps on how you use SSH with AWS Sagemaker.
How does the SSH setup work?
SSH is a way in which you let two machine communicate with each other, for this case we have to create a way in which the local machine and the notebook instance can talk with each other.
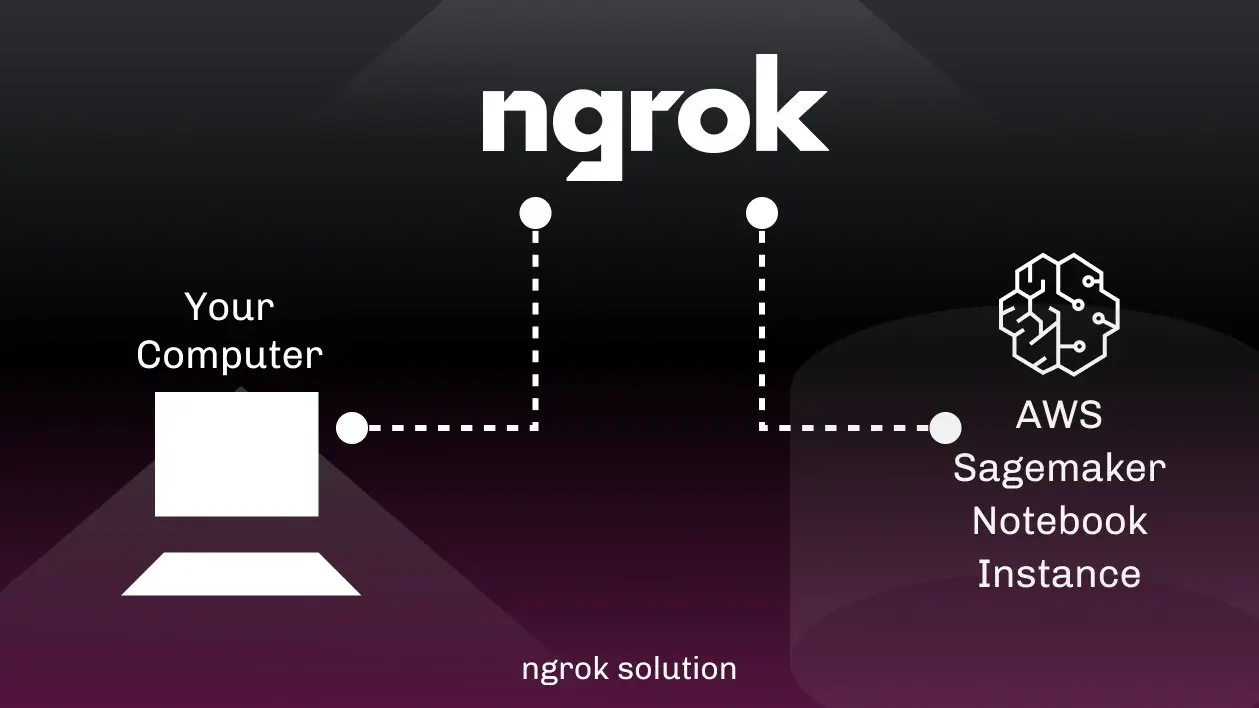
When two machines can’t talk to each other, but they both know a third machine, they can ask that third machine to exchange their messages. That’s exactly what we’ll do.
In our solution we will use ngrok reverse proxy (3rd party proxy) to create an ssh connection to AWS Sagemaker.
Lifecycle Configurations in Amazon SageMaker
Before we start setting up the connection, we have to make sure that there is a lifecycle configuration attached to our notebook instance. If there is no configuration, then we have to create one and configure the ssh in it.
Below are the steps to set up a lifecycle configuration:
- Login to your AWS console
- If you have your notebook instance running, stop it (and wait for it to stop)
- Make sure you have jq tool installed
- Copy the following script into your terminal (on your computer and not SageMaker).
- If you know there is one and you know the name, you can just fill this variable,
INSTANCE_NAME and CONFIGURATION_NAMEand skip the rest steps.
# fill in the instance name here
INSTANCE_NAME=”instance_name”
CONFIGURATION_NAME=$(aws sagemaker describe-notebook-instance --notebook-instance-name "${INSTANCE_NAME}" | jq -e '.NotebookInstanceLifecycleConfigName | select (.!=null)' | tr -d '"')
echo "Configuration \"$CONFIGURATION_NAME\" attached to notebook instance $INSTANCE_NAME"
if [[ -z "$CONFIGURATION_NAME" ]]; then
    # there is no attached configuration name, create a new one
    CONFIGURATION_NAME="configuration_name"
    echo "Creating new configuration $CONFIGURATION_NAME..."
    aws sagemaker create-notebook-instance-lifecycle-config \
        --notebook-instance-lifecycle-config-name "$CONFIGURATION_NAME" \
        --on-start Content=$(echo '#!/usr/bin/env bash'| base64) \
        --on-create Content=$(echo '#!/usr/bin/env bash' | base64)

 # attaching lifecycle configuration to the notebook instance
 echo "Attaching configuration $CONFIGURATION_NAME to ${INSTANCE_NAME}..."
 aws sagemaker update-notebook-instance \
     --notebook-instance-name "$INSTANCE_NAME" \
     --lifecycle-config-name "$CONFIGURATION_NAME"
fi
Setting up SSH with Ngrok
Ngrok is a third party reverse proxy that will tunnel our traffic to notebook instance. Now maybe you will get about how secure our connection since we have integrated a 3rd party proxy, but you should not get worried because SSH is encrypted end to end so ngrok (3rd party proxy) can’t read any of it. To get permissions for creating TCP tunnels, one needs a free ngrok account and once it is created, you will find authentication token in their dashboard. Once you grab it, fill in the token below and run it step by step.
export NGROK_AUTH_TOKEN="FILL_TOKEN_HERE"
echo "Downloading on-start.sh..."
# save the existing on-start script into on-start.sh
aws sagemaker describe-notebook-instance-lifecycle-config --notebook-instance-lifecycle-config-name "$CONFIGURATION_NAME" | jq '.OnStart[0].Content'  | tr -d '"' | base64 --decode > on-start.sh

echo "Adding SSH setup to on-start.sh..."
# add the code to persist conda environments
echo '' >> on-start.sh
echo '# set up ngrok ssh tunnel' >> on-start.sh
echo "export NGROK_AUTH_TOKEN=\"${NGROK_AUTH_TOKEN}\"" >> on-start.sh
echo 'curl https://raw.githubusercontent.com/Davidelvis/sagemaker-setup/master/scripts/ssh/on-start-ngrok.sh | bash' >> on-start.sh

echo "Uploading on-start.sh..."
# update the lifecycle configuration config with updated on-start.sh script
aws sagemaker update-notebook-instance-lifecycle-config \
    --notebook-instance-lifecycle-config-name "$CONFIGURATION_NAME" \
    --on-start Content="$((cat on-start.sh)| base64)"
After running the steps above, now every time you AWS Sagemaker and run your notebook instance, ngrok starts automatically with your authentication token.
The ngrok config will be located in /home/ec2-user/SageMaker/.ngrok/config.yml.
Incase the tunnel ever closes, which might happen because sometimes connections can drop, you can run start-ssh-ngrok in your SageMaker terminal and the tunnel will run in the background.
Now all we are remaining with is setting up ssh keys.
Setting up SSH keys
So far we’ve set up the way to talk to your SageMaker instance, but we still haven’t defined who exactly can access these machines.
To do so, we’ll have to add public keys for all users that need access to ~/SageMaker/ssh/authorized_keys.
That likely means that you will have to copy whatever is in your local ~/.ssh/id_rsa.pub into ~/SageMaker/ssh/authorized_keys on SageMaker instance.
Once you’ve done that, make sure you run copy-ssh-keys on SageMaker terminal so these keys are copied to the correct location.
Every time your machine starts, the address you have to connect to will change. It’s unfortunate and can be fixed by more scripting, but I won’t go into details in this post.
Every time it changes, it will be written to ~/SageMaker/SSH_INSTRUCTIONS file.
If you click on Open Jupyter in AWS Console, it should be in the directory shown by default.
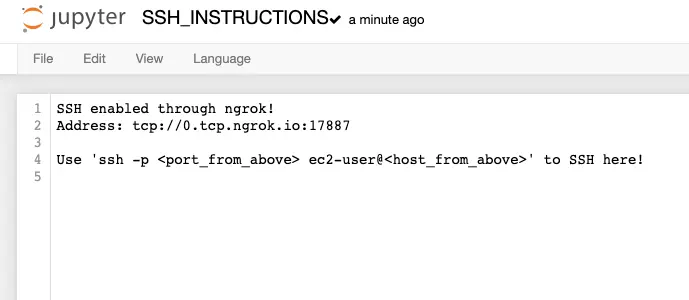
Now all you need to run is ssh -p <port_address> ec2-user@<host_name> and boom! you will be in!
Conclusion
In this blog, we have presented a solution to the problem of not being able to connect to AWS SageMaker using SSH. I hope that this will help you to use SSH and AWS SageMaker to make your projects much easier.
Additional Resources:
SHARE:


About Saturn Cloud
Saturn Cloud is your all-in-one solution for data science & ML development, deployment, and data pipelines in the cloud. Spin up a notebook with 4TB of RAM, add a GPU, connect to a distributed cluster of workers, and more. Request a demo today to learn more.
