
This article was published when data science tooling like Dask and R was a primary focus for Saturn Cloud. Today, Saturn Cloud is the enterprise AI platform for any GPU infrastructure.
Photo Credit: Unsplash (Shubham Dhage)
Introduction
In today’s world of technology, running large-scale computing workloads can be challenging and time-consuming. The demand for compute-intensive workloads increases daily, and organizations constantly look for efficient ways to process and manage their batch jobs. Batch processing refers to a series of programs that IT teams typically defined through scripts, command lines, or a programming language that execute without human intervention, making sequencing and scheduling those programs especially important.
Batch computing runs jobs asynchronously and automatically across multiple compute instances. While running a single job may be trivial, running many at scale, particularly with multiple dependencies, can be more challenging. This is where a fully managed service such as AWS Batch offers significant benefits. AWS Batch provides a scalable, fully-managed, and cost-effective solution to run batch computing workloads on the AWS Cloud. AWS Batch takes care of the underlying infrastructure and automatically scales compute resources based on demand so that you can focus on your workloads.
In this article, we’ll guide you through the core AWS Batch concepts and the process of setting up AWS Batch, from creating a computing environment to submitting a job. Whether you are a developer, scientist, or engineer, this comprehensive guide will provide the knowledge and skills to leverage AWS Batch and efficiently manage your batch computing workloads.
AWS Batch Components
AWS batch organizes its work into four components:
1. Jobs
- A job is a unit of work (such as a shell script, a Linux executable, or a Docker container image) that you submit to Batch.
- You can submit a single job or an array of jobs, and these jobs can reference other jobs by name or by ID and can be dependent on the successful completion of other jobs.
- A job can have different states, for example, Submitted, Pending, Running, Succeeded, Failed, etc.
2. Job definitions
- They specify how jobs should be run
- The definition can contain:
- An IAM role in providing programmatic access to other AWS resources.
- Memory and CPU requirements for the job.
- Controls for container properties, environment variables, and mount points for persistent storage.
3. Job Queues
- This is where the batch jobs reside before they are run.
- It is possible to associate one or more compute environments with a job queue and assign priority values for the compute environments and even across job queues.
- The Batch Scheduler8 evaluates when, where, and how to run jobs submitted to a job queue. Jobs run in approximately the order they are submitted as long as all dependencies on other jobs have been met.
4. Compute environment
- This is a set of managed or unmanaged computing resources used to run jobs, such as EC2 instances.
- These environments can be configured to be managed by AWS or on your own as well as the number of and type(s) of instances on which Jobs will run.
Before you start the set-up, some prerequisites will make this tutorial easy to follow, and it will include some good practices regarding security.
Prerequisites
- Have an AWS account.
- Create an IAM user with administrator permissions. To do this, you can just follow this tutorial. I recommend you give granular permissions to the user that will do the provisioning.
- Install and configure AWS CLI.
Setting up AWS Batch
To start, log in to your AWS account and search for AWS Batch using the search bar, or you can use this link to go direct to the Batch dashboard, which looks like this:
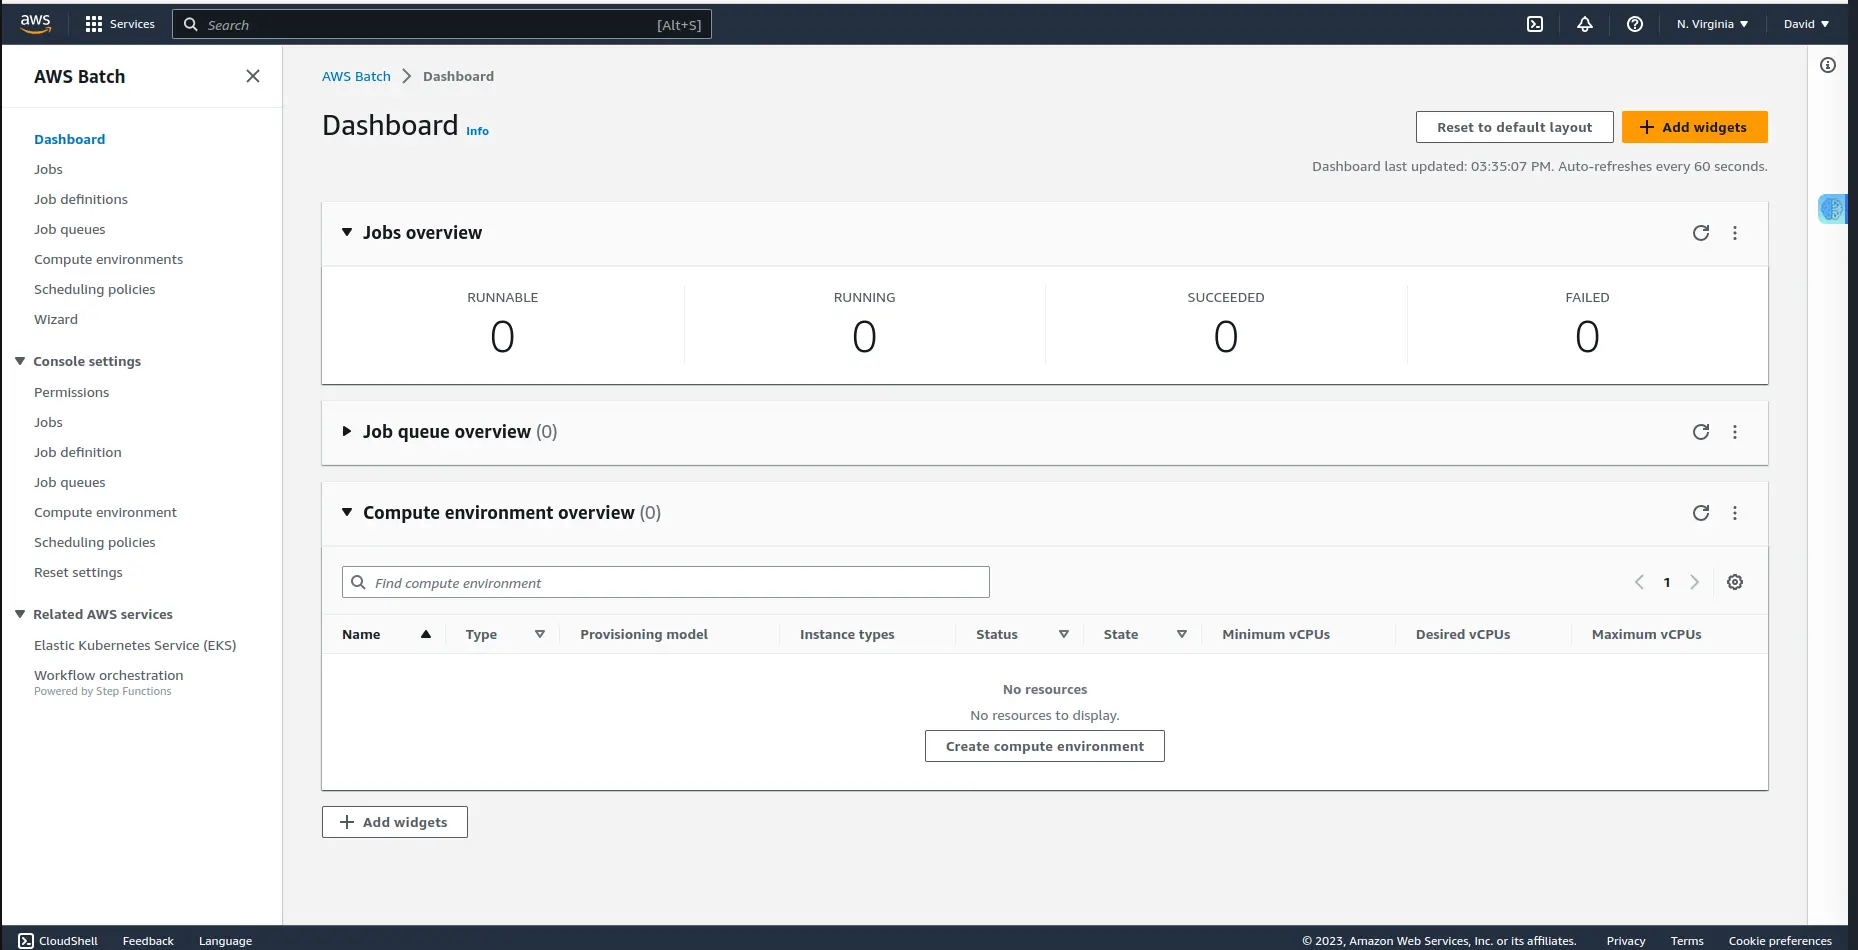
While in the dashboard, you can see that right now it is 0 everywhere; in Job queues, compute environments and also jobs under all statuses.
Creating a computing environment
A computing environment is where the jobs will run from. In this section, you’ll configure the instance type and other things we are about to see.
Regarding creating instances, there are two options, you can either configure for instances to be created right away, speeding up job scheduling or AWS Batch will create one when needed.
Click the “Compute environments” link that appears in the left menu. You’ll see the following screen:

Now click the “Create” orange button to define the computing environment.
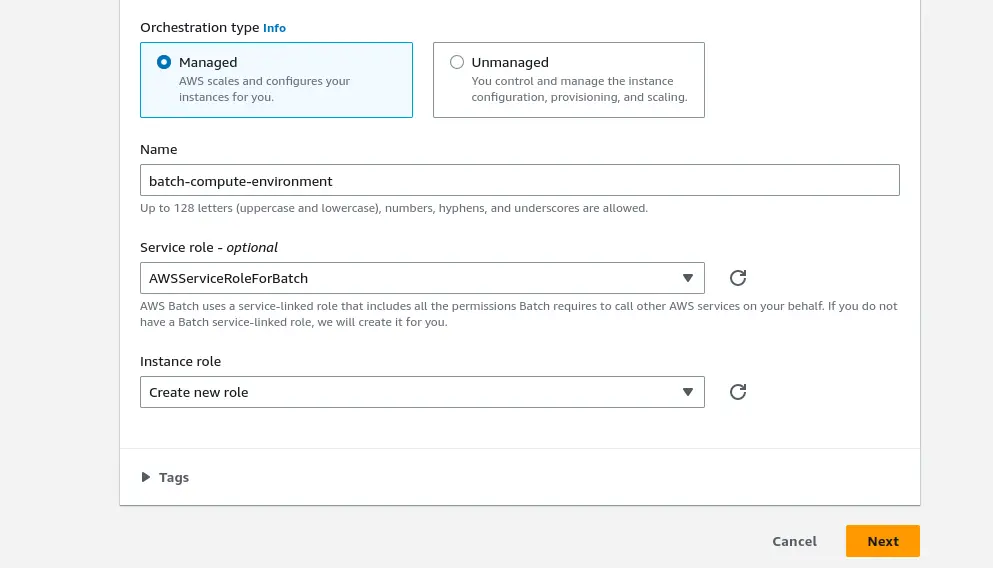
You need to give a name to your environment, for example, in this case, we name it batch-compute-environment.
It is important to note that you can either choose managed environment type, where AWS scales and configures the instances for you, or Unmanaged where you will control and manage the instance configuration, provisioning, and scaling.
You don’t have to worry about creating a service or instance role. Just choose the option “Create new role” for instance role and the default value for the service role, and AWS will take care of them for you with the proper permissions. It will help you see which permissions are needed and adjust them if you want to.
Instance Configuration
When you click on Next, you get to instance configuration, where we’ll discuss compute resources.
You’ll see the following screen:
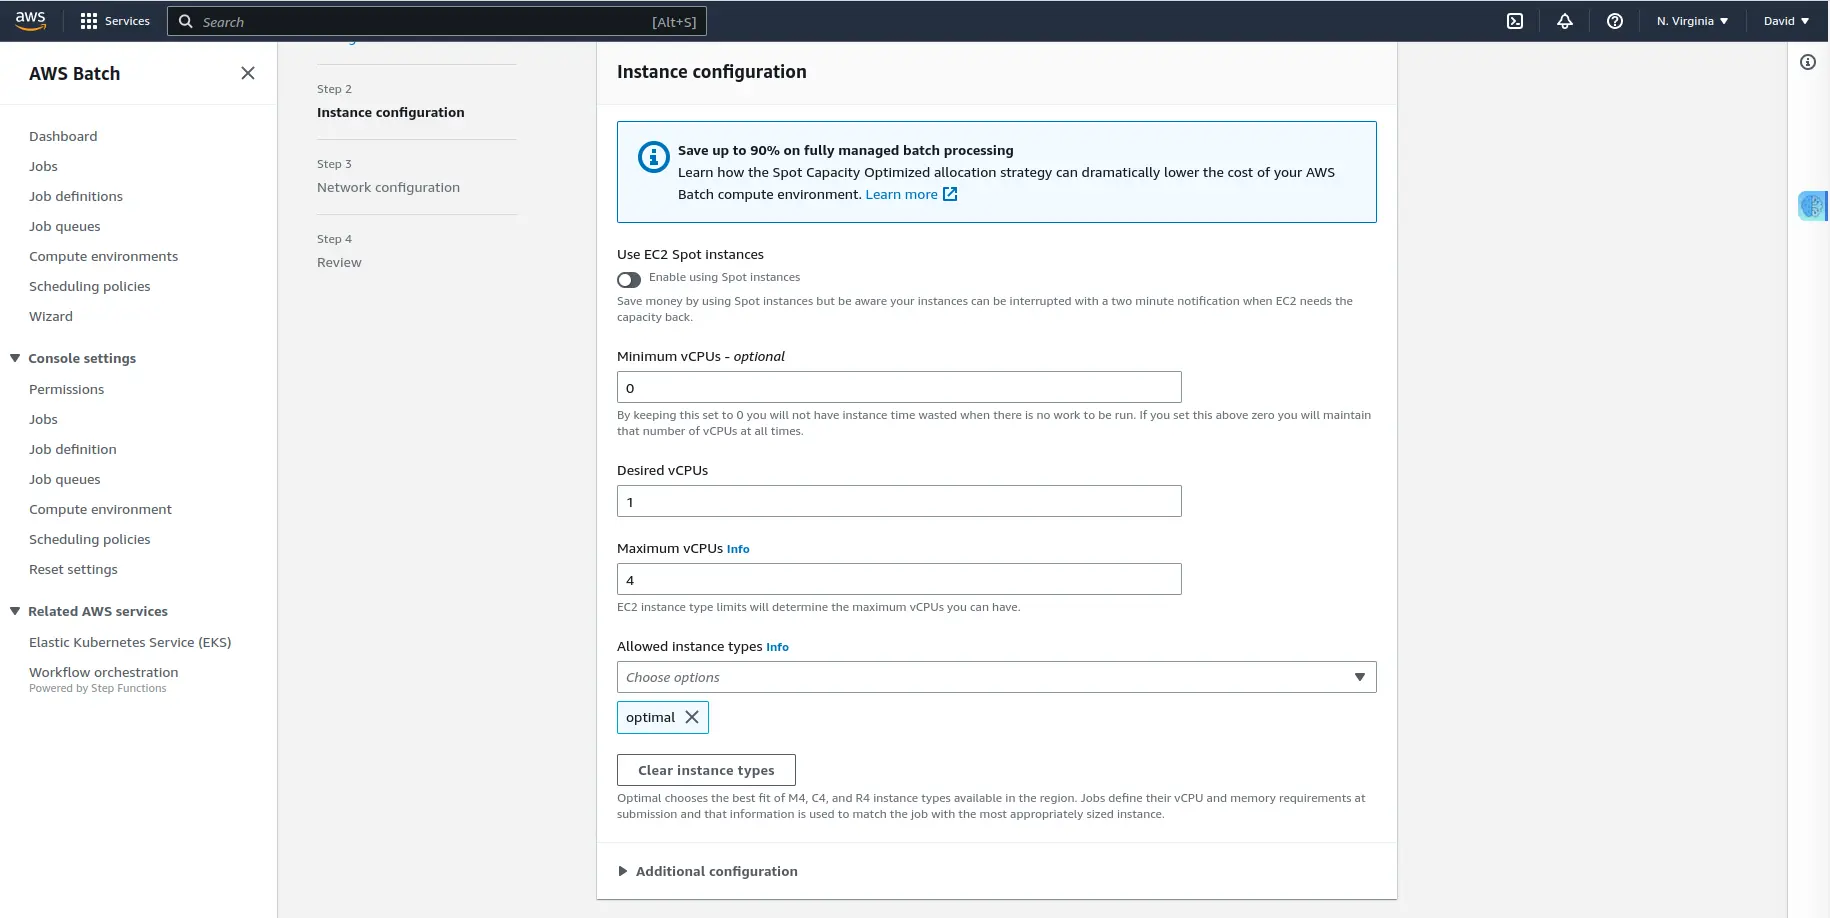
In this section, you get to choose if you want to use EC2 spot instances or on-demand. For simplicity, we choose “on-demand”.
In the “Allowed instance types” field, is where you get to choose which family type you’d like these environments to create. In this field, you can create compute environments that are CPU-intensive and choose between C family instance types. Or if there are jobs that are memory intensive, you can choose M family instance types. You’re limiting which instance types can be created. I chose “optimal", so AWS decides which instance is better based on the configuration of job queues.
The vCPUs fields (minimum and maximum) are essential to get you started in running your jobs. It is good to know that vCPUs are virtual CPUs, not CPU units you configure in a container when running in ECS.
For our case, we configure a maximum of 4 vCPUs. It means that if, at some point, the cluster has 4 vCPUs among all instances, it won’t create more. Jobs will run slowly, but your costs will remain controlled. We also put 1 vCPU as desired, so that it starts creating an instance right now. AWS will adjust this later if needed, and you can change it when submitting a job if you’re in a hurry.
Network Configuration
In this section, you’ll configure the networking section and tags.
For now, leave the VPC and the subnets values to default, click on the “Next” button, and wait a bit while the environment is created.
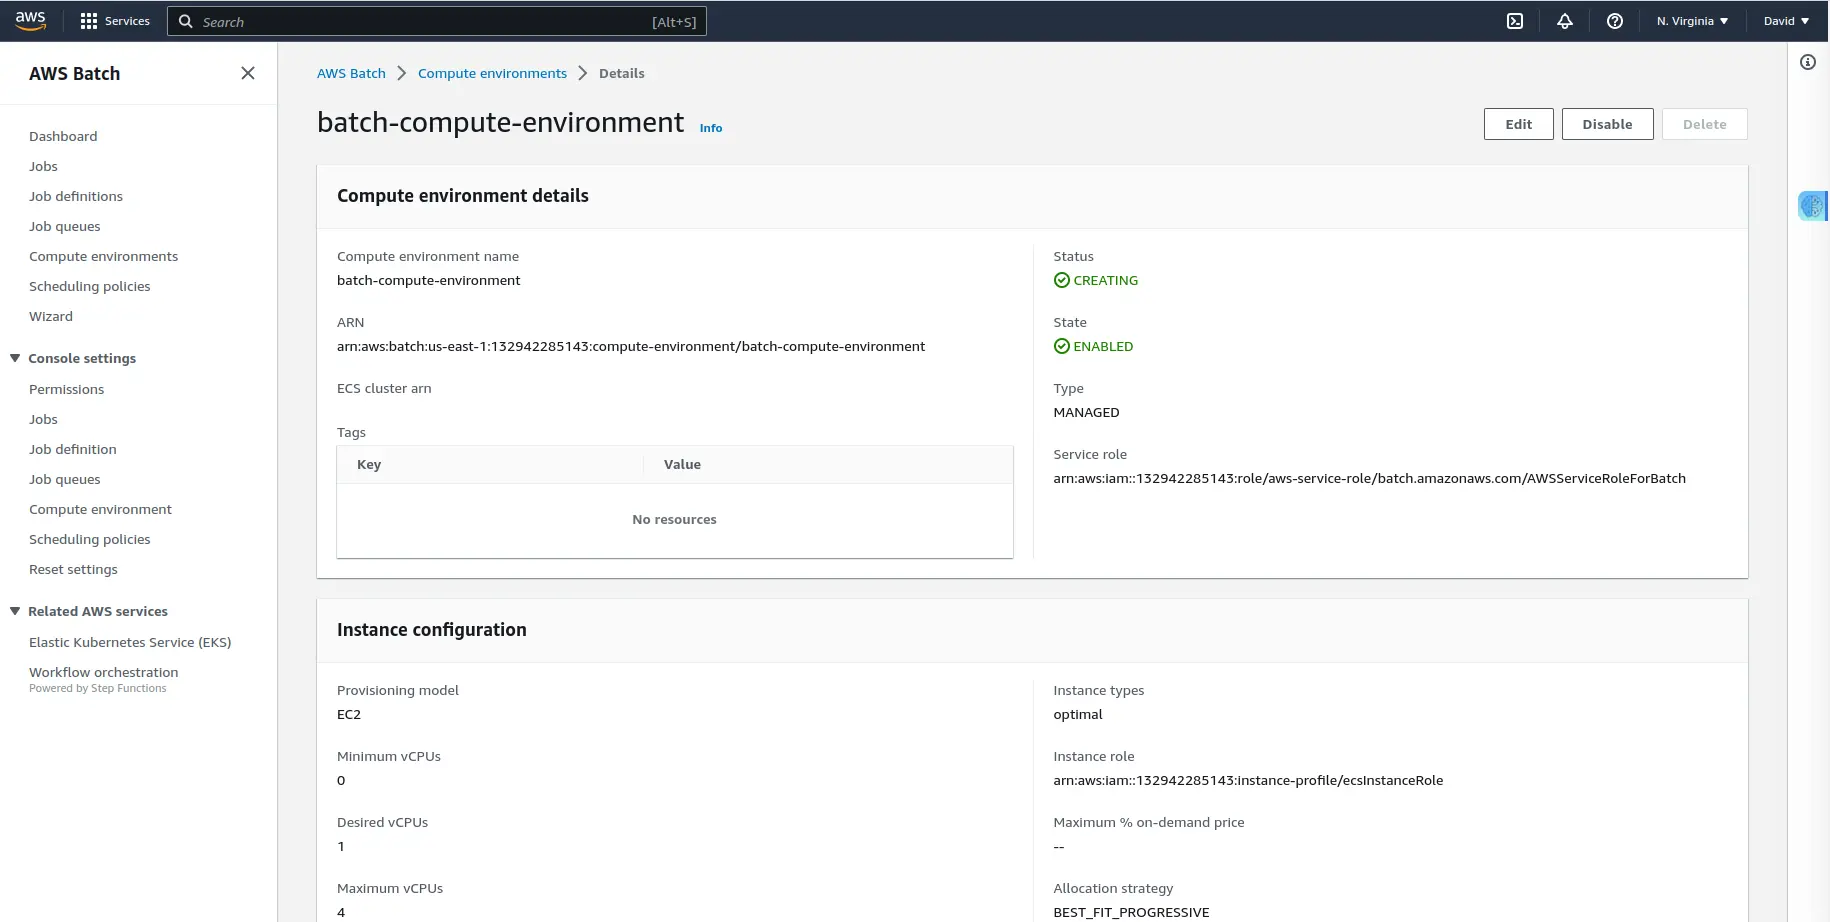
You’ve successfully created a computing environment from which you will run the jobs.
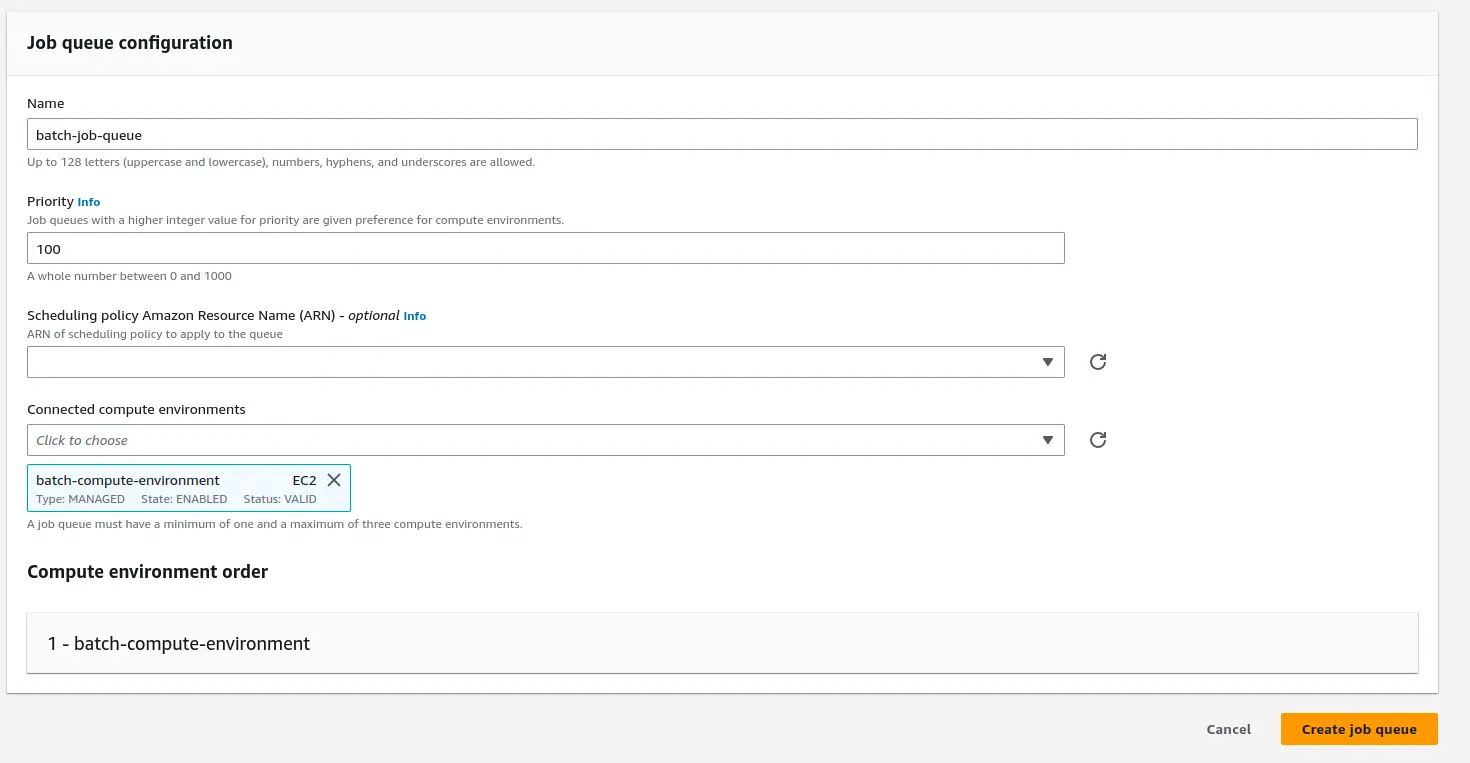
Creating a Job Queue
Now, you need a job queue that will be attached to the computing environment you have created, and it will use the min, max, and desired vCPUs configuration to know how many instances to create.
Click on the “Job Queues” link on the left panel and again click on the “Create queue” button to start the creation process of the Job queue.
Make sure to give a name to the queue, for our case, it is batch-job-queue. You also need to connect this queue to one or more computing environments.
In the priority field, you can choose a value representing how the Job queue will be prioritized.
Why have more than one computing environment? It’s helpful if you want to speed up a job’s processing time by creating more instances using the spot market. You can have an on-demand computing environment where you always have resources available. And if the load increases, you can create spot instances, if any are available, based on the bid you configured.
Creating a Job
Jobs can be invoked as containerized applications that run on Amazon ECS container instances in an ECS cluster, or you can submit a bash script.
For demonstration purposes, you will create a simple bash script that puts a Fibonacci sequence in a DynamoDB table. It uses an environment variable called FOO to create the series of numbers, and it uses an argument just to print it in the console.
Create a bash script and name it fibonacci_job.sh and paste the following contents:
#!/bin/bash
date
if [ -z "$AWS_BATCH_JOB_ID" ]
then
   AWS_BATCH_JOB_ID="100"
else
   echo "\$AWS_BATCH_JOB_ID is NOT empty"
fi
echo "Args: $@"
echo "jobId: $AWS_BATCH_JOB_ID"
Num=$FOO
Fib=""
f1=0
f2=1
echo "The Fibonacci sequence for $Num is:"
for (( i=0; i<=Num; i++ ))
do
   Fib+="$f1 "
   fn=$((f1+f2))
   f1=$f2
   f2=$fn
done
echo $Fib
echo "{\"jobID\": {\"S\": \"$AWS_BATCH_JOB_ID\"}, \"Fibi\": {\"S\": \"$Fib\"}}" > item.json
RESP=$(aws dynamodb put-item --region us-east-1 --table-name batch-dynamo-table --item file://item.json)
echo $RESP
For successful running of the Job, you will need to perform the following:
- Create a DynamoDB table in the region same as AWS Batch service with the primary key of “jobID”. In our case, we call it
batch-dynamo-table. If you decide to enter a different name, make sure you change it at the end of thefibonacci_job.shscript. - Create an S3 bucket in the same region as the AWS Batch service. We’ve named our case
batch-job-s3-bucket. - Upload the
fibonacci_job.shscript in the bucket you just created. - Create an IAM role for an ECS service task with permissions to the S3 bucket and the DynamoDB table. If you don’t know how to do that, follow these instructions. For our case, we name it batch-role. We’ll use this one next.
Now, you’ll create the job definition and then submit the job.
Creating Job Definitions
In this section, you’ll define and run the job definition. Click on the “Job definition” link on the left panel to see the “Create" button. Click on it to start the job definition.
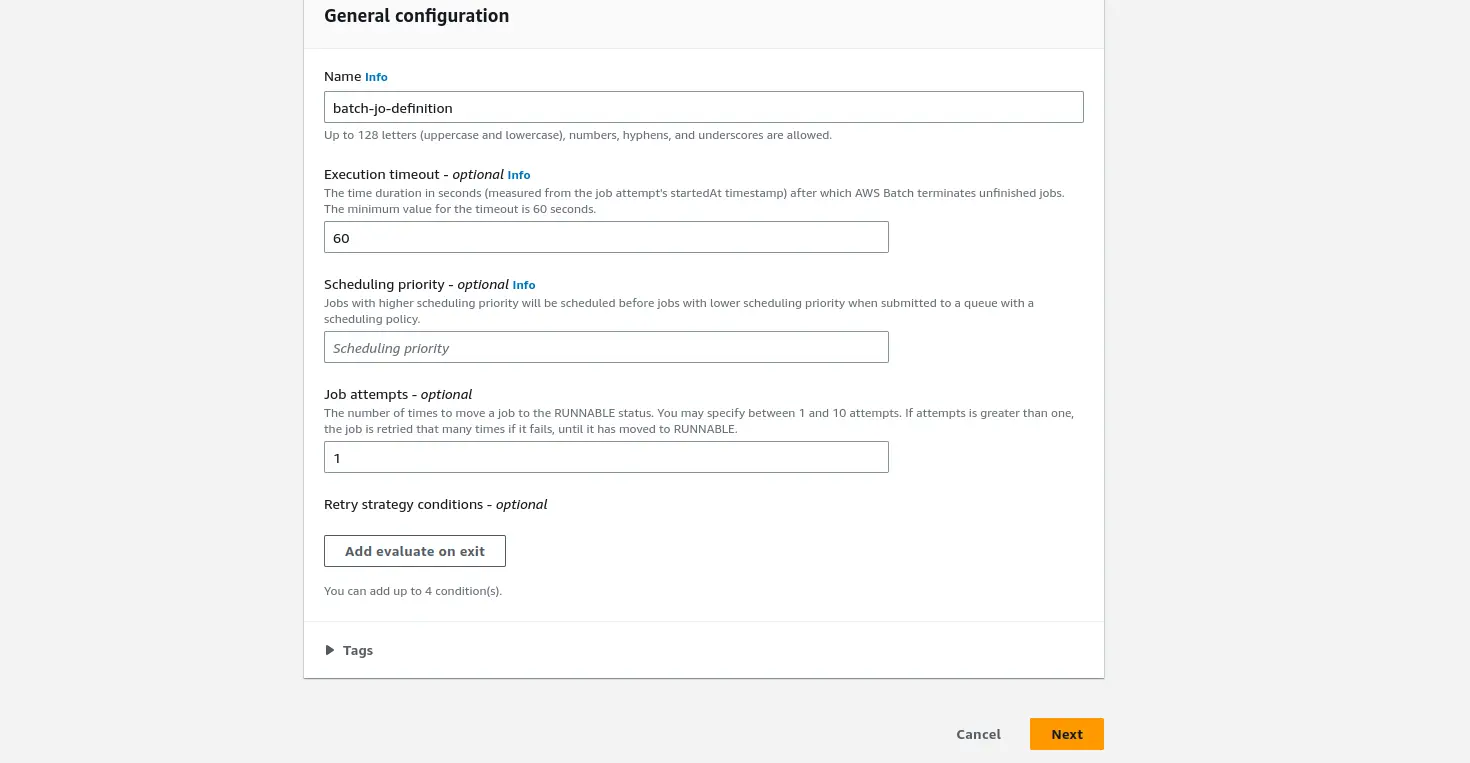
Enter the job definition name and also set the job attempts to 1. Job attempts are the maximum number of times to retry your job if it fails. And Execution timeout, is the maximum number of seconds your job attempts would run. For this example, we set it to 60 seconds.
Click on the “Next” button, and you can now configure the container and the environment configurations.
Submitting the Job
And finally, now you’ll submit the job to the job queue. Click on the “Submit new job” button where you will be prompted to set up your first job.
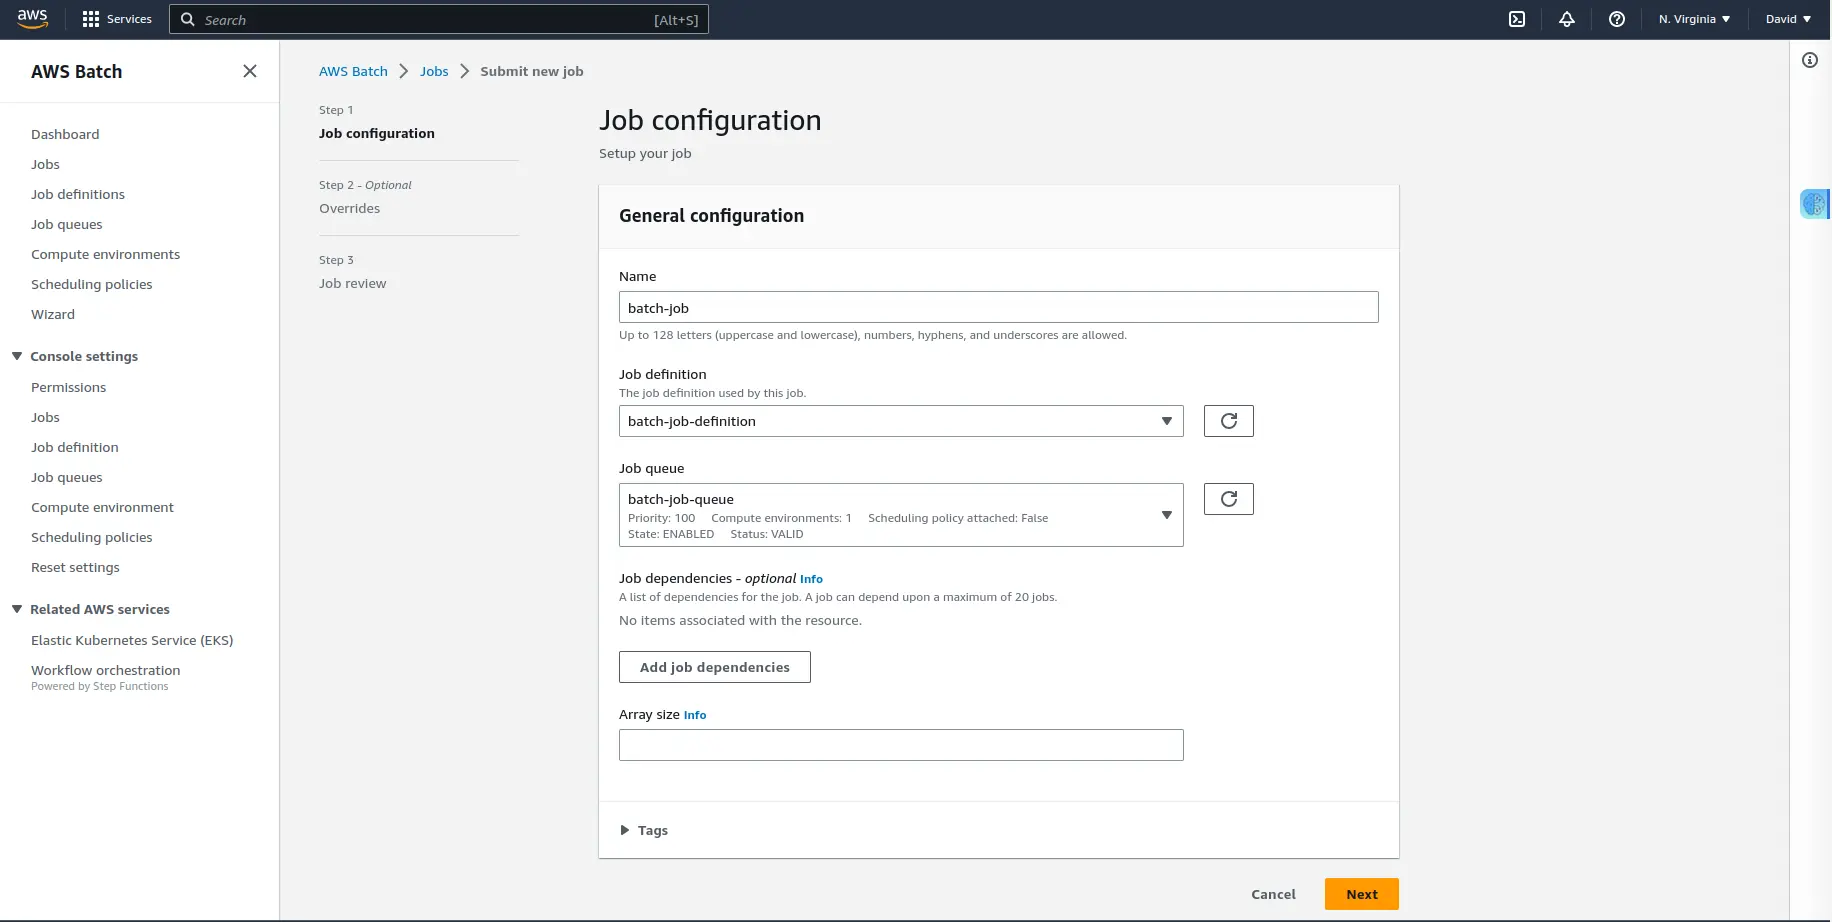
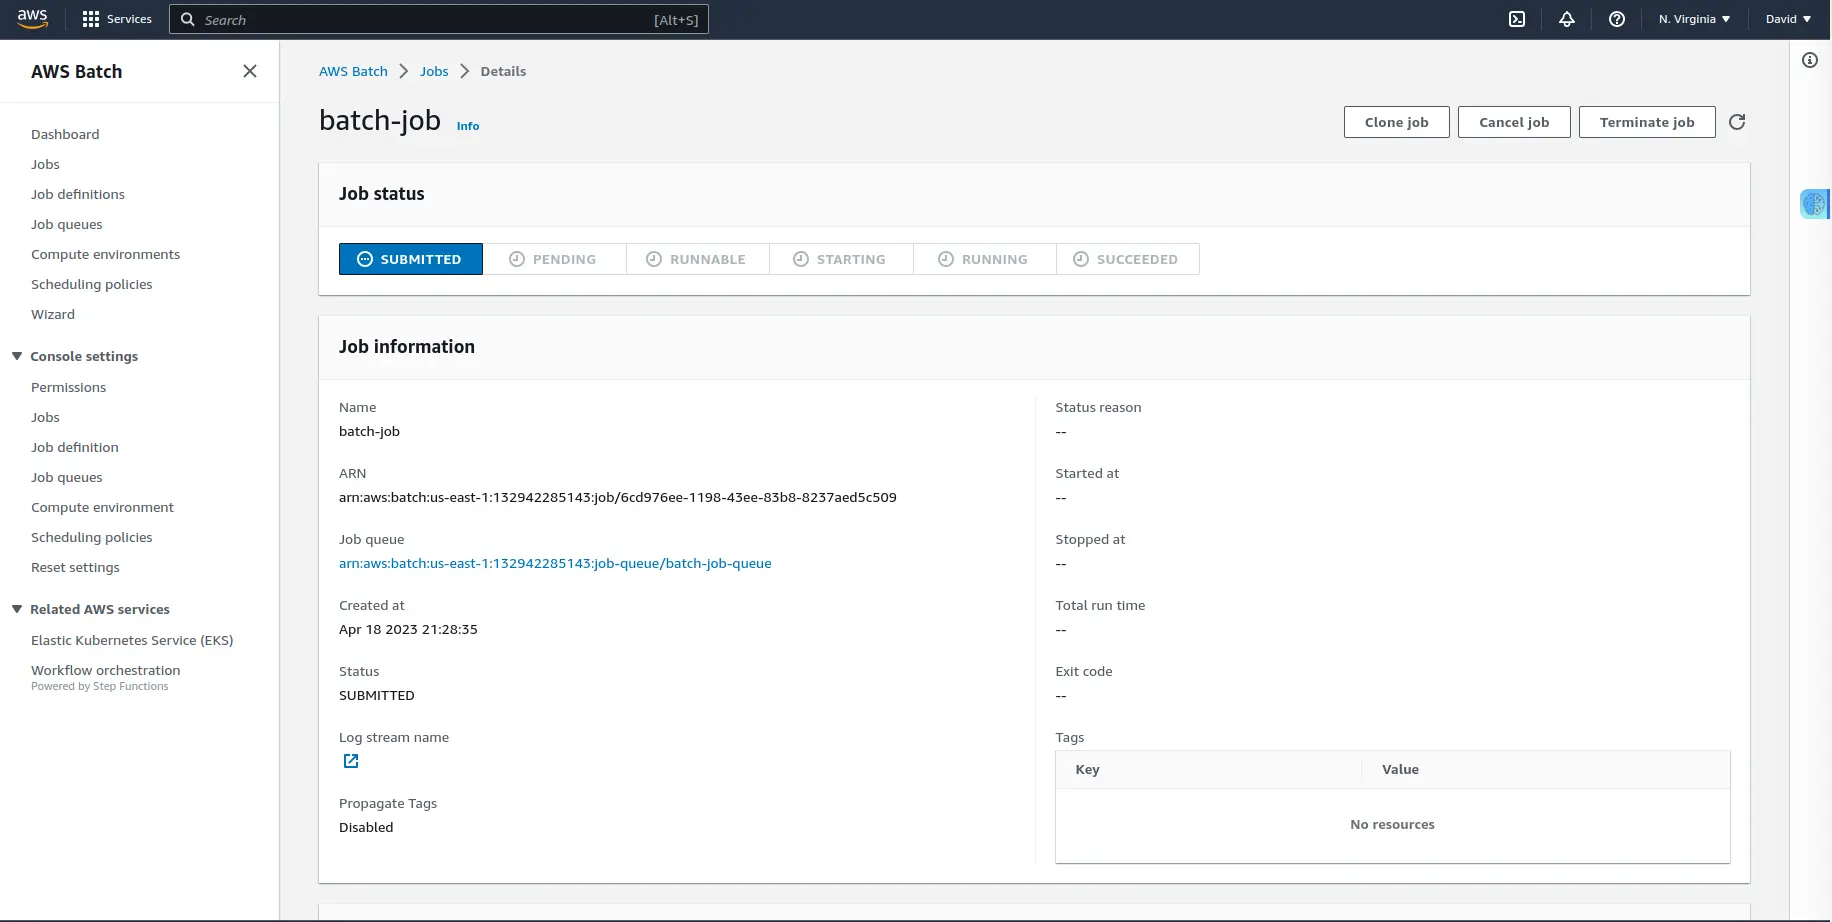
Name the job, and choose the job definition and job queue that you created. Click on the “Next “ button and review the Job before clicking on “Create job”.
After clicking on the “Create job” button, It will start creating one instance. When the instance is ready to process a job, the job will transition from RUNNABLE to SUCCEEDED.
Conclusion
In this blog post, we’ve discussed step by step how to set up AWS Batch so that you are able to submit computational jobs on demand.
With AWS Batch, you will not need to maintain a cluster or manually spin up and shut down EC2 instances, but because of its high scalability, you can submit as many jobs as you want.
You may also be interested in:
- Github Action + ECR + Optimizing Disk Space
- Install Jupyterhub in a VPN with AWS
- Setting up JupyterHub Securely on AWS
- [Setting up S3 Buckets For Data Science](https://saturncloud.io/blog/setting-up-s3-buckets-for-data-science/)
- How to Work with Custom S3 Buckets and AWS SageMaker
- [How to securely connect to AWS SageMaker using SSH through a Bastion Host](https://saturncloud.io/blog/how-to-securely-connect-to-aws-sagemaker-using-ssh-through-a-bastion-host/)