
This article was published when data science tooling like Dask and R was a primary focus for Saturn Cloud. Today, Saturn Cloud is the enterprise AI platform for any GPU infrastructure.
Introduction
Amazon Simple Storage Service, also known as Amazon S3, is an object storage service that offers industry-leading scalability, data availability, security, and performance. Amazon S3 is so widely used that companies like Netflix store all of their video content to stream to the masses. Even Dropbox has built its entire cloud storage infrastructure on top of S3!
In S3, files are stored in buckets, similar to how your files are stored on your computer in folders. Each bucket has a unique name and is hosted on the AWS platform, allowing you, your team, and all your applications to read and write data to the bucket from anywhere in the world. Buckets can be utilized across a wide range of applications, such as:
Data lakes
Websites
Mobile applications
Backups and archives
Enterprise applications
IoT devices
In addition to the benefit of fast and redundant storage, S3 buckets also allow you to collaborate with your team towards one centralized data location. This is much more effective than sending datasets to each other, especially when this dataset is constantly being modified or updated. S3 also provides additional features to complement their buckets, such as file version control, redundancy, and user permission controls.
In this blog, we’ll go over the different buckets offered by Amazon S3, how to set one up, and how to call this data to use in Python for your next data science project.
Which Bucket Should I Use?
Depending on your use case, buckets have different tiers based on how frequently the bucket is accessed. While each tier has 99.9% uptime and durability, each tier differs in the number of zones the data resides in, their billing conditions, and data retrieval times. There are three main categories of S3 buckets to choose from based on your use case: Standard, Infrequent Access, and Glacier.
Standard Buckets
Standard buckets are typically the default storage plan when starting out. The standard bucket is perfect for users who require frequent access (more than once a month) since it provides millisecond response times. Pricing is calculated per gigabyte of storage with no retrieval fees. In our demo, we will be using a standard bucket since it best demonstrates how a data scientist would frequently access their data for analysis or training. Standard buckets can also be appropriate for cloud applications, websites, content distribution, and applications.
Infrequent Access (IA)
As the title suggests, Infrequent Access buckets have the same benefits as Standard buckets while being approximately 46% cheaper per stored gigabyte than standard buckets. However, Infrequent Access buckets are subject to data retrieval costs. Based on your usage, this might or might not be a more financially sound choice.
Glacier
Glacier buckets are focused on targeting archival purposes. Depending on the speed at which you need to retrieve data, Glacier tiers have different variants of retrieval access ranging from milliseconds to hours. Examples of data that can be considered archived but might need instant retrieval access are medical records or content archives. Something that might be accessed less frequently could be annual regulatory documents. While the storage pricing is the cheapest out of all the tiers, data retrieval is much more expensive, depending on your desired speed.
Other Variants
Another exciting offering is the S3 Intelligent Tiering, which tracks data usage for user-selected files in your bucket. When access patterns change, Intelligent Tracking will move across frequent and infrequent bucket tiers. Pricing for this is charged for every file that is being tracked. For more information regarding all storage tiers and their pros and cons, click here. For information about tier pricing, click here.
A Quick Demonstration
As aforementioned, the purpose of this post is to sharpen your intuition for leveraging S3 buckets in your data science projects. This demo will prioritize selecting the most straightforward steps to achieve a working bucket. Once the bucket is set up, I’ll review several methods of accessing the bucket, writing to the bucket, and additional resources if more functionality and integration with S3 buckets is desired.
Setting Up Your First S3 Bucket
Signup for AWS. Note that you will be signing into the portal as a root user to manage additional users if you wish to give access to fellow collaborators.
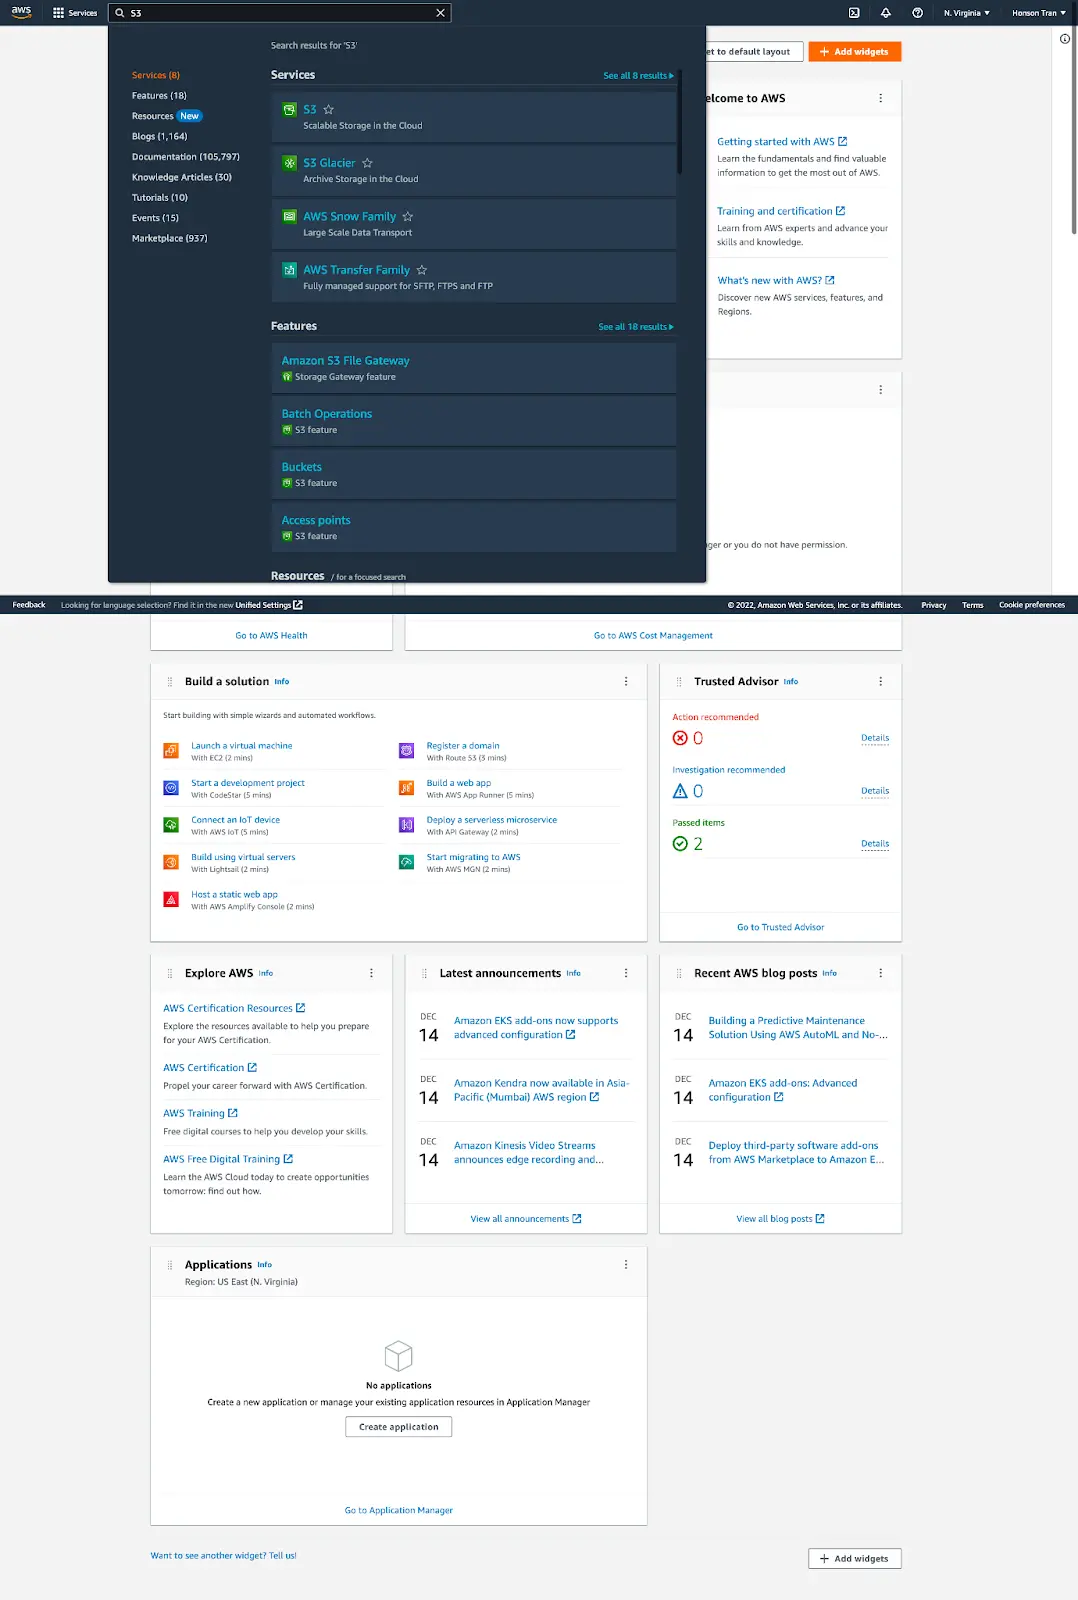
Once you’re verified and logged in, you’ll be greeted with the AWS dashboard. On the top of the dashboard is a search bar. Search for the keyword “S3” and click on the S3 service.
- If this is your first time creating a bucket, you should now be greeted by a page with a button to create a bucket. Click this button to proceed onwards to the bucket setup.

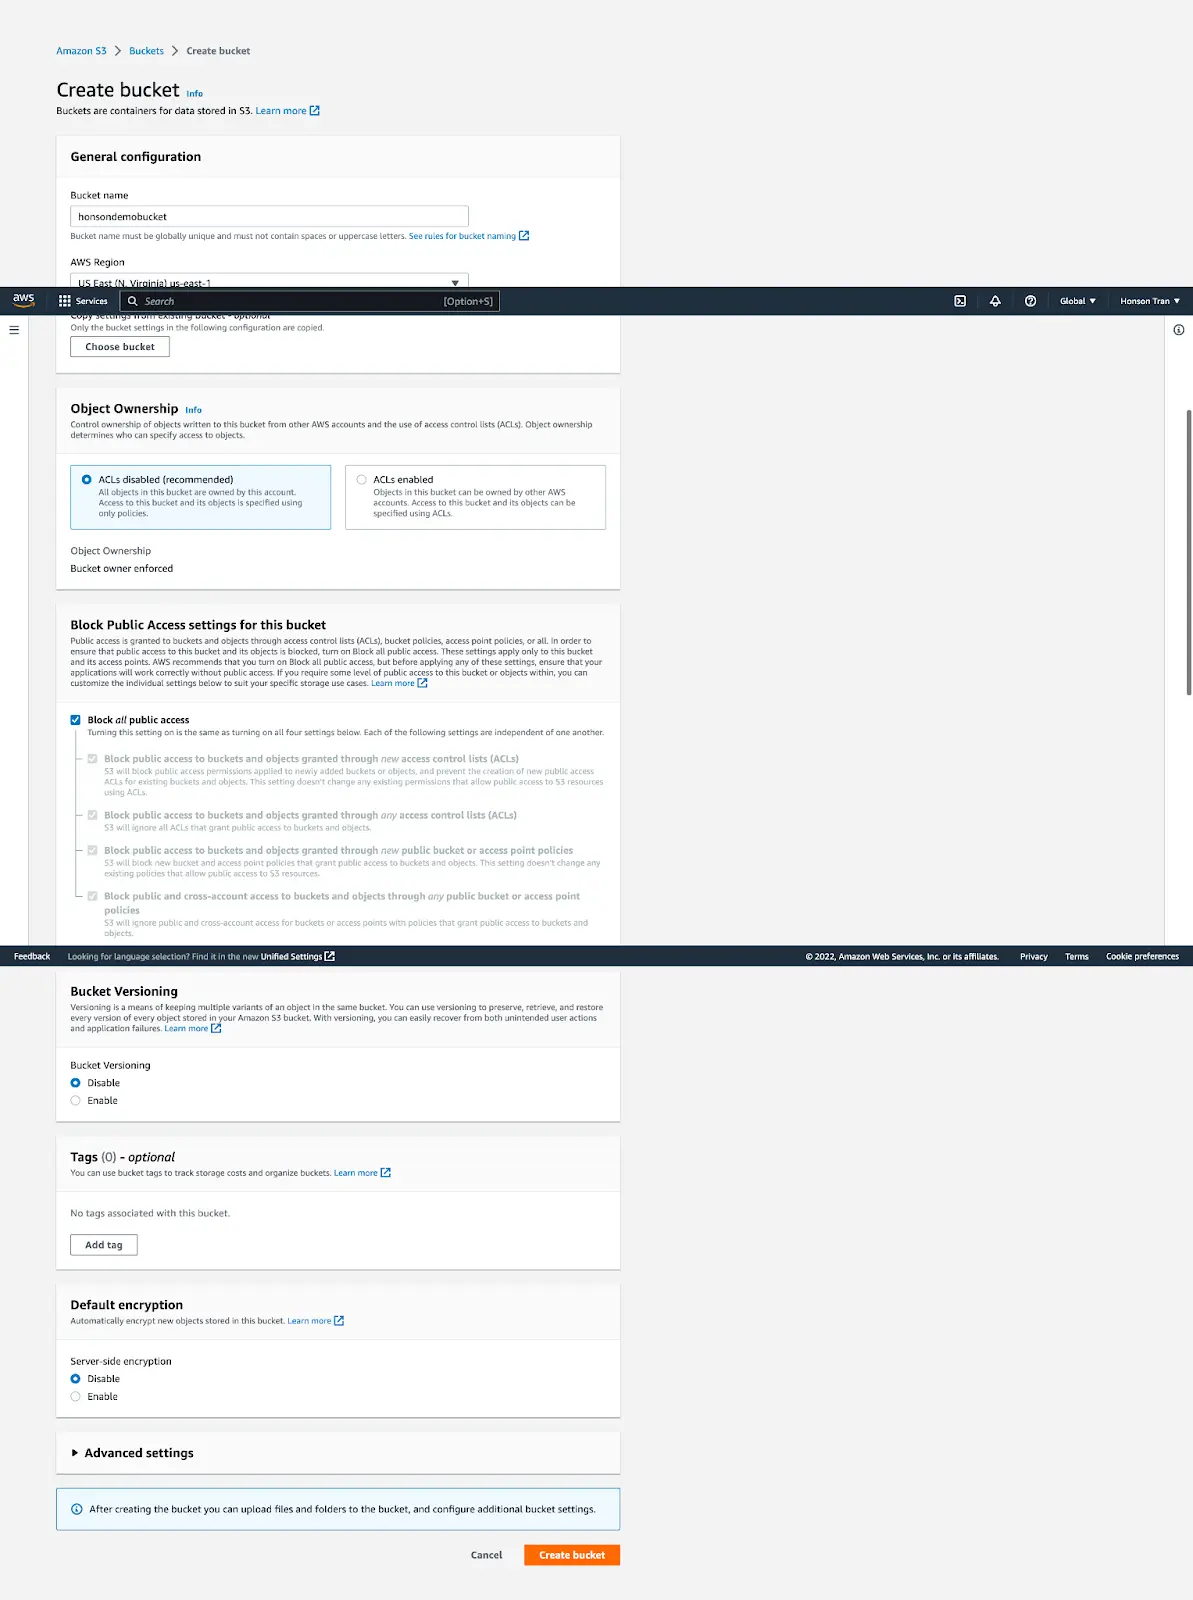
- Next, decide what your bucket name will be. Note that your bucket name must be unique compared to all other S3 buckets on the AWS network. For simplicity, the default settings are used on the setup page. In our demo, I have named the bucket “honsondemobucket”. The screenshot of the values used in the demo is shown below. Click on “Create Bucket” once you’re done.
Adding a User
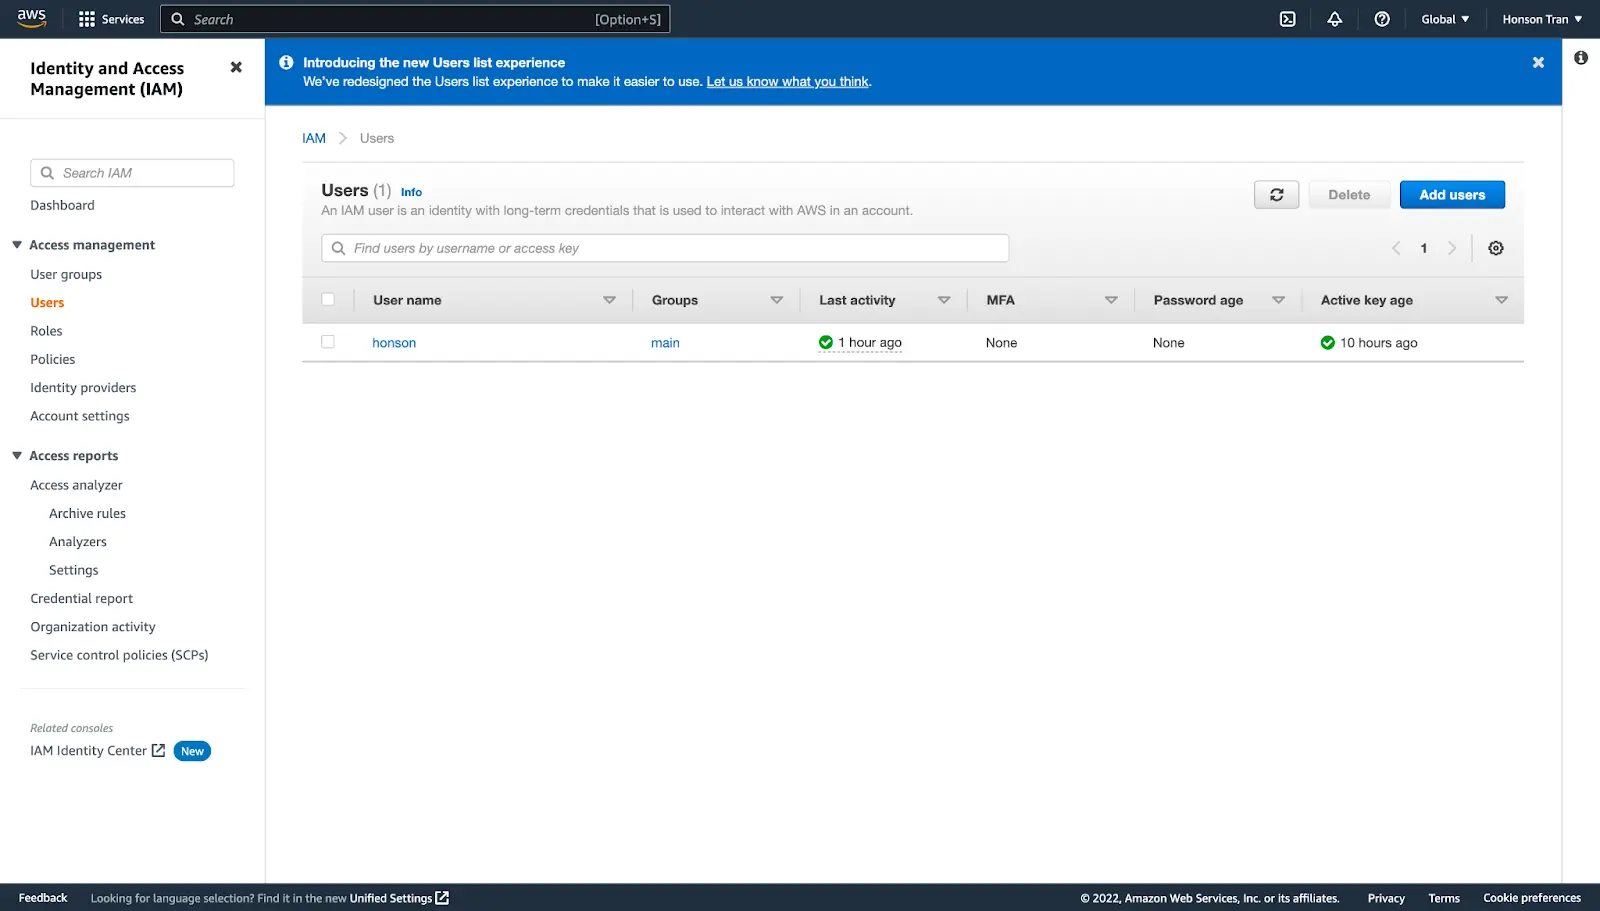
- Once the bucket is created, access keys must be made for users (as well as yourself) to access the bucket outside the AWS dashboard, such as a Jupyter notebook. To create users, search for “IAM” on the search bar at the top of the AWS dashboard. On the left side panel, click Users, followed by the blue “Add Users” button to create a user.
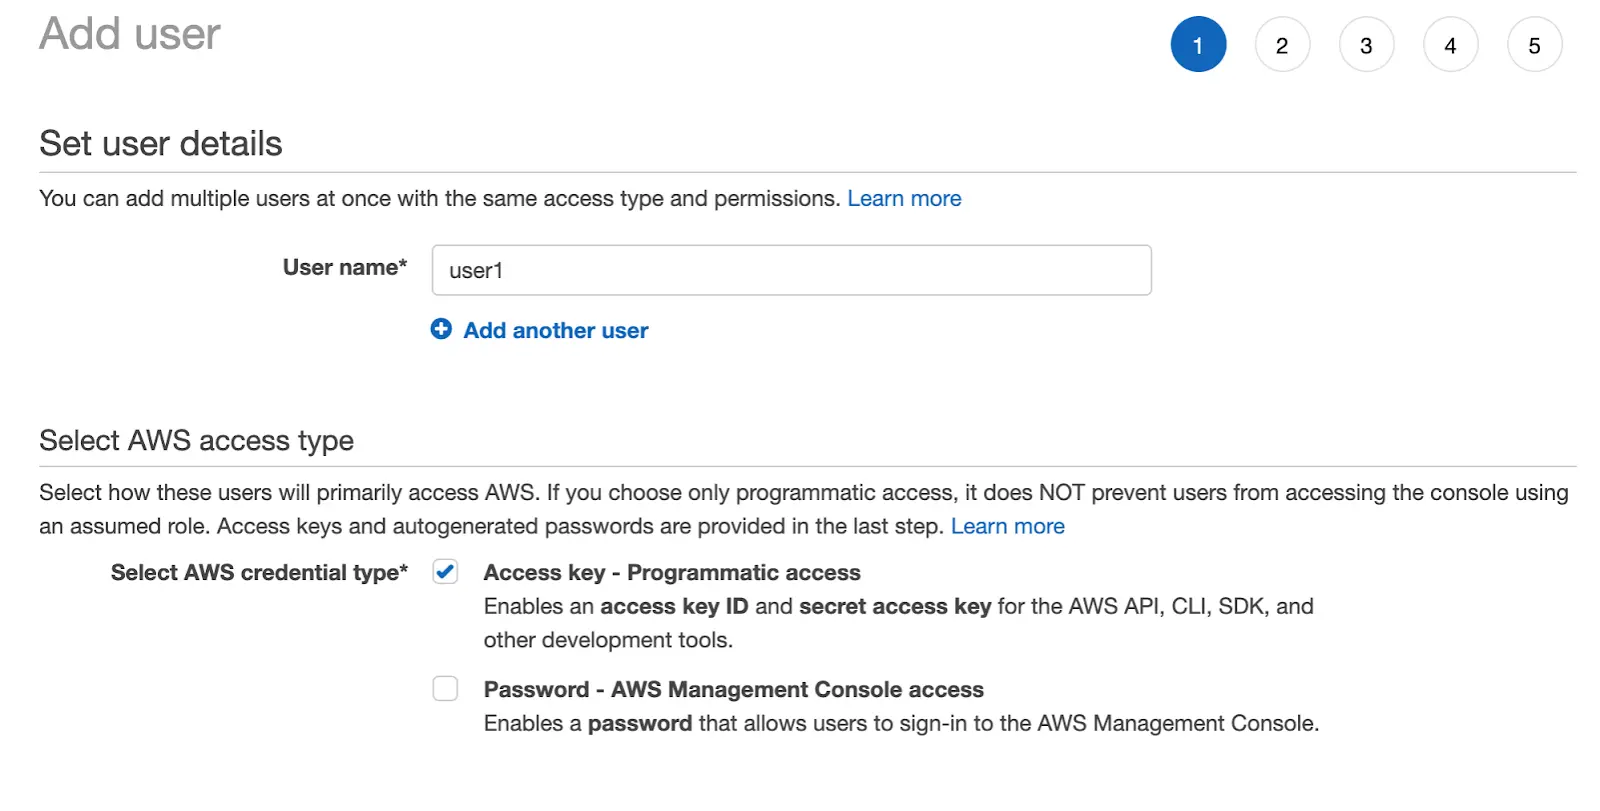
- Create your username, and select “Access key - Programmatic access” to generate an access key. Click next to proceed to the next step.
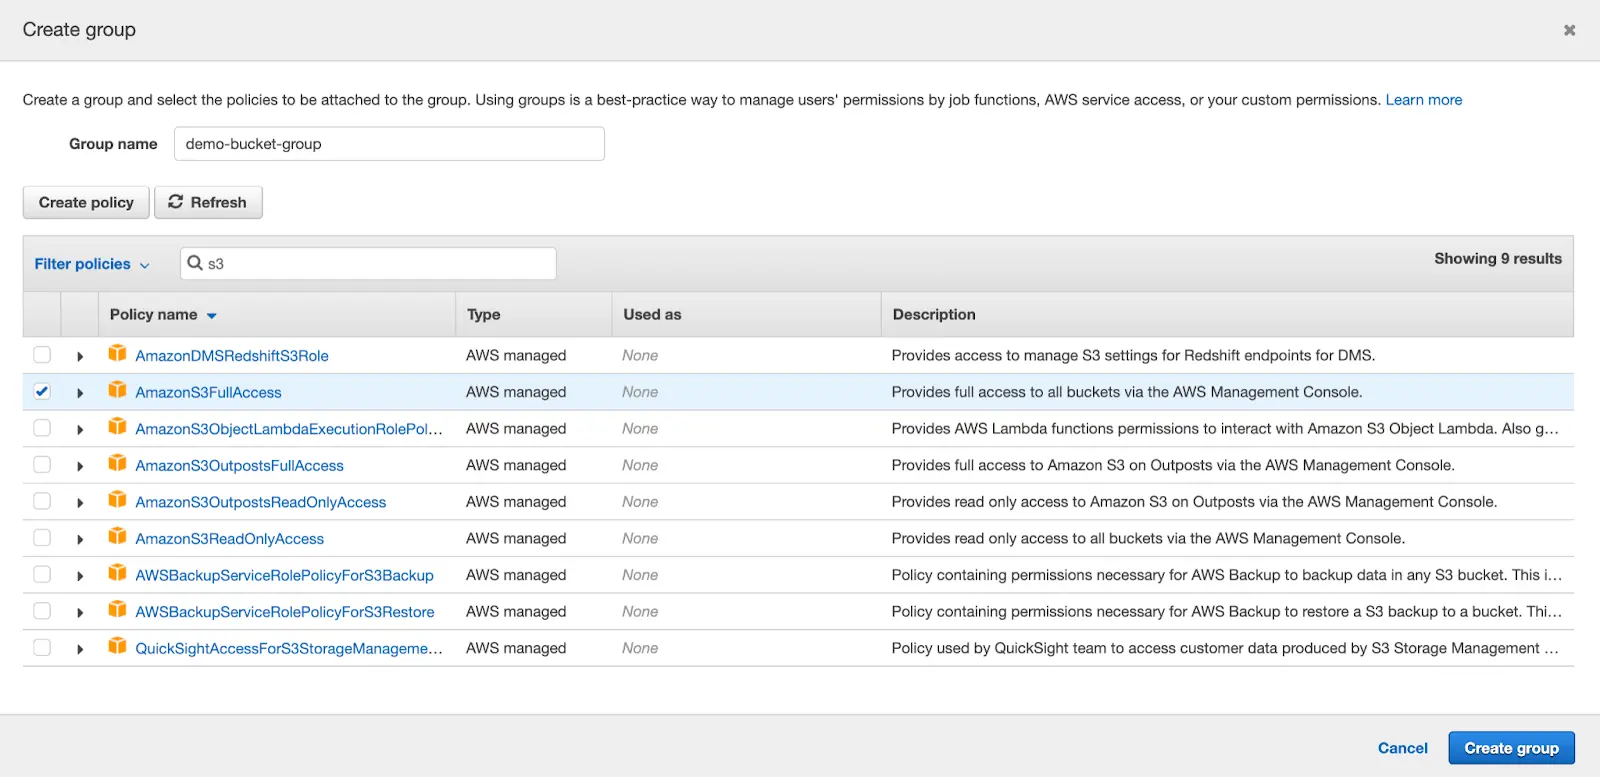
In step 2 of the user account creation, you can create group policies and assign users to these groups. Click “Create Group”. From here, there are two choices to make. The first option is simply adding the policy to allow the user to access all buckets. To do this, search for S3 in the search bar and add the “AmazonS3FullAccess” policy.
For the second option, if you wish to be more restrictive with your user permissions, it’s also possible to allow only specific buckets to users. To do this, click “Next” without creating any groups. We will worry about adding permissions after the user has been created.
The next section after the group policies is adding tags to the user. For this demo, we will not be tagging, but feel free to enter user information, such as an email address. Click “Next”.
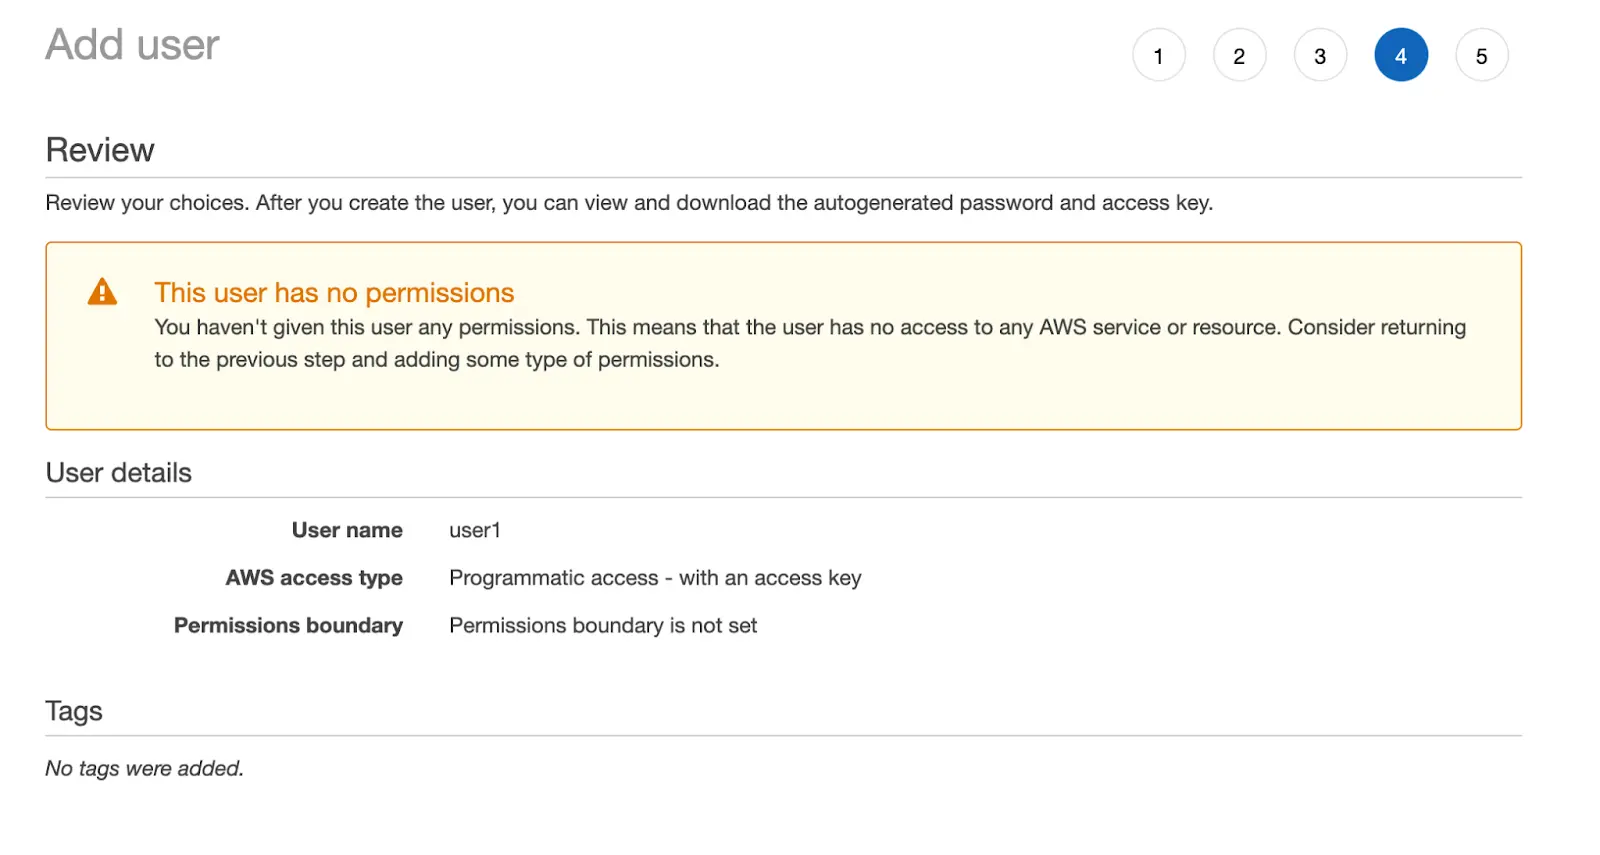
Now that we’re at the final stage of the creation process, note that there is a warning stating the user has no permissions. Don’t worry about this, as we’ll give permissions to our new user soon. Save the “Access Key ID” and “Secret Access Key” for later use. This is important! Once you have noted the keys, click “Create User”. You will then be greeted at the IAM user dashboard.

Configuring Permissions for a User
Now that your user is created let’s give the user permissions. Click on the new user you have just created. If you have created a group for this user, go to the “Groups” tab to add the user to the group via the “Add user to groups” button.
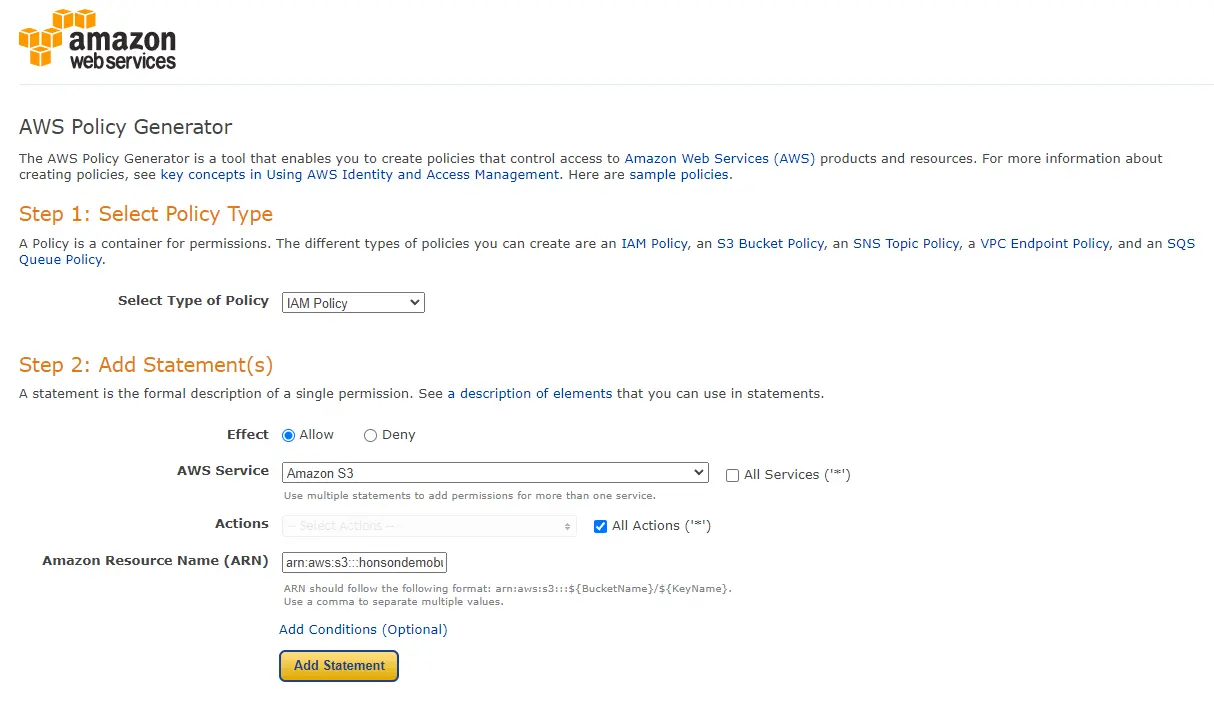
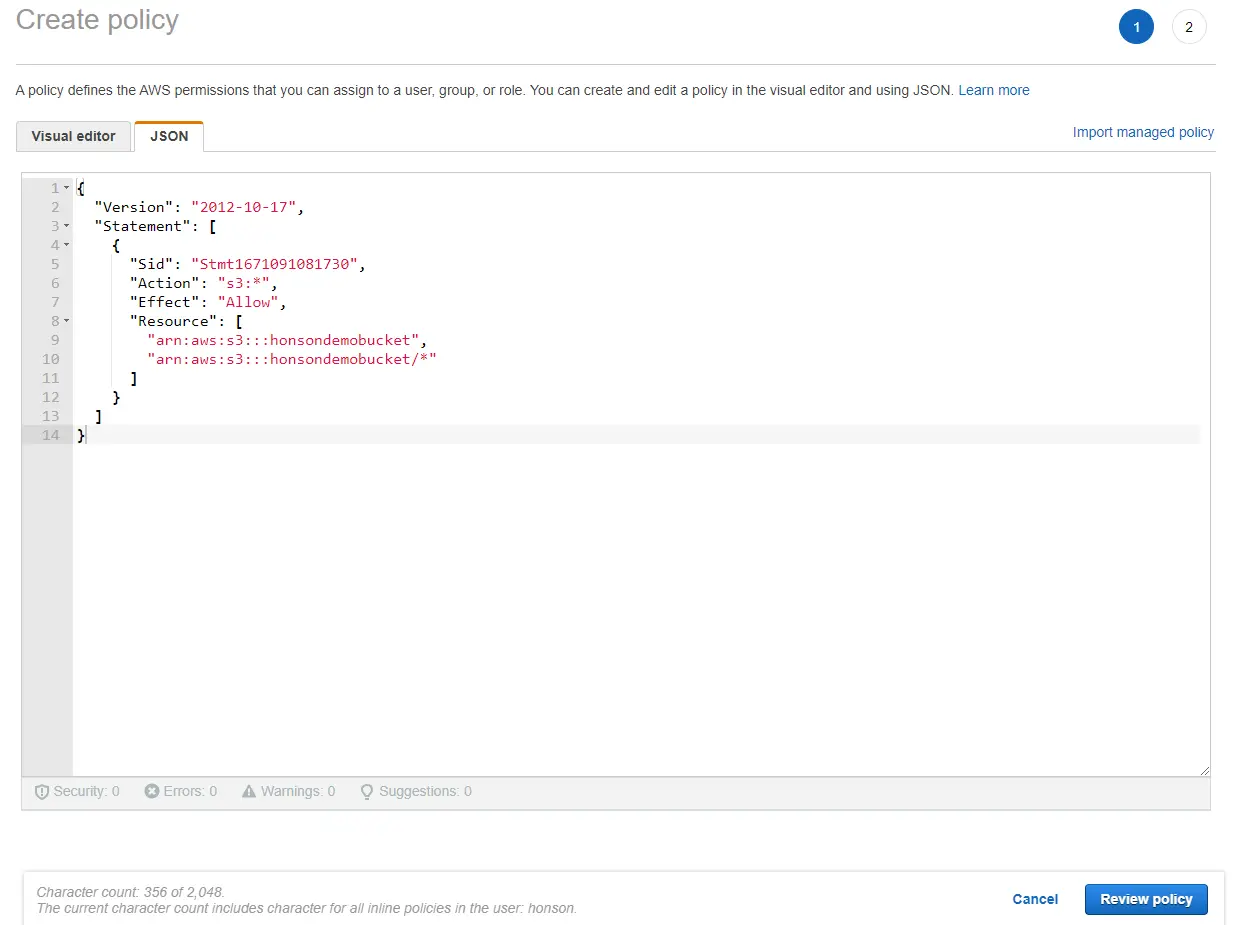
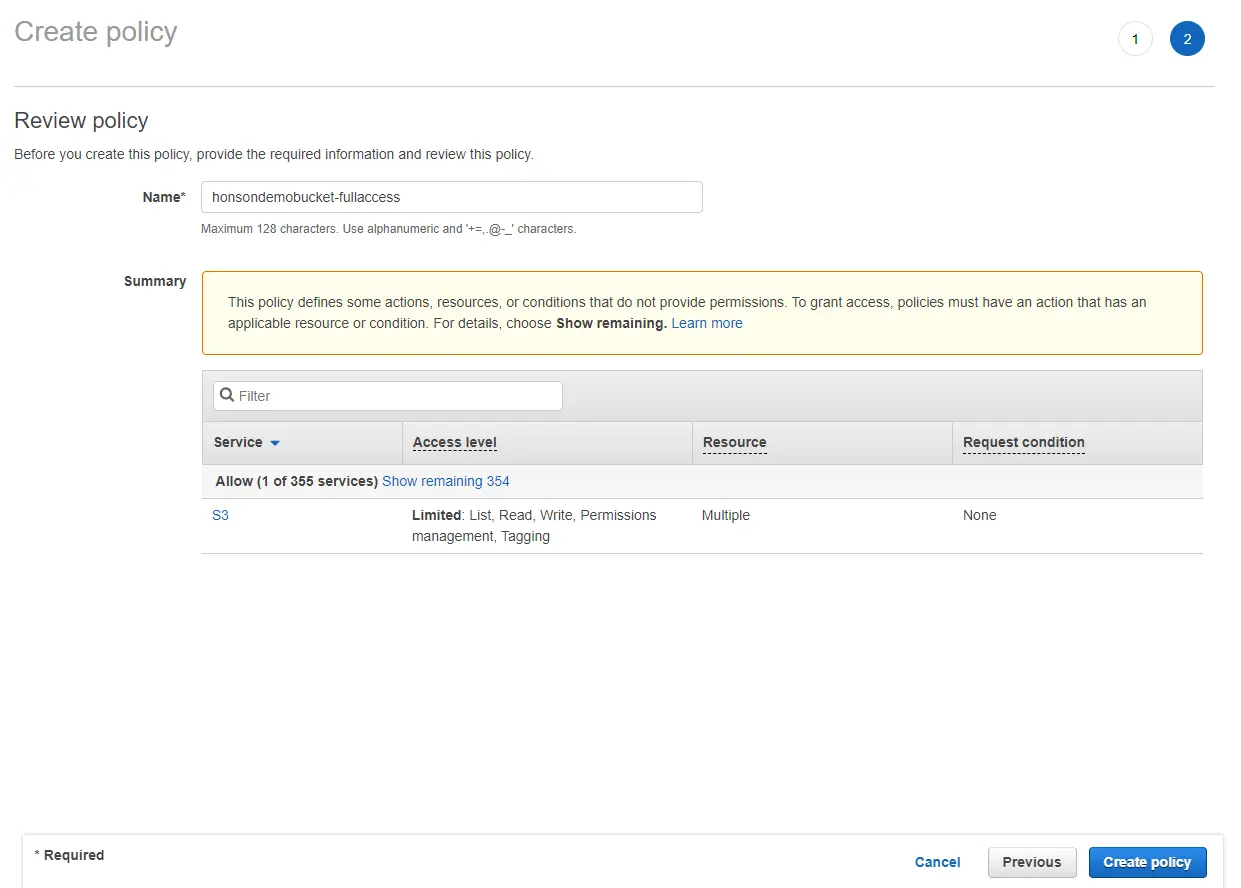
If you opted for more restrictive permissions, click this link here to generate a quick custom JSON for your permissions. Select “IAM Policy” and fill in the permissions shown in the screenshot below. It’s important to note the Amazon Resource Name (ARN) should be written as “arn:aws:s3:::honsondemobucket,arn:aws:s3:::honsondemobucket/*”, indicating that the user has permissions to the bucket itself as well as the objects inside the bucket (shown by the asterisk at the end of the bucket name). Click “Add Statement” and then generate the policy. A popup of your generated JSON will show on the screen. Copy this JSON and follow the next step.
- If you have a custom-generated JSON, go back to the AWS IAM user dashboard to the user you wish to apply permissions to. Click the “Permissions” tab and click the dropdown menu to “Permissions policies”. Click on “Add inline policy”.
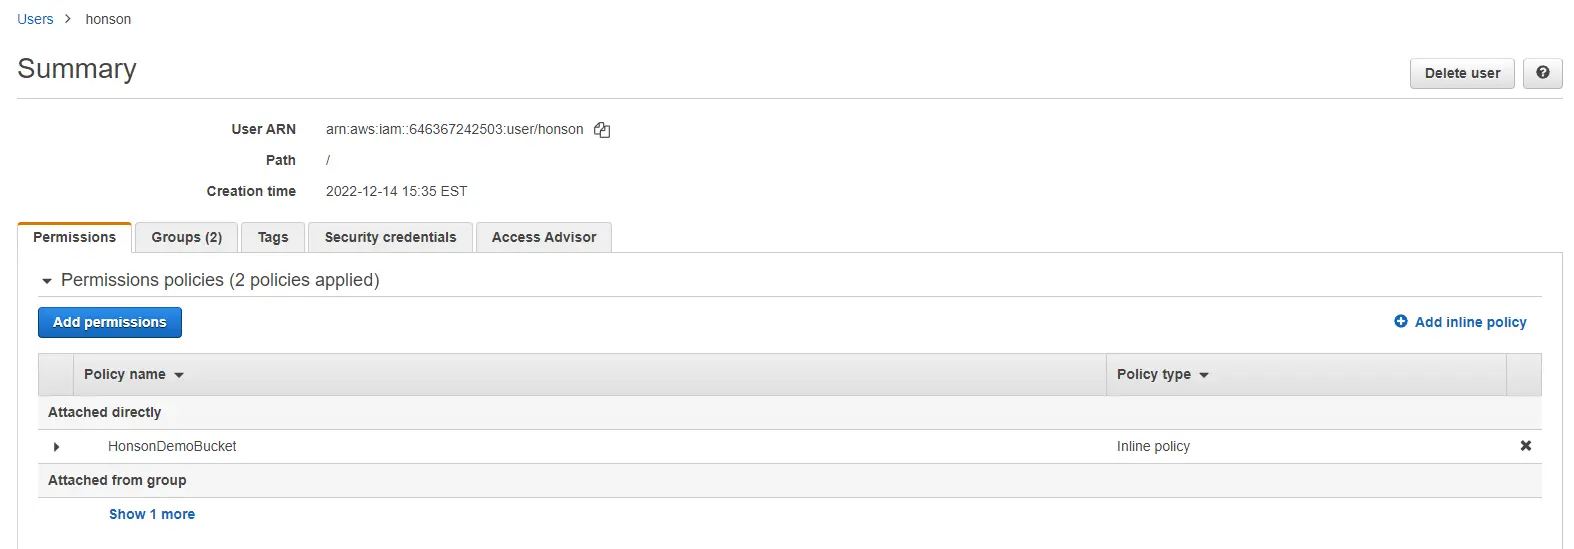
- Click the “JSON” tab, and paste your generated JSON into the field. Click on “Review Policy”, name your policy, then click “Create Policy”. You now have an authorized user to access your bucket!
Authorizing and Accessing Your Environment
Now that you have a bucket set up, accessing files can be quickly done through the AWS dashboard, a python script, or CLI. The easiest manner of uploading files as a single user is to use the dashboard to drag and drop files onto the buckets dashboard. For reading our data, we’ll be using a Python library called Boto3 to interact with the data. To do so, make sure you have the following:
Optional: Jupyterlab is installed on the system
Python is installed on your system
Boto3 is installed on the system (simply call pip3 install boto3)
Based on your OS, create a file that looks like the snippet below at the corresponding file location. Boto3 will check this configuration file to access the bucket. The benefit of this approach is being able to hold multiple logins. Also, this will prevent developers from accidentally pushing their access keys to a repo.
[any_profile_name_you_want]
aws_access_key_id = access_key_here
aws_secret_access_key = secret_access_key_here
Once this is setup, you’re ready to use Boto3 to communicate back to your bucket. Here are several contexts in which you can use buckets.


