This article was published when data science tooling like Dask and R was a primary focus for Saturn Cloud. Today, Saturn Cloud is the enterprise AI platform for any GPU infrastructure.
Saturn Cloud provides customizable, ready-to-use cloud environments
for collaborative data teams.
Try Saturn Cloud and join thousands of users moving to the cloud without having to switch tools.
Introduction
AWS VPN
Install jupyterhub in a VPN with AWS
Introduction
It is essential for every data team to protect their information, data and code from unauthorized access and other malicious threats.
Weak data security can affect an organization in so many which includes sensitive data breaches, hackers using your resources to mine crypto coins which can incur unwanted tech debts and a lot more.
As a result, hackers were able to hack into Tesla’s AWS account and use Tesla’s resources to mine cryptocurrency. Within a few hours, this file was discovered by hackers who created several hundred cryptocurrency mining cyber instances, resulting in a one-night cost of using AWS at $6,000.
Its important to set up network security in your data team and platforms. in this article, we will learn how to deploy a data science platform on a private subnet, accessible only through a VPN which is great to guarantee that the data science platform cannot be accessed by outside parties.
IBM estimates that a data breach costs $3.86 million on average. Depending on the severity of the incident, it could also cost your reputation or even your job. With that in mind, here are seven data security best practices to adopt this year.
AWS VPN:
Amazon Web Services (AWS) Virtual Private Network (VPN) is a service that enables you to securely connect your on-premises data center or network to the AWS Cloud. It uses a virtual private network connection to establish a secure connection between your on-premises data center and the AWS Cloud, allowing you to extend your on-premises network into the AWS Cloud and access resources in the AWS Cloud as if they were on your own network.
In Amazon Web Services (AWS), there are two types of Virtual Private Networks (VPNs) that the user can use to connect their on-premises data centers to their VPCs:
AWS Site-to-Site VPN: This type of VPN allows the user to create a secure, encrypted connection between their on-premises data center and their VPC. It uses Internet Protocol Security (IPSec) to create a secure tunnel between the two locations. The user can use this type of VPN to securely connect their on-premises resources to their VPC and extend their on-premises network into the cloud.
AWS Client VPN: This type of VPN allows the user to securely connect their clients, such as laptops or mobile devices, to their VPC over the internet. It uses OpenVPN, an open-source software application, to create a secure connection between the client and the VPC. The user can use this type of VPN to allow their employees to access their VPC resources securely from anywhere with an internet connection.
In this article, we will be using the AWS Client VPN to set up a client connection from our computers into our VPC so that we can communicate with resources in that VPC using their private IP addresses, this is possible because it establishes a secure and encrypted connection between your device and the VPC, allowing you to access the resources as if you were on a VPN connection within the VPC.
Benefits of using VPN in your Data Team:
Protect your platform from unauthorized access
Prevent data breach
Prevent unauthorized access to credential
Install jupyterhub in a VPN with AWS
Requirements:
Let’s start with setting up the authentication we will use for the network connection.
AWS Client VPN supports certain types of authentication including
Mutual Authentication
Active Directory (AD) authentication
Federated authentication, etc
We will be using Mutual Authentication in this Article
Mutual authentication:
This is an authentication process where two entities build a trust relationship by fact-checking each other for communication to happen.
A very layman understanding will be checks and balances in government, in the sense that for successful communication to occur, B1 has to check B2 and B2 has to check B1 before building a successful relationship and communication
In a network scenario, the client and the server have to exchange and verify each other certificates and this exchange is done via TLS(Transport layer security).
Mutual authentication can happen in 3 ways; certificate authentication, public key authentication, or username and password.
Mututal authentication help prevent certificate theft, and spoofing attack on your organization’s data. read more here
You can use mutual authentication on your infrastructure via AWS certificate manager. We will use ACM(AWS certificate manager) to build a trust relationship between our VPN and our VPC
AWS Certificate manager:
AWS certificate manager helps you serve and manage TLS ( Transport layer security) /SSL (Secure Socket Layer) certificates for your infrastructure or internal resources(Private or Public)
With ACM you can provision a public or private certifcates for identification of a website over a public and private internet or network. read more here
Now we understand mutual authentication and AWS certificates manager, let’s create one and build a relationship between our VPN and our AWS services.
Let’s set up a client authentication that will establish a connection between the AWS client VPN endpoint and OpenVPN. If this authentication fails, we will prevent the client from establishing a VPN session.
Imagine this as a house where you don’t have a key(authorized certificates) to the house (AWS resources — private or public).
STEP 1:
First, we will download OpenVPN or AWS VPN and use Easy-RSA to generate certificates for our VPN.
OpenVPN uses VPN technologies to secure and encrypt data sent over the internet. Its custom VPN protocol uses SSL/TLS for key exchange.
The process is similar for every operating system, for this tutorial we will use MacOS.
    #clone easy rsa github repo
    git clone https://github.com/OpenVPN/easy-rsa.git


    #navigate to the directory
    cd easy-rsa/easyrsa3

    #install a new PKI
    ./easyrsa init-pki
PKI stands for public key infrastructure and PKI environment is an essential field for developing a secure authentication between certificates
    # build a new certificate authority (CA)

    $ ./easyrsa build-ca nopass


    # Generate the server certificate and key.

    $ ./easyrsa build-server-full server nopass


    # Generate a client certificates and key
    $ ./easyrsa build-client-full client1.domain.tld nopass
After this let’s upload our VPN certificates to ACM(AWS certificates manager)
Before we proceed, create a new folder and move all the keys to the new folder.
    mkdir new_folder
    cp pki/ca.crt ~/new_folder/
    cp pki/issued/server.crt ~/new_folder/
    cp pki/private/server.key ~/new_folder/
    cp pki/issued/client1.domain.tld.crt ~/new_folder
    cp pki/private/client1.domain.tld.key ~/new_folder/
    cd ~/new_folder/
Next, we will have to ensure our AWS configuration is precise.
Run the command below
    # validate your AWS Credentials. This is a one time opertation. if you configurstion is correct you don't need to run this
    $ aws configure
Now, let’s upload our certificates and keys
    # upload server certificates

    $ aws acm import-certificate --certificate fileb://server.crt --private-key fileb://server.key --certificate-chain fileb://ca.crt

    # upload client certificates
    $ aws acm import-certificate --certificate fileb://client1.domain.tld.crt --private-key fileb://client1.domain.tld.key --certificate-chain fileb://ca.crt


    #output

    {
        "CertificateArn": "arn:aws:acm:us-east-1:xxxxxxxx:certificate/xxxxxxxxxxxxxx"
    }
Navigate to your AWS certificate manager and you will see your uploaded certificates and keys
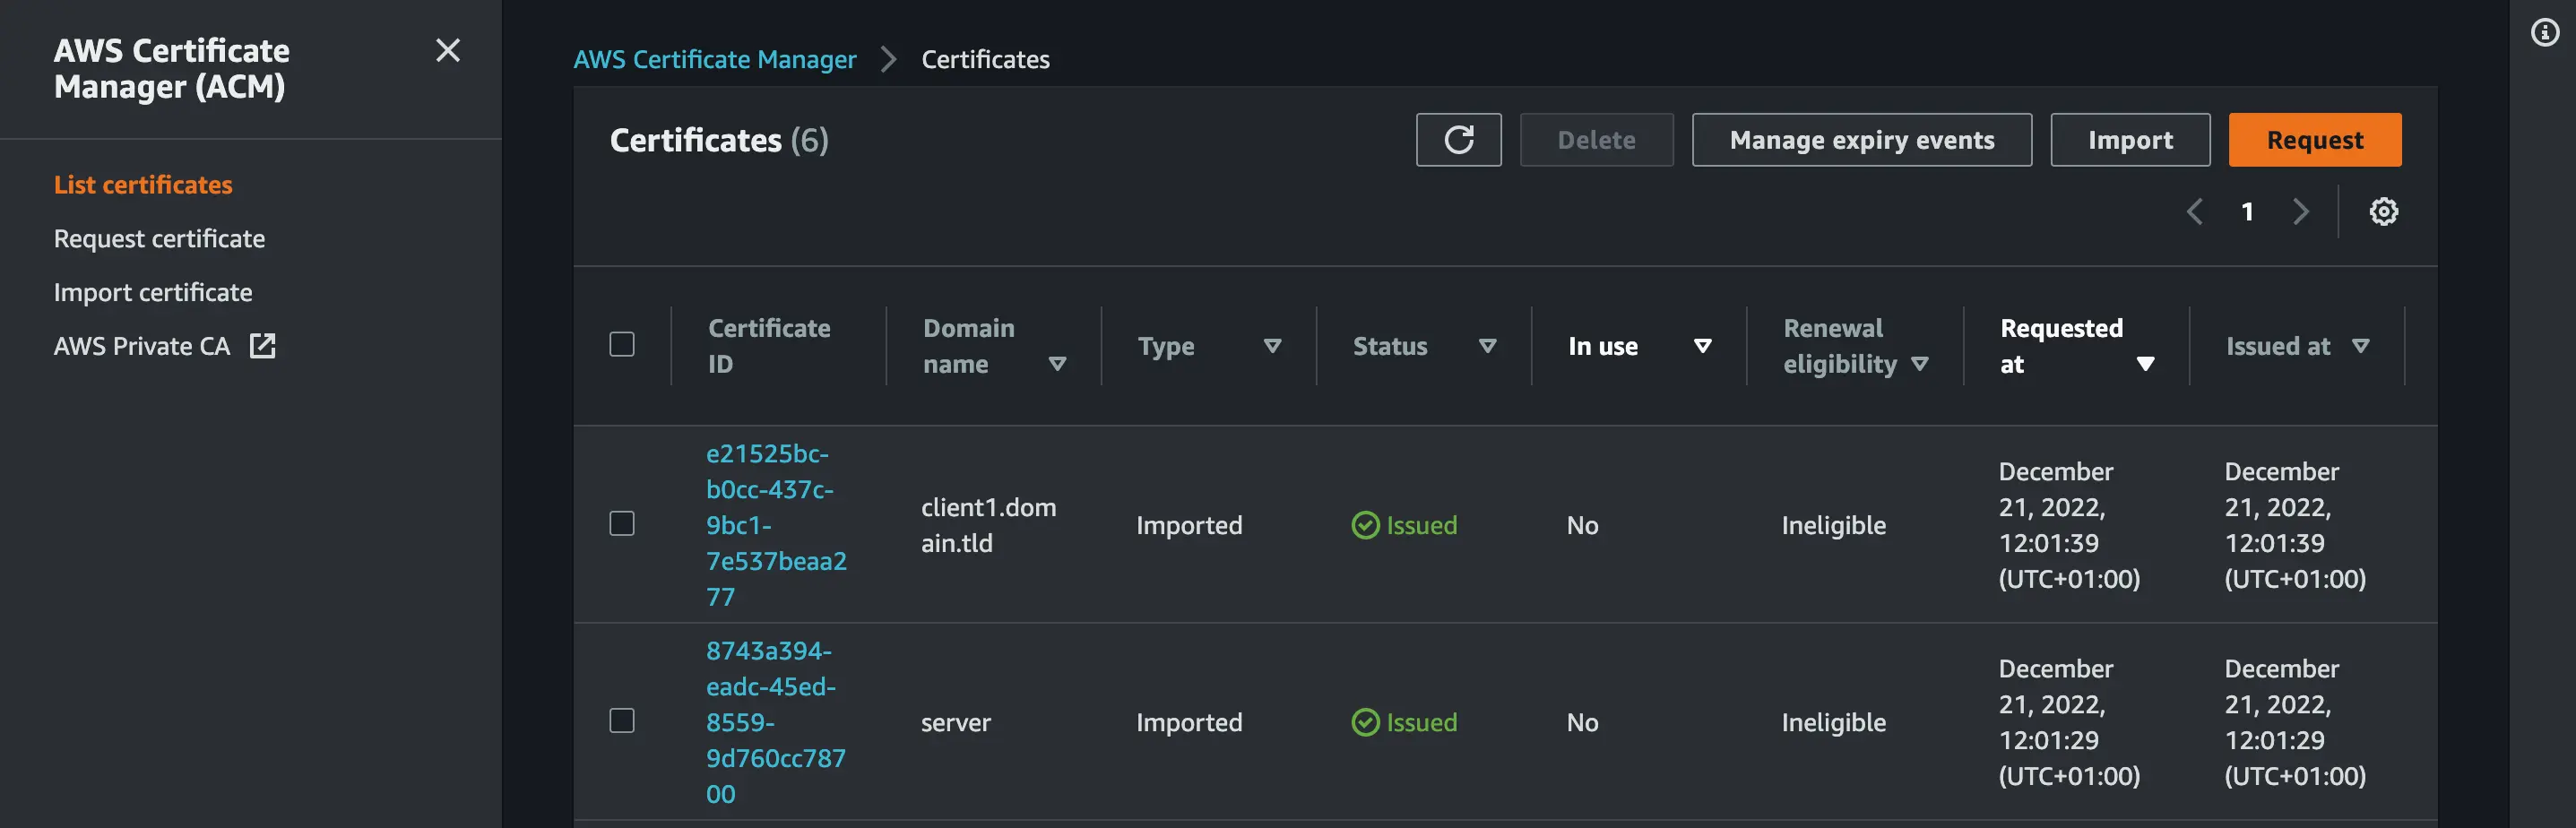
We have successfully uploaded our server and client certificates. Next, we will set up our VPC and Client VPN Endpoint
AWS VPC (Virtual Private Cloud):
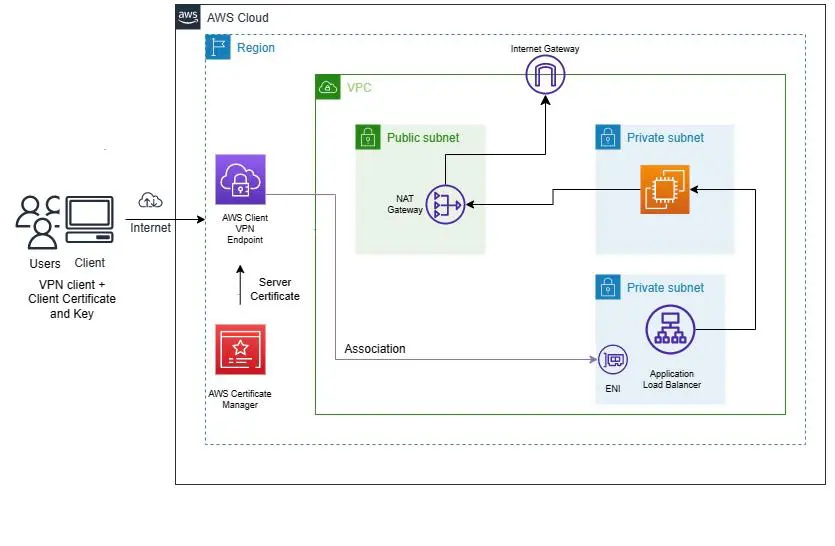 Image credit: Alero Awani
AWS Virtual private cloud allows us to create an isolated virtual network in a public cloud. it’s similar to the local data center where you have complete control over the virtual networking, security, and connectivity (Route and tables).
Imagine VPC as a room in a house with “staff only banner” where everyone in the house can’t access the room if you aren’t part of an organization that reserve the room.
AWS Virtual private cloud has a lot of features that are important in configuring your VPC for the connectivity your application need;
Subnets:
A subnet is a subsection of a network or you can say subnets consist of computers in a specific location or region. IN AWS VPC, a subnet is a segment of a VPC’s IP address range where you can place groups of isolated resources
A subnet can either be private or public based on the route table (either accessible via the internet or not) additionally, you can have multiple subnets in a VPC and have multiple resources in a subnet
CIDR: CIDR stands for Classless Inter-Domain Routing or supernetting and it’s a method that eases IP address distribution. While setting up AWS client VPC, you will need to specify Client IPv4 CIDR which is the range of the IP Address.
IP addressing: Computers use IP addresses to communicate with each other on a network and IP address is used to identify a device in a network. In AWS VPC, You can assign IPv4 address and IPv6 address to your VPCs and subnets. You can also bring your public IPv4 and IPv6 GUA addresses to AWS and allocates them to resources in your VPC, such as EC2 instances, NAT gateways, and Network Load Balancers.
Routing: Like the term route(way, or path), Routing basically helps you direct the network traffic from your subnet or gateway.
There are various route concepts for VPC. read more here
DNS Hostname: The Amazon DNS server resolves a public DNS hostname to the public IPv4 address of the instance outside the network of the instance.
Gateways and endpoints: Gateways are basically the bridge that connects your VPC to the internet. We have Internet and NAT Gateway.
Internet gateway enables you to set AWS VPC connection to the public Internet while NAT Gateway (Network Address Translation) enable you to grant a private subnet to access the Internet.
STEP 2:
Let’s set up AWS VPC (virtual private cloud) and subnets.
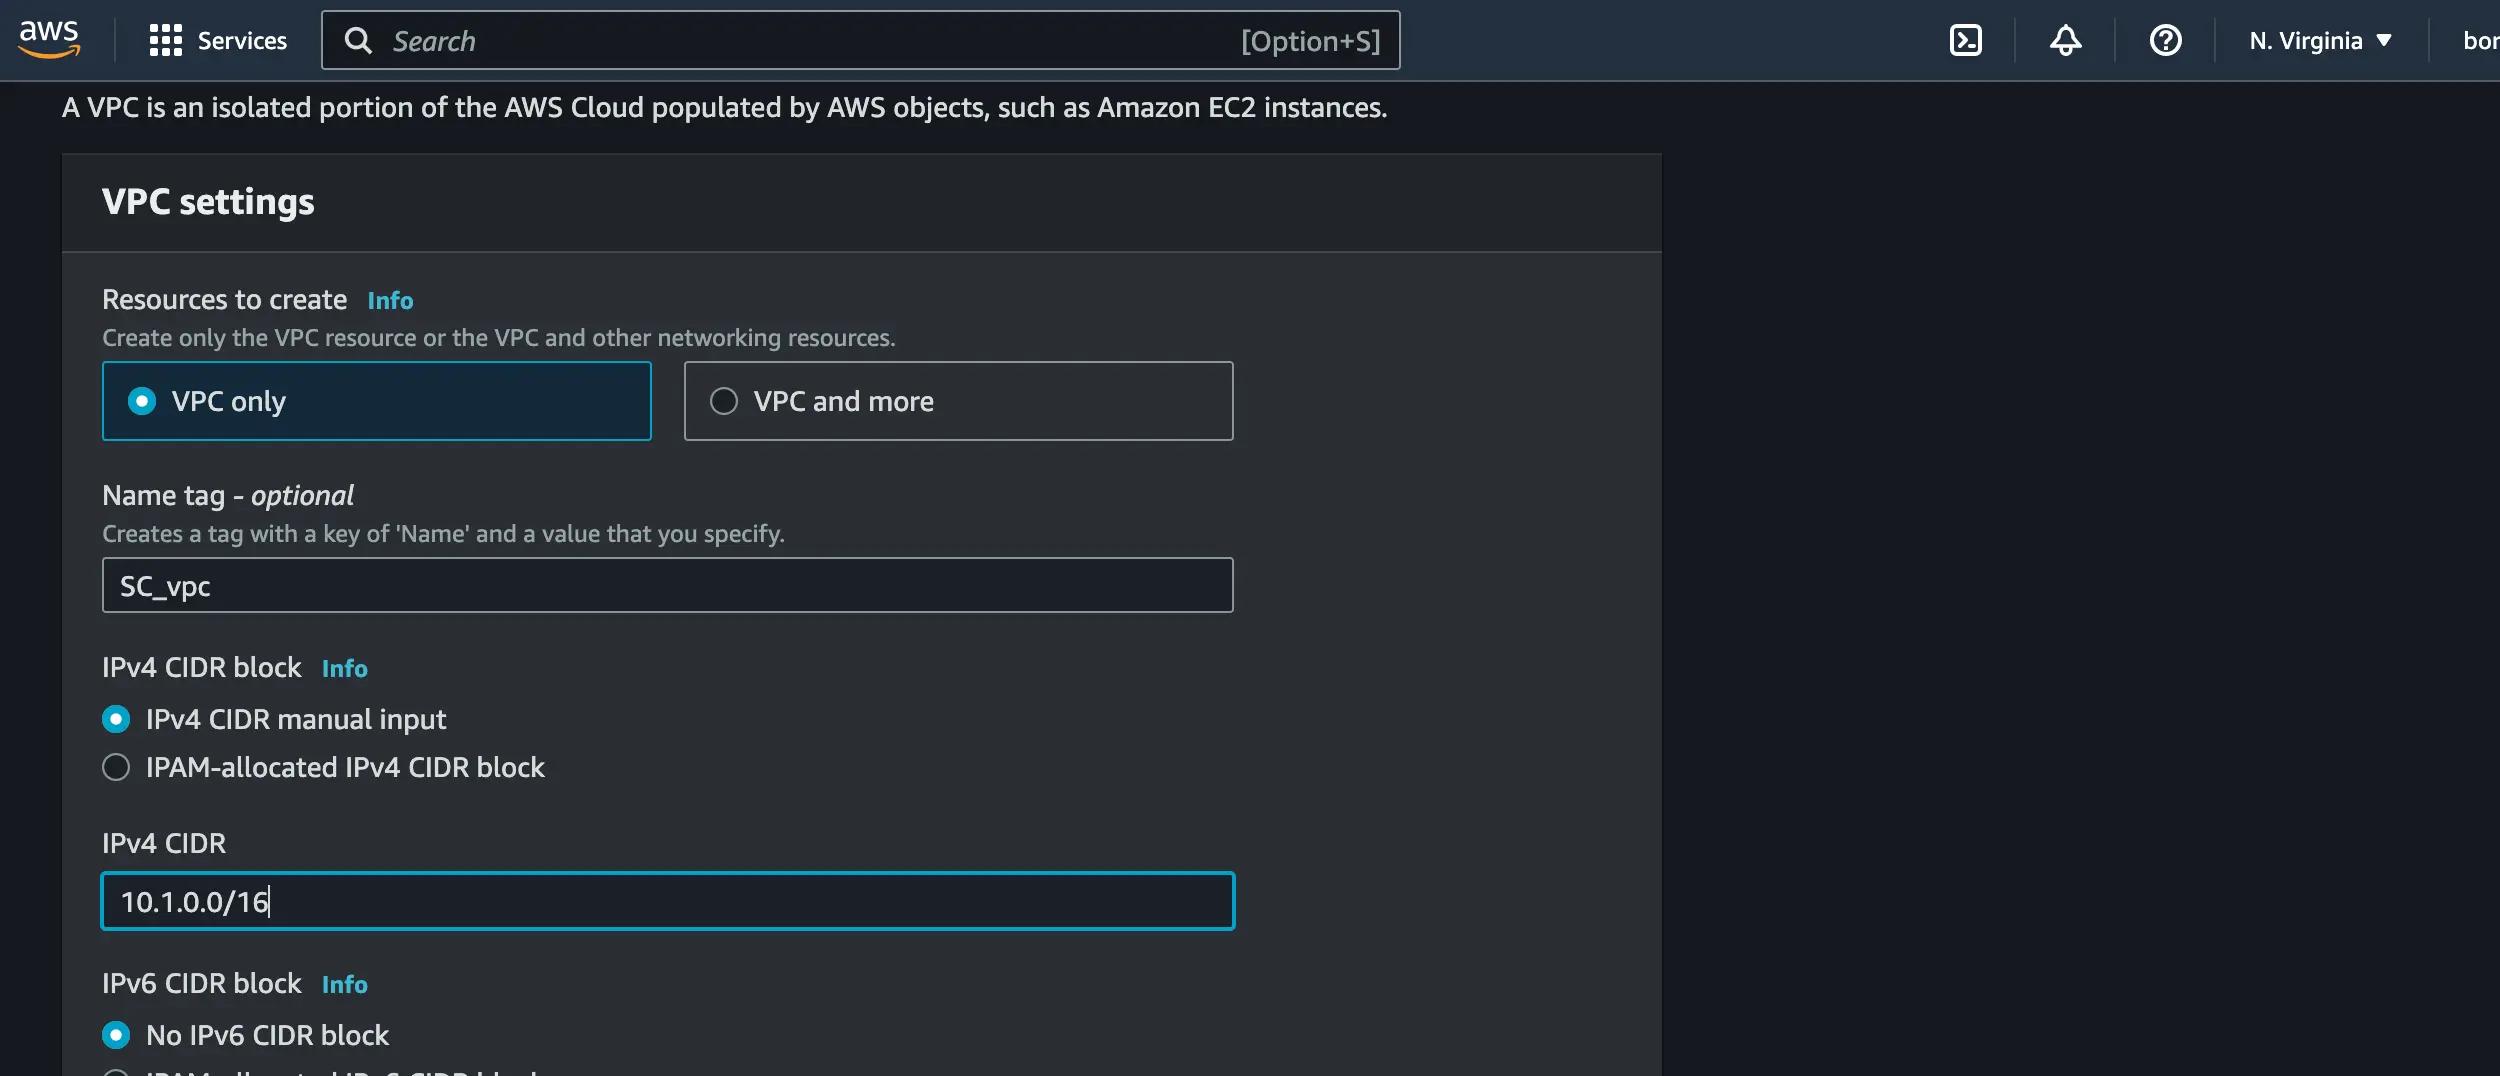
VPC setup
Navigate to your AWS Console and search for VPC
Click on Create VPC
Set 10.1.0.0/16 as your IPv4 CIDR
Subnets Setup
Navigate to Subnets on the VPC nagivatation pane
Create the following subnets below with their IPV4 CIDR address
     +-------------+-------------------+
     | Subnets     |    IPV4 CIDR       |
     +-------------+--------------------+
     |private_sn   |10.1.0.0/24         |
     | public_sn   | 10.1.1.0/24        |
     | lb_sn       | 10.1.2.0/24        |
     | lb_sn2      | 10.1.3.0/24        |

    #lb = load balancer
    #sn = subnet
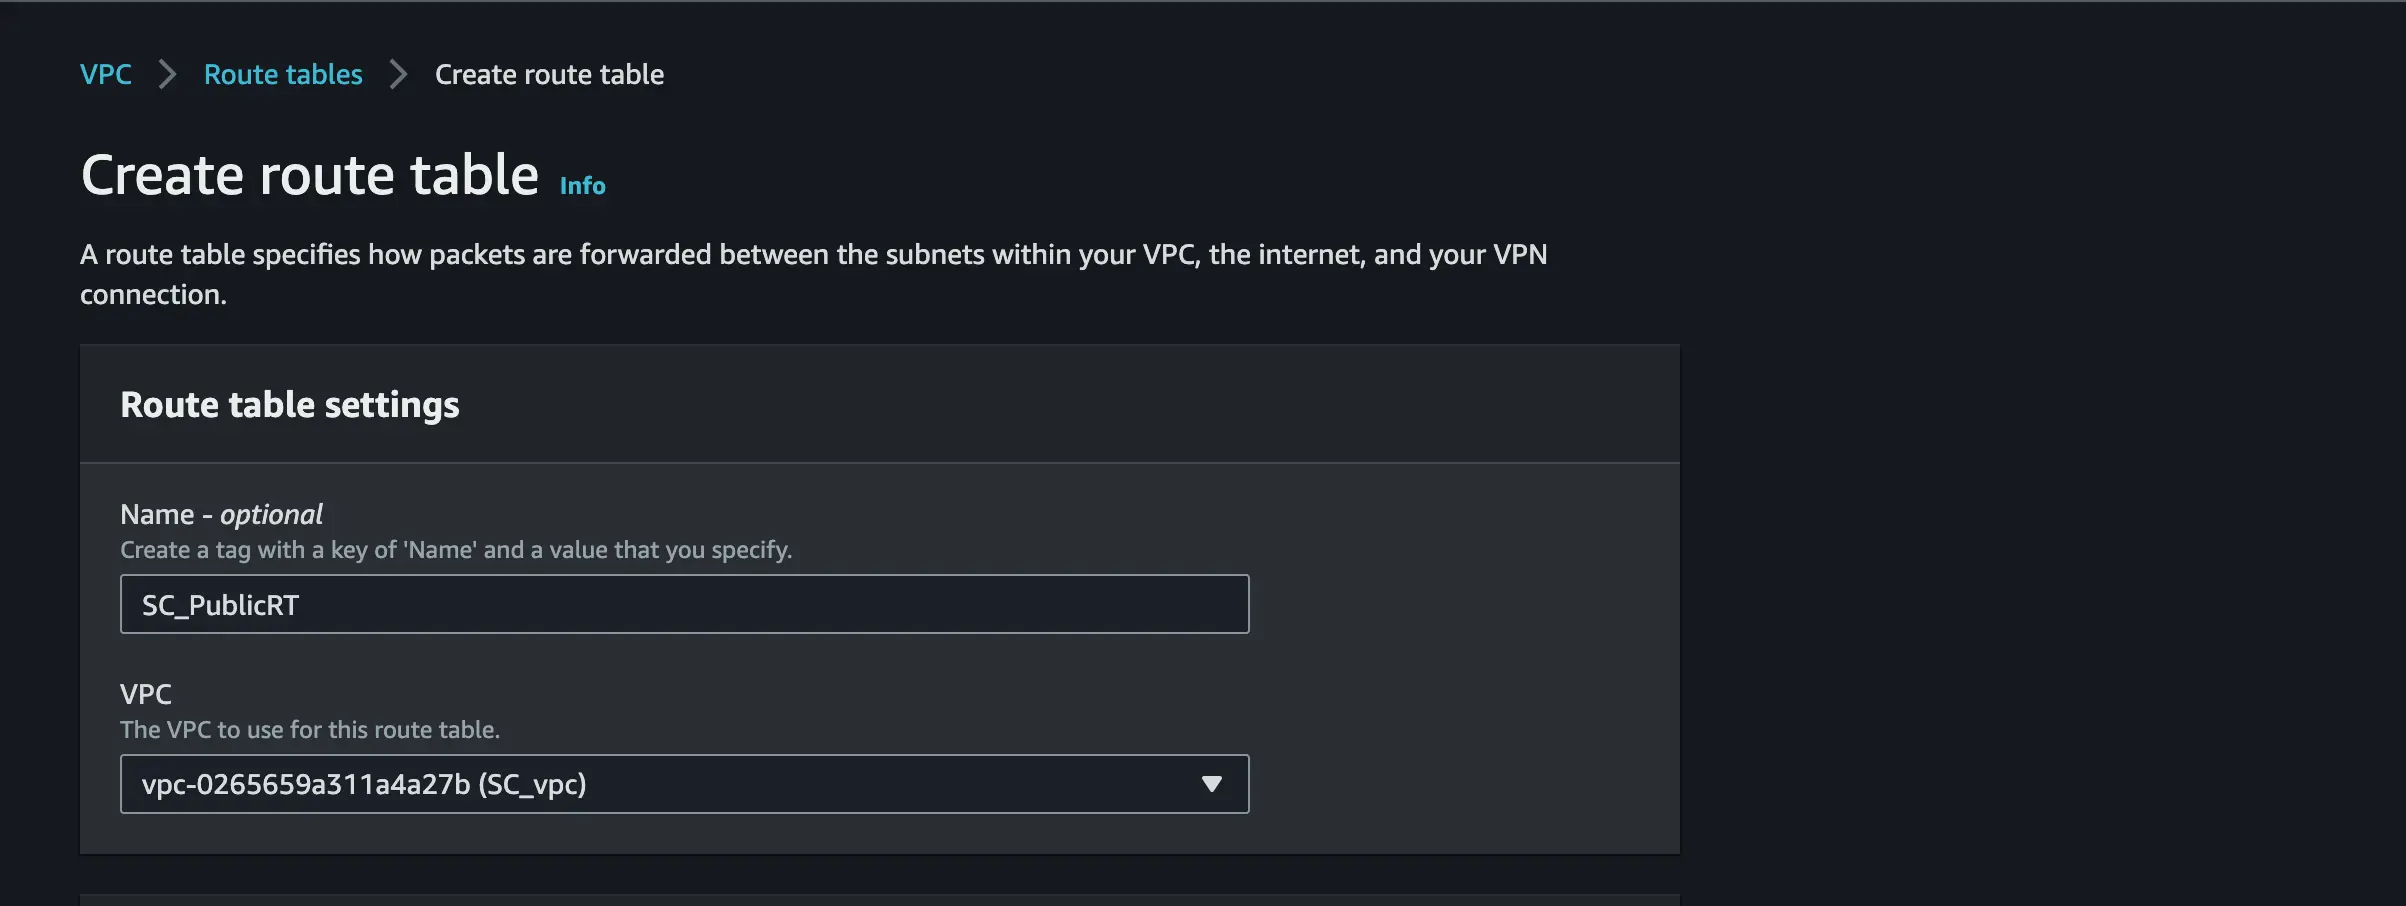
Navigate to Route table and create a traffic route for the public and private subnets and attach the VPC you created to it.
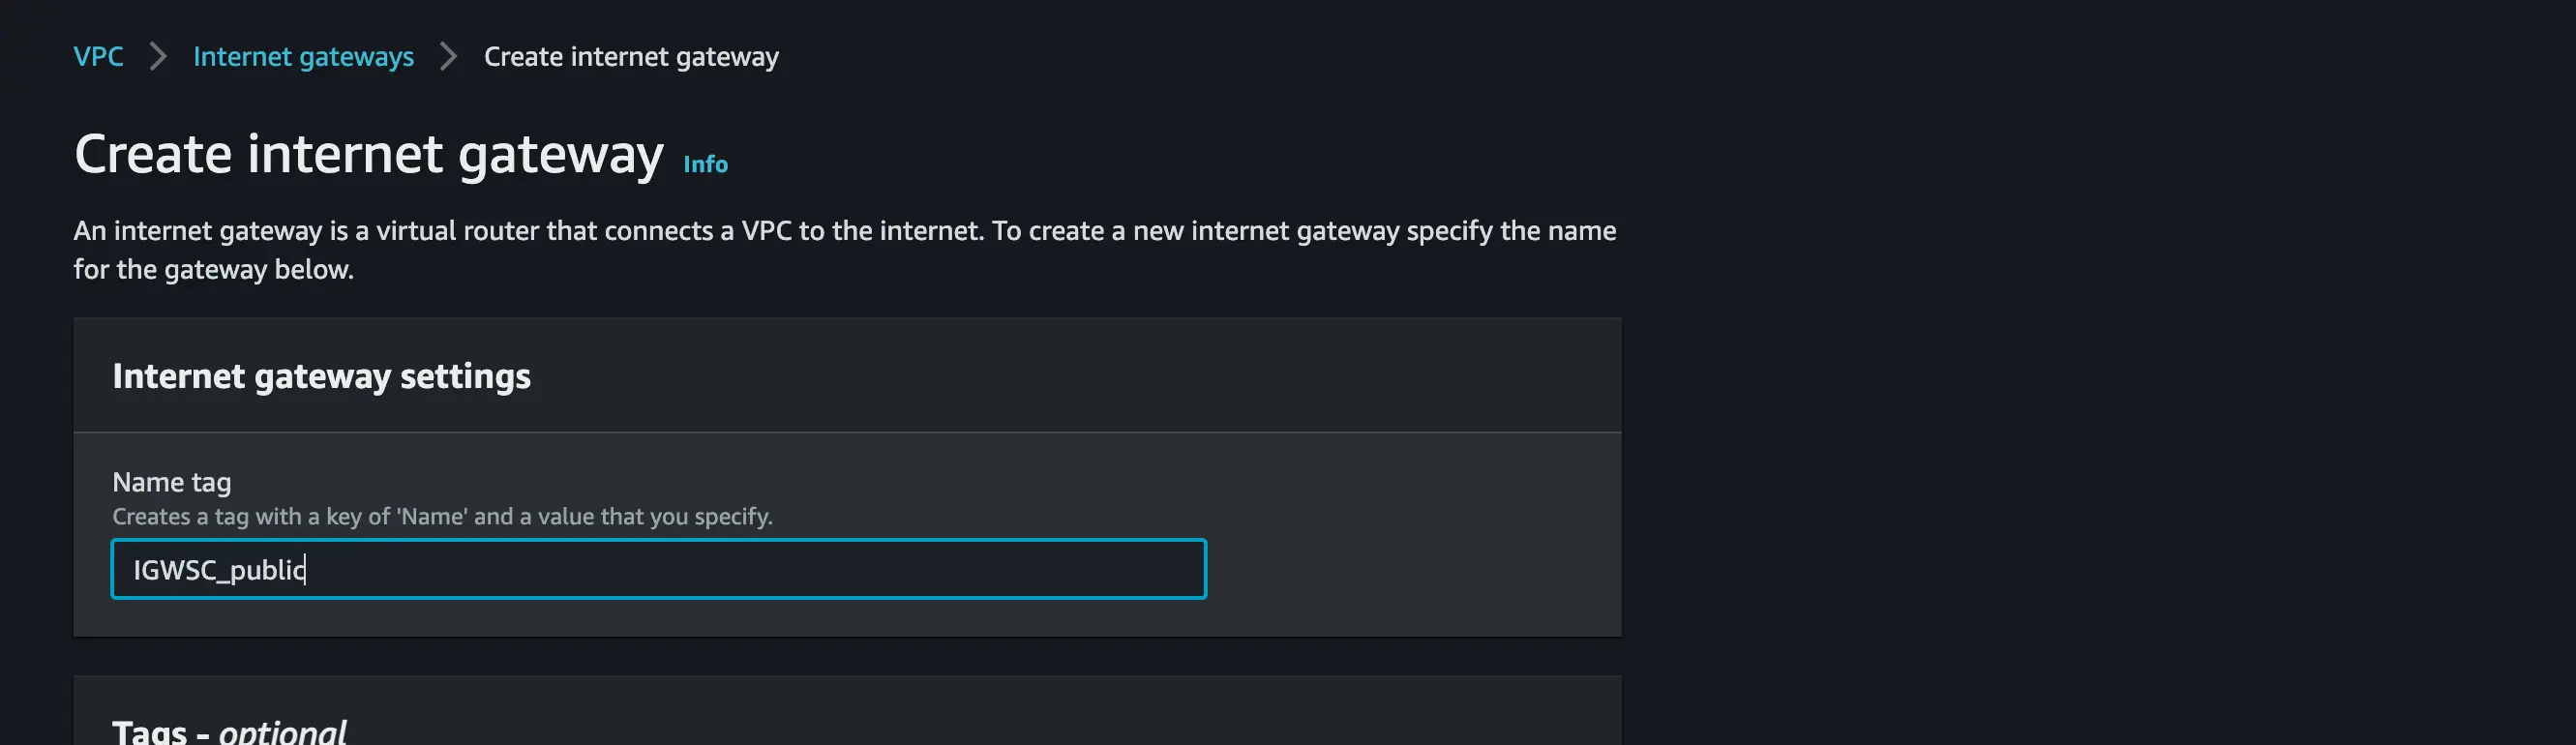
Next, navigate to the Internet Gateway, create an Internet gateway for the public
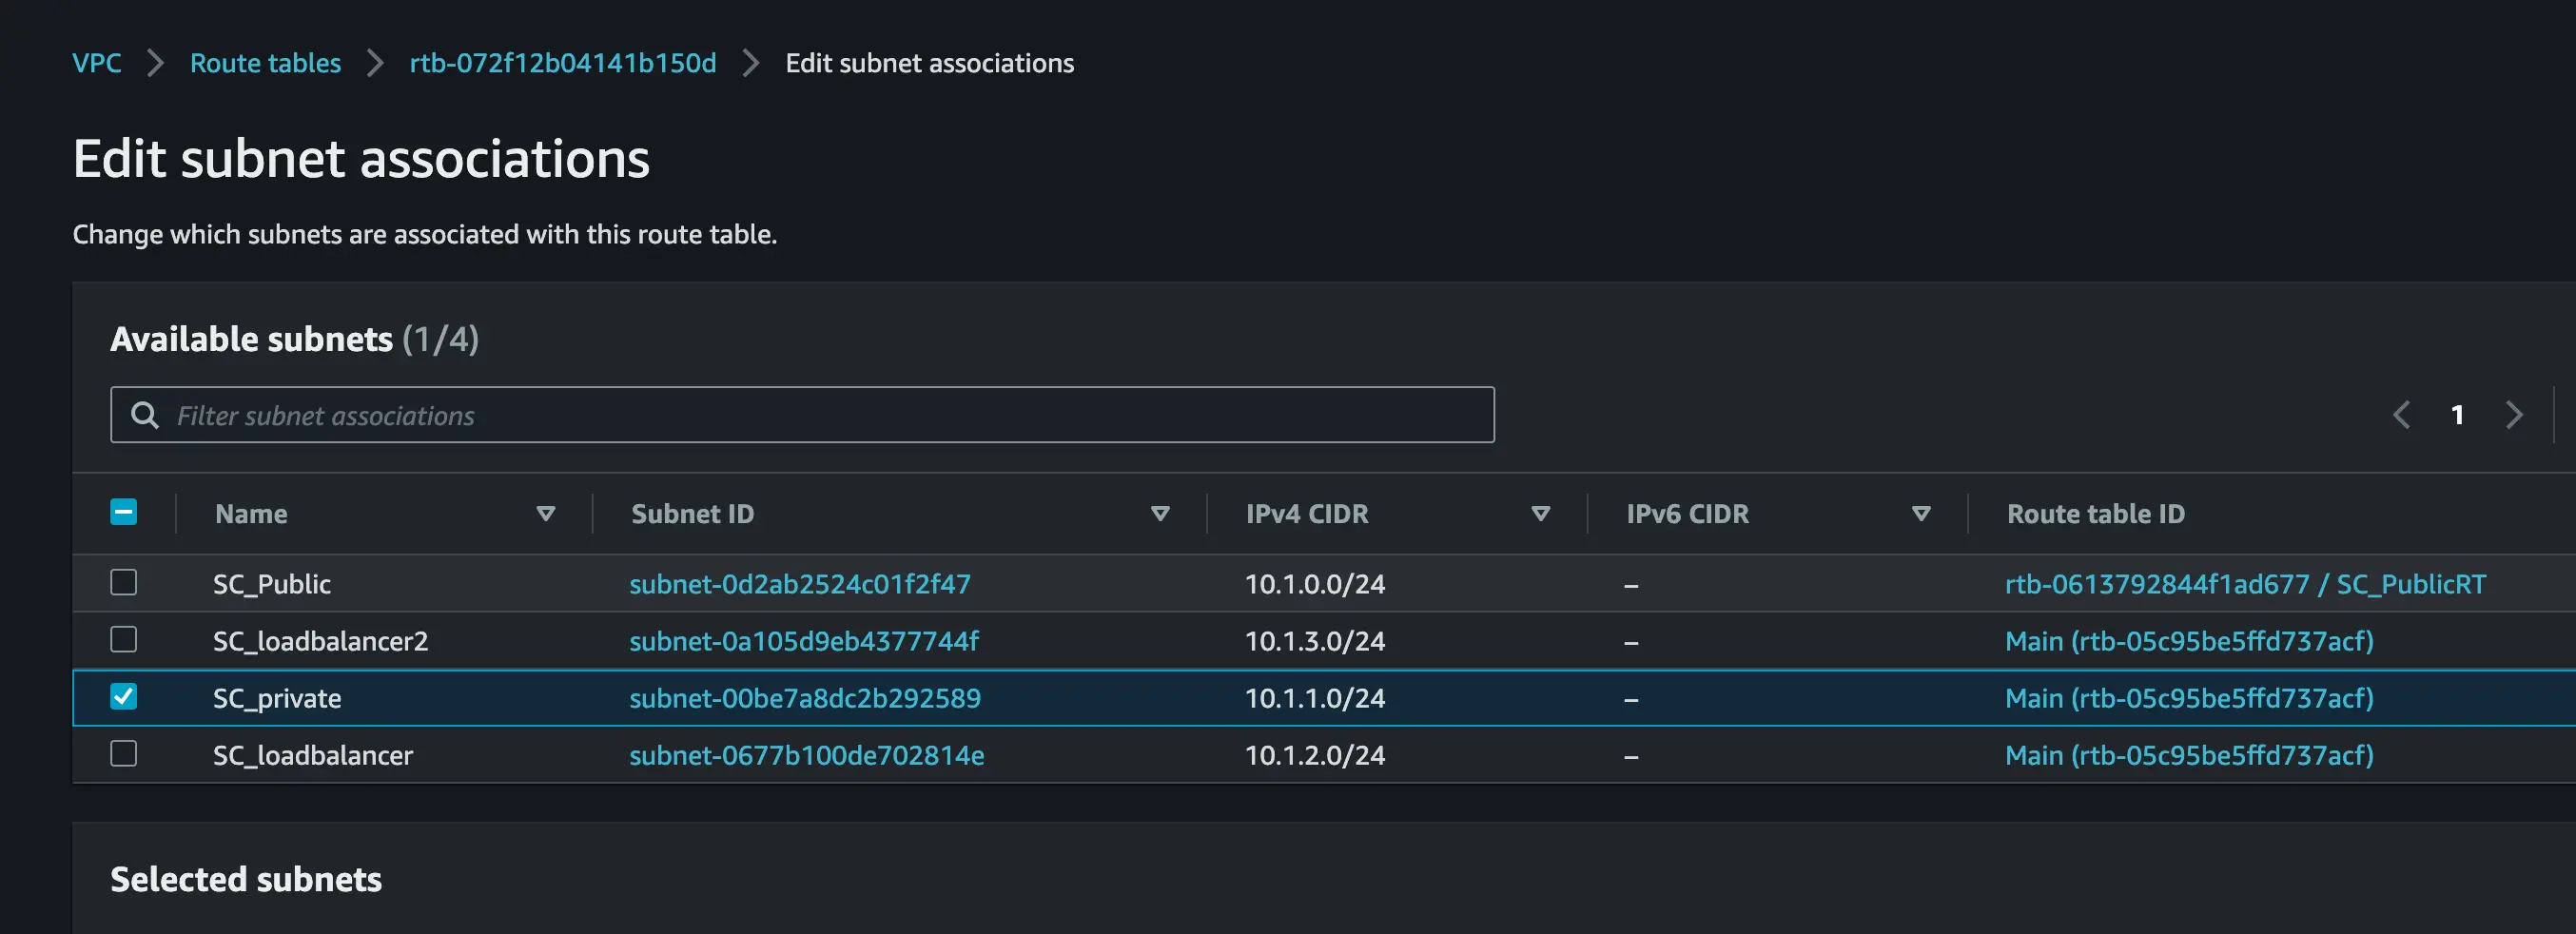
Connect the public and private subnet to the public and private Route tab
Attach the internet gateway to the Public Subnet
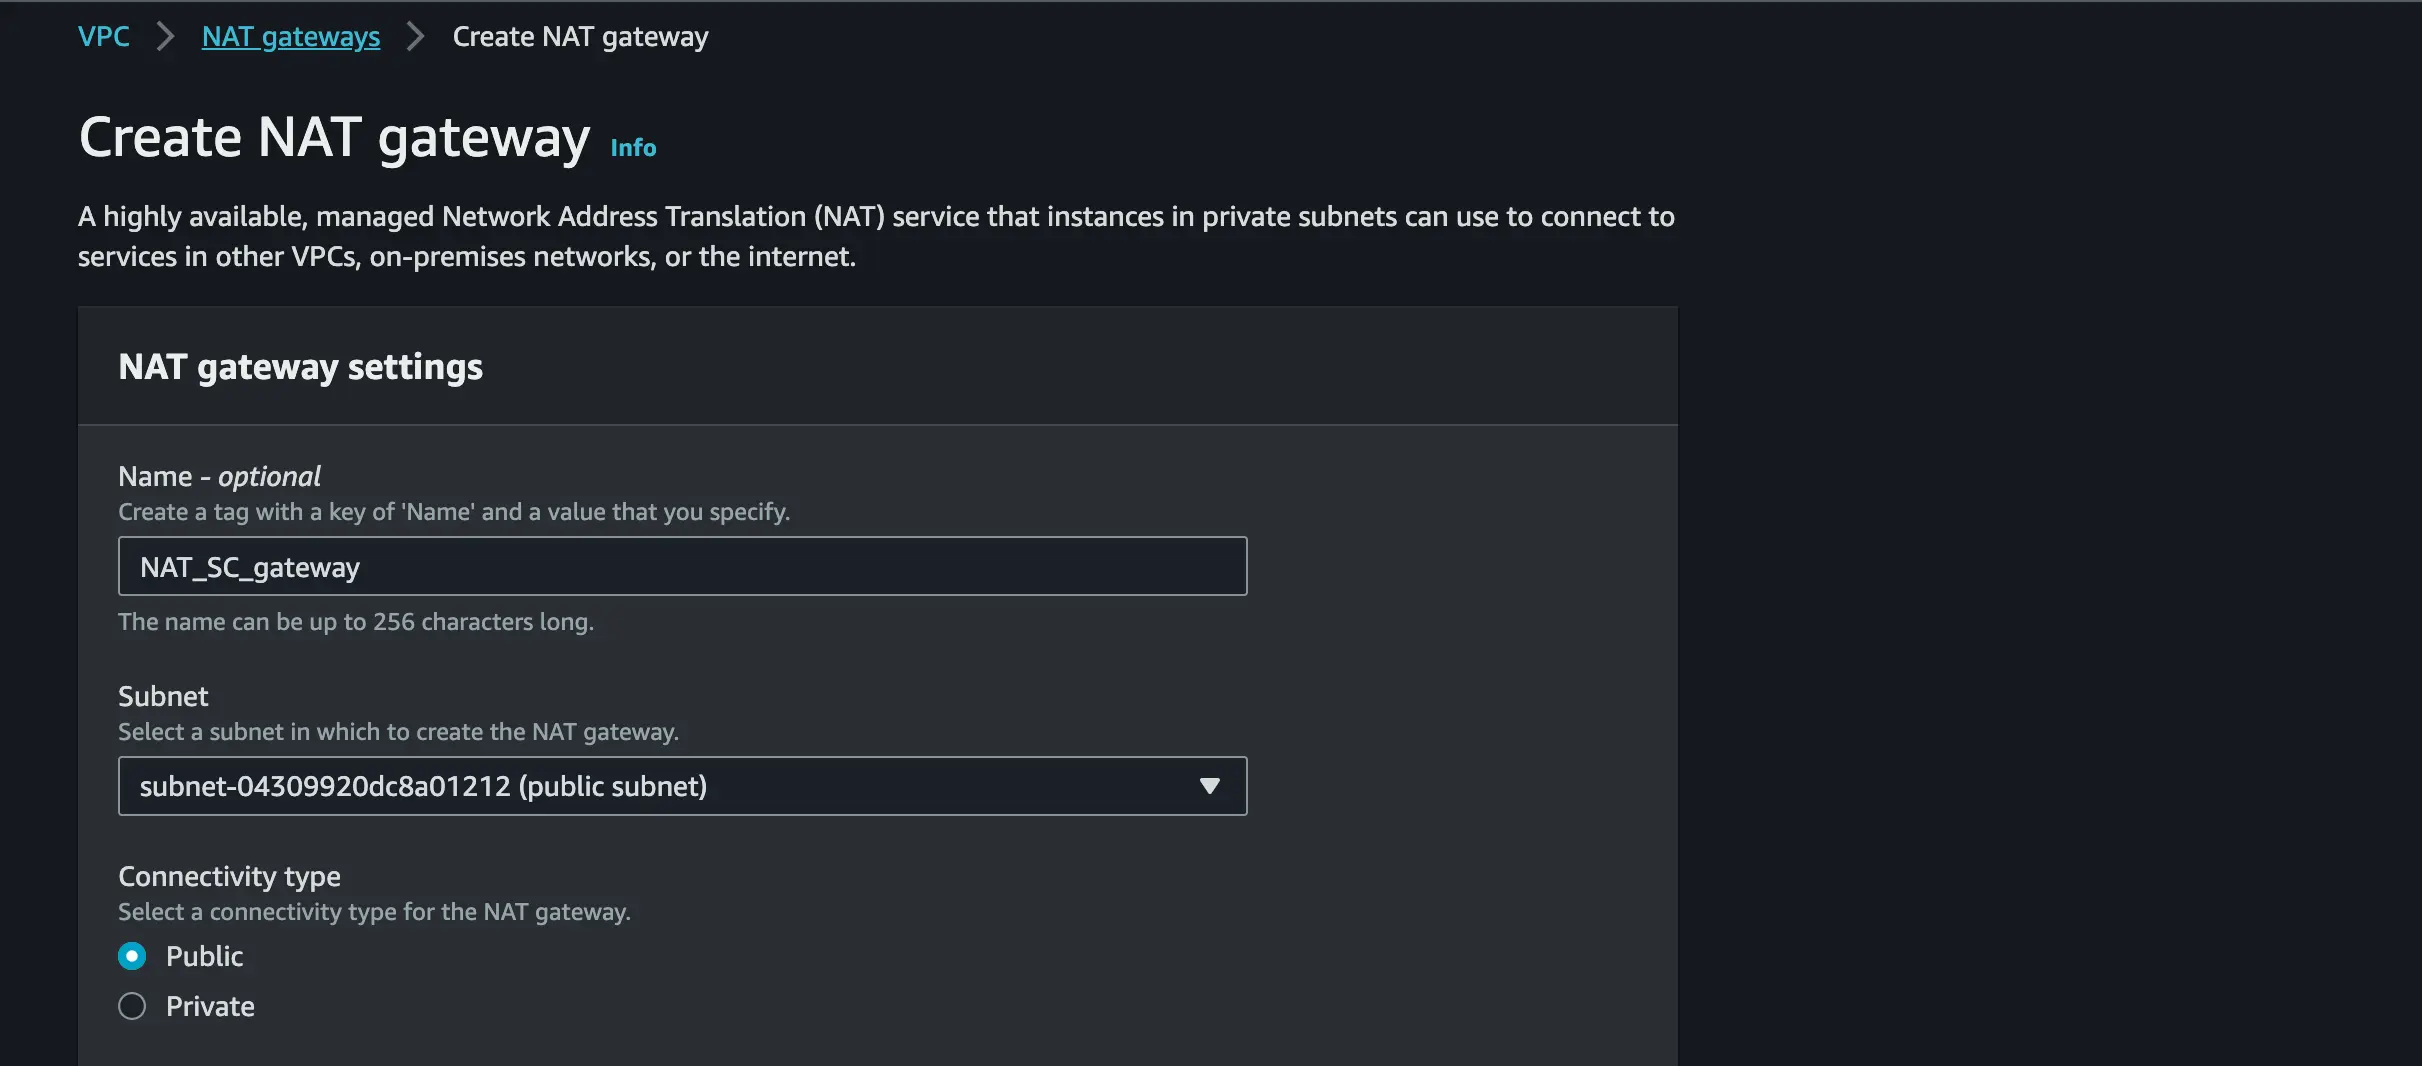
GATEWAY Setup
Create a NAT GATEWAY and pick the Public subnet
Allocate an Elastic IP to the NAT GATEWAY
Attach the NAT GATEWAY to the Private subnet

STEP 3:
AWS Client VPN Endpoints:
AWS Client VPN is a VPN client service that allows you securely access your AWS resources.
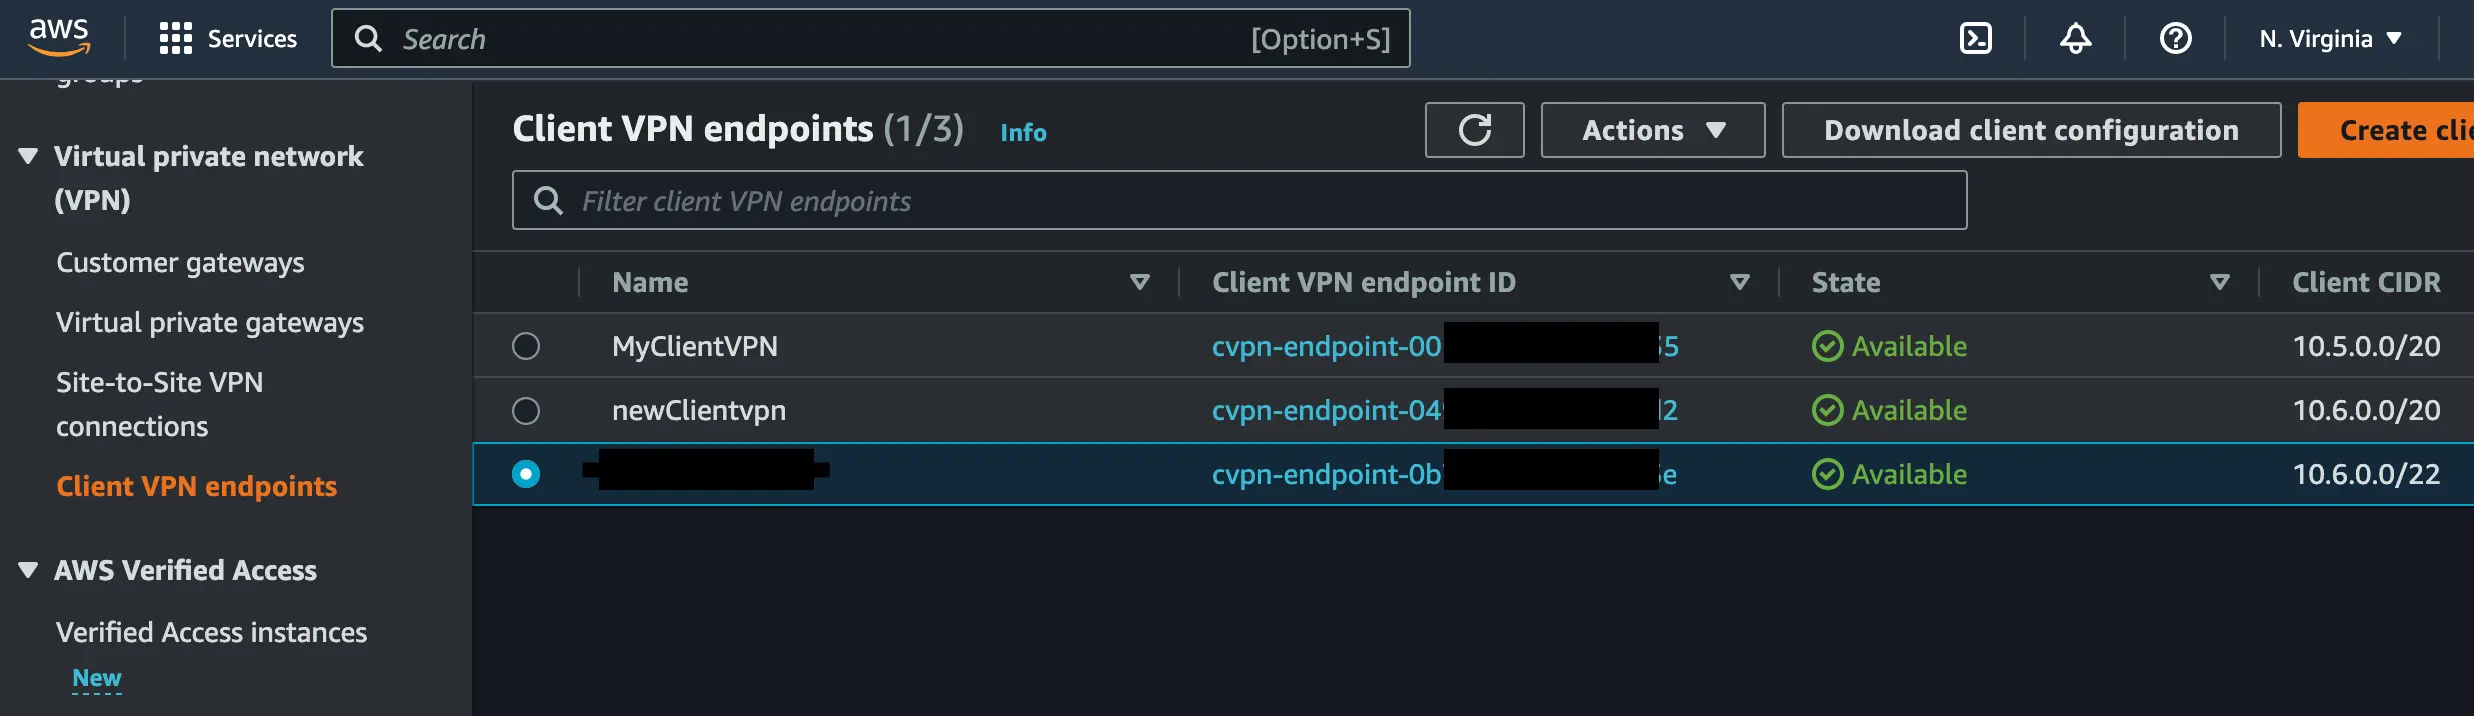
Create a Client VPN Endpoints:
Open your AWS VPC console
Navigate to the navigation pane and select Client VPN Endpoint » Create Client VPN Endpoint
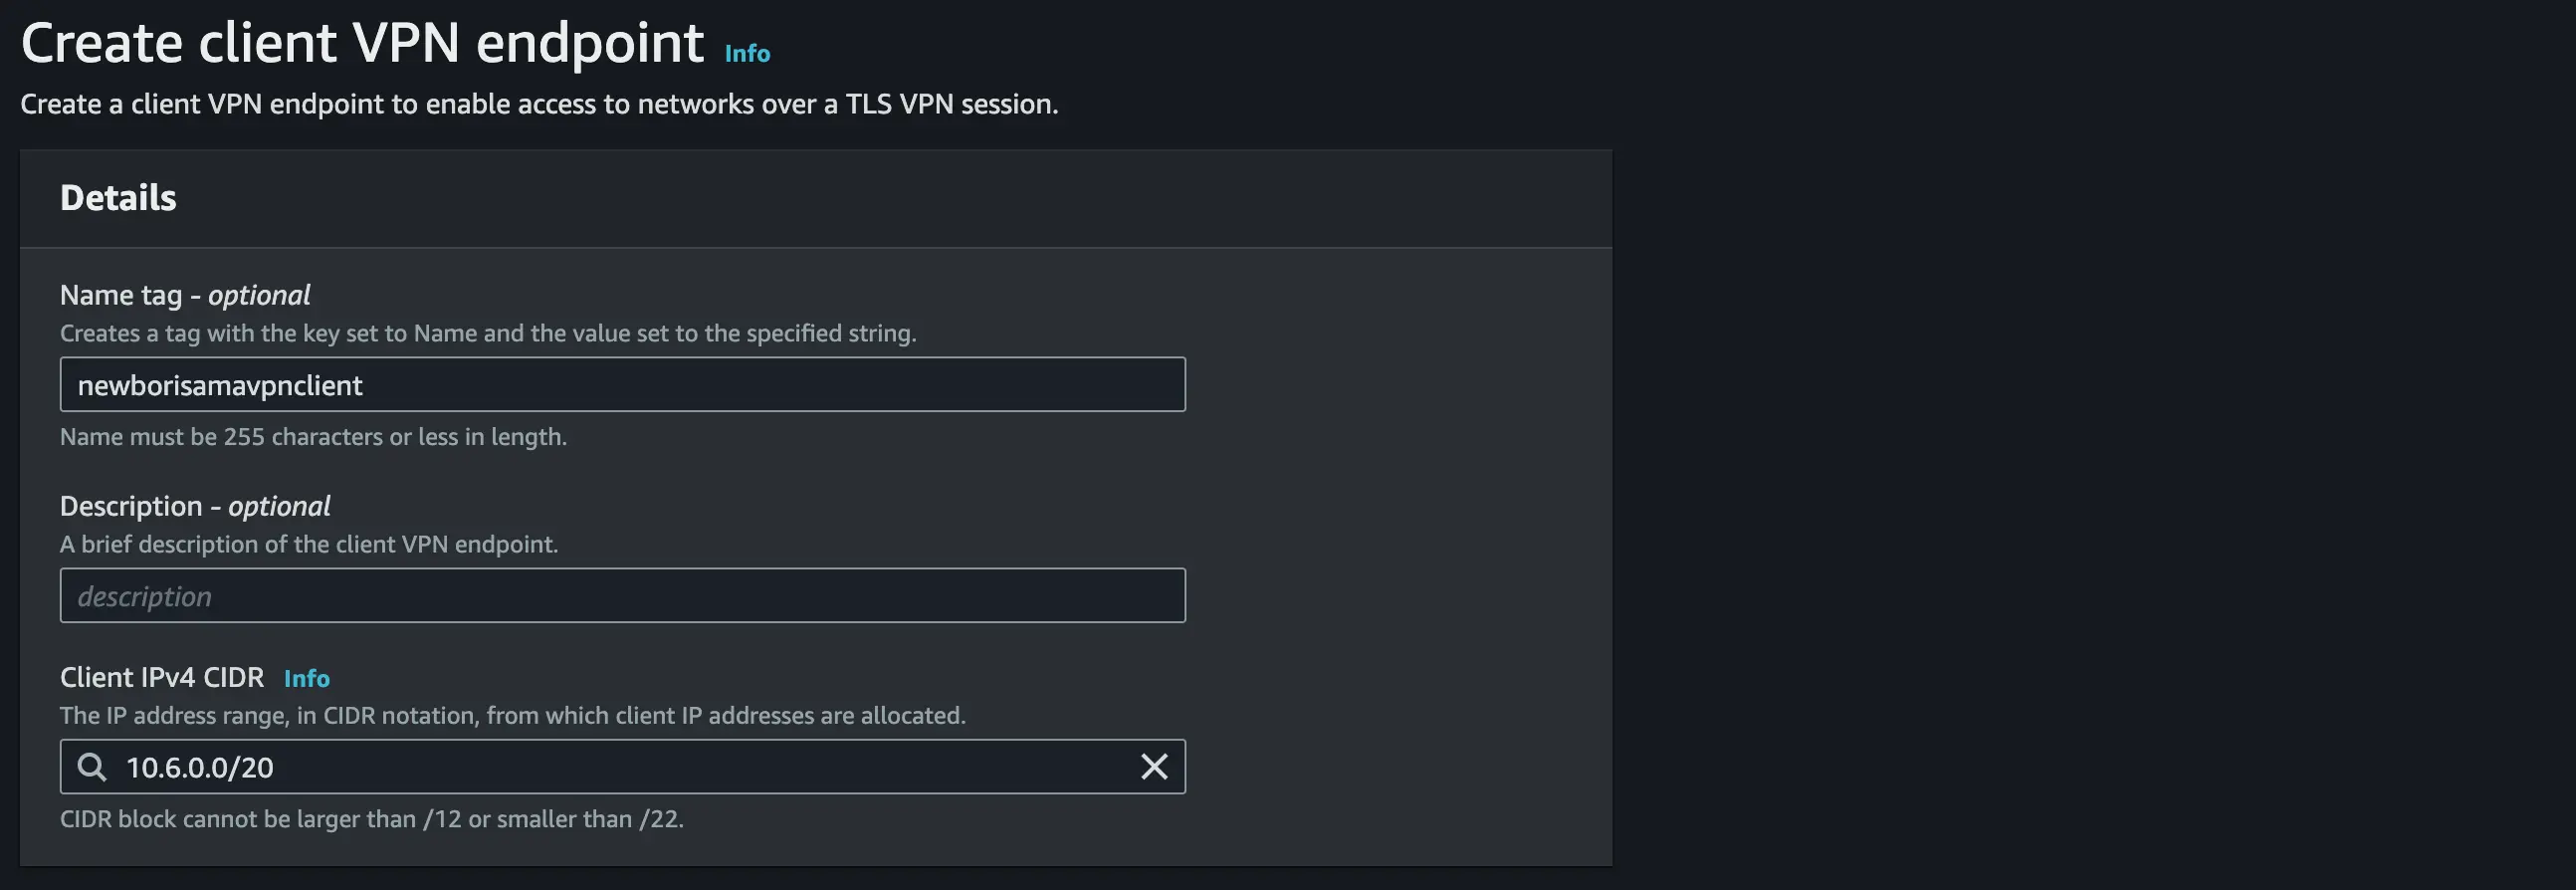
Use your preferred name and description
For Client IPv4 CIDR, set an IP address range. we will set our IP range to 10.6.0.0/20.
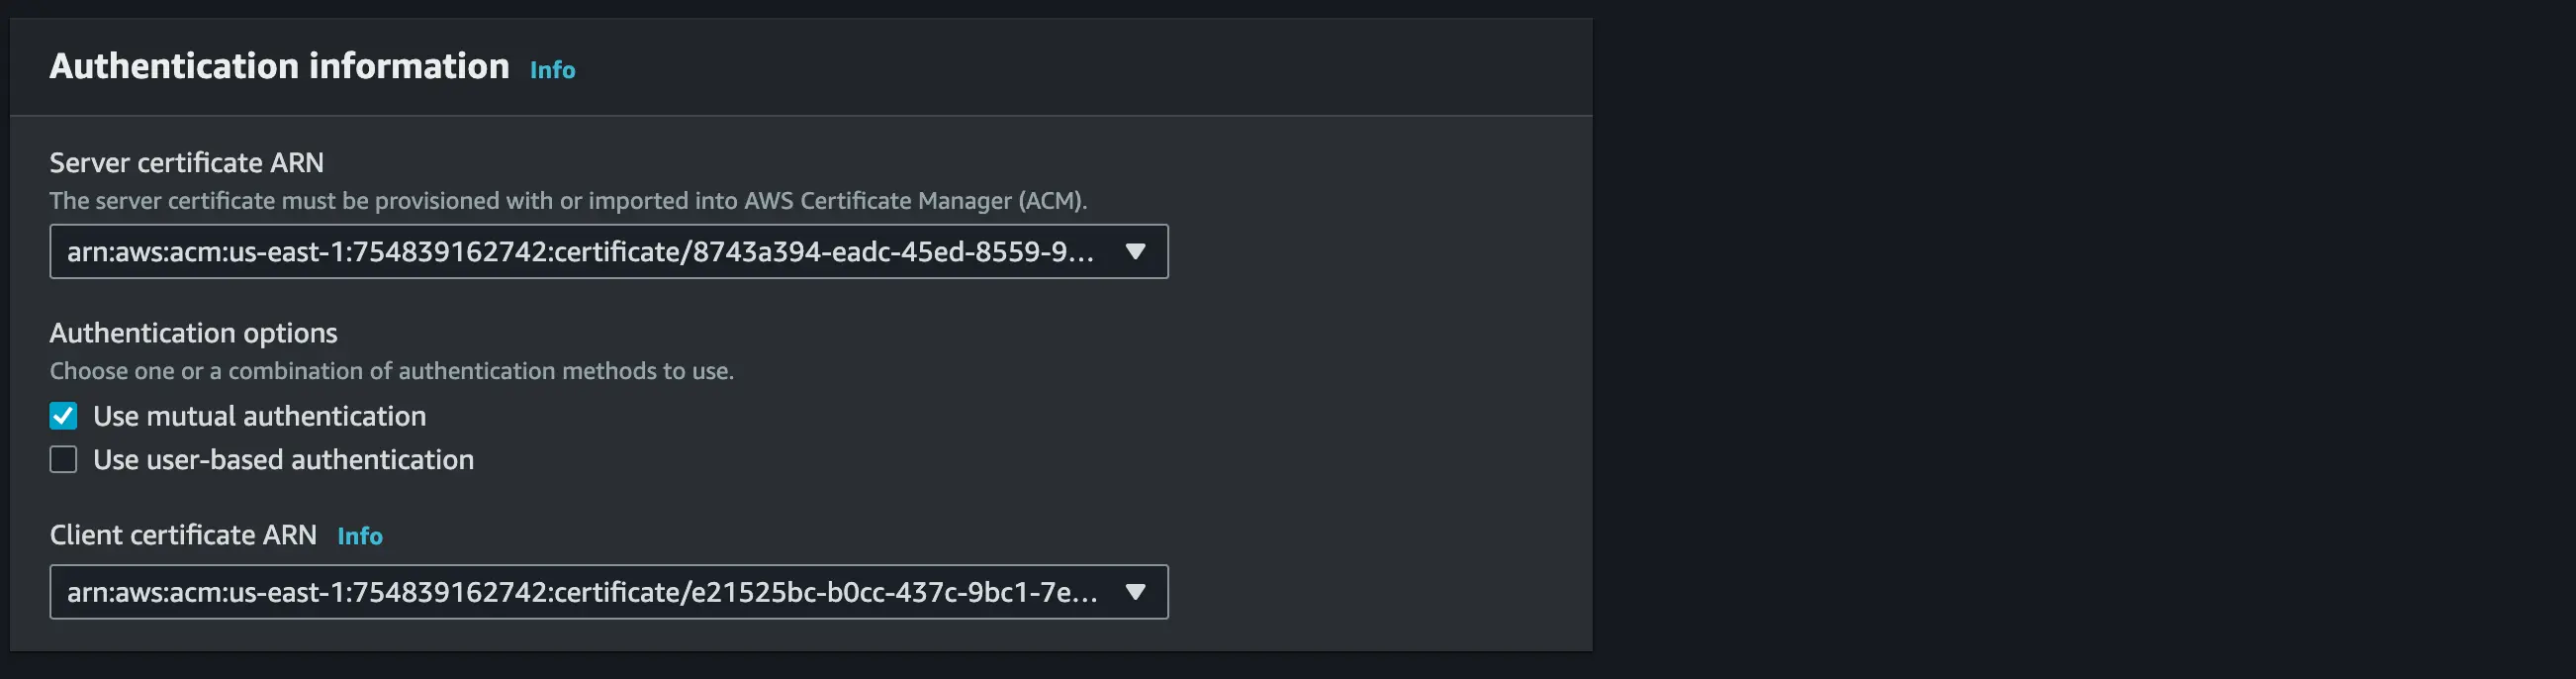
For server Certificate ARN(Amazon Resource Names) use the server certificate you uploaded in your AWS certificate manager.
Pick Mutual authentication to enable certificate-based authorization
Use your Client Certificate ARN(Amazon Resource Names) and client key you uploaded in your AWS certificate manager.
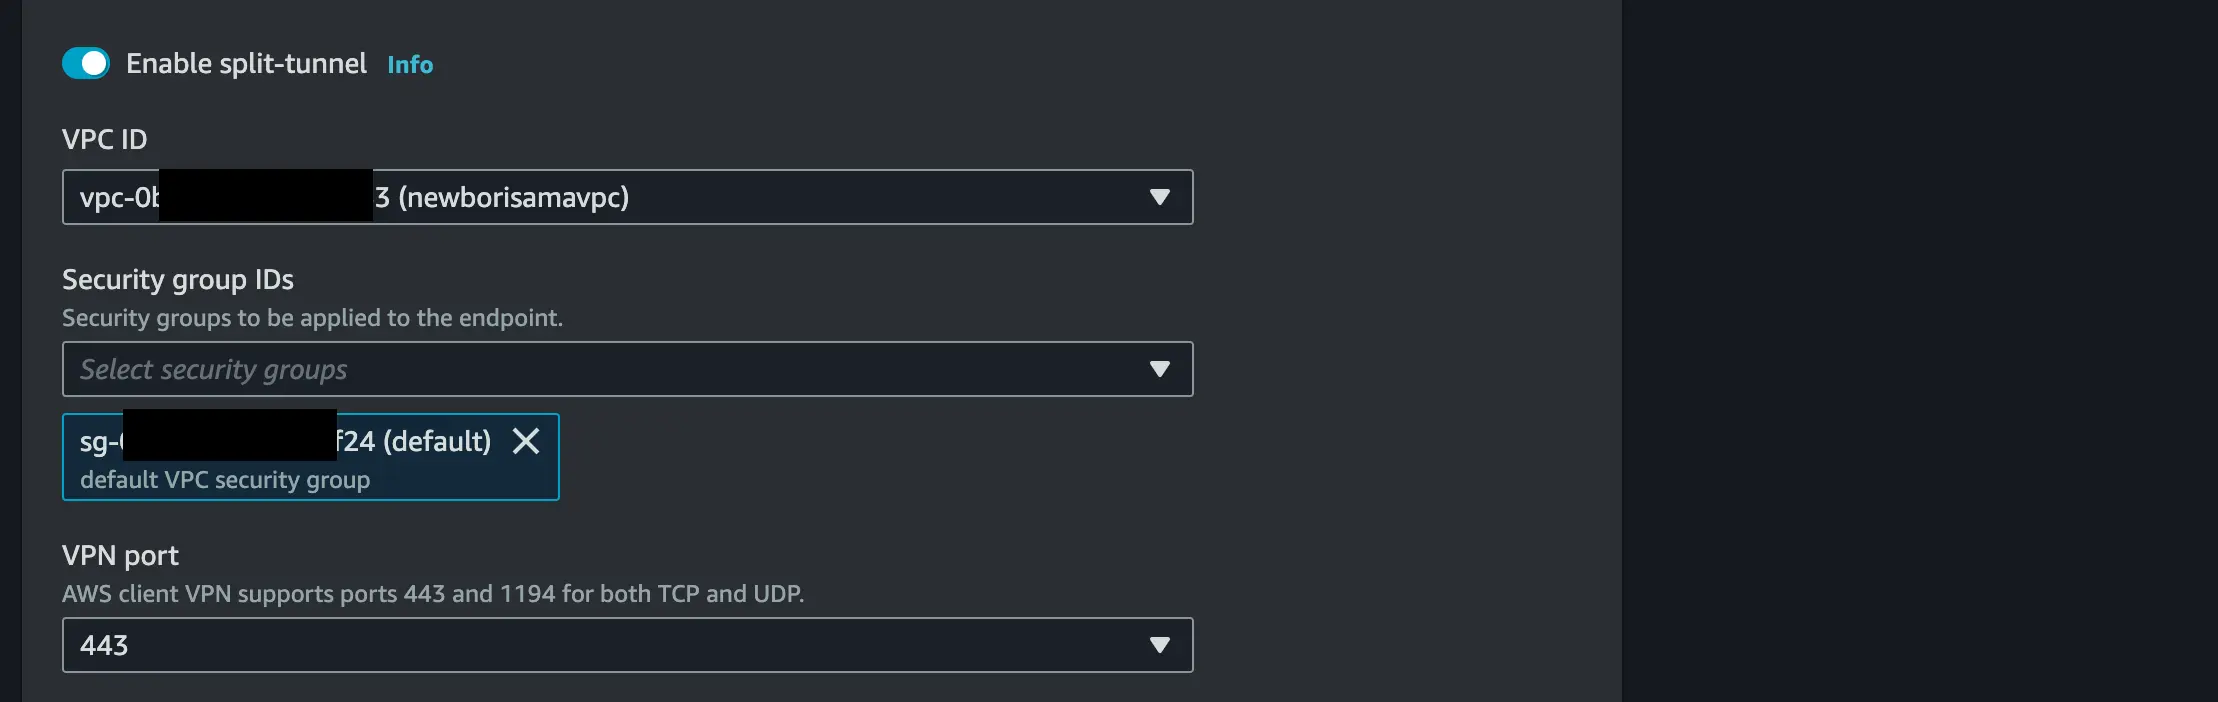
Enable Client split-tunnel
Set your VPC ID and the Security group ID should be the default VPC security group
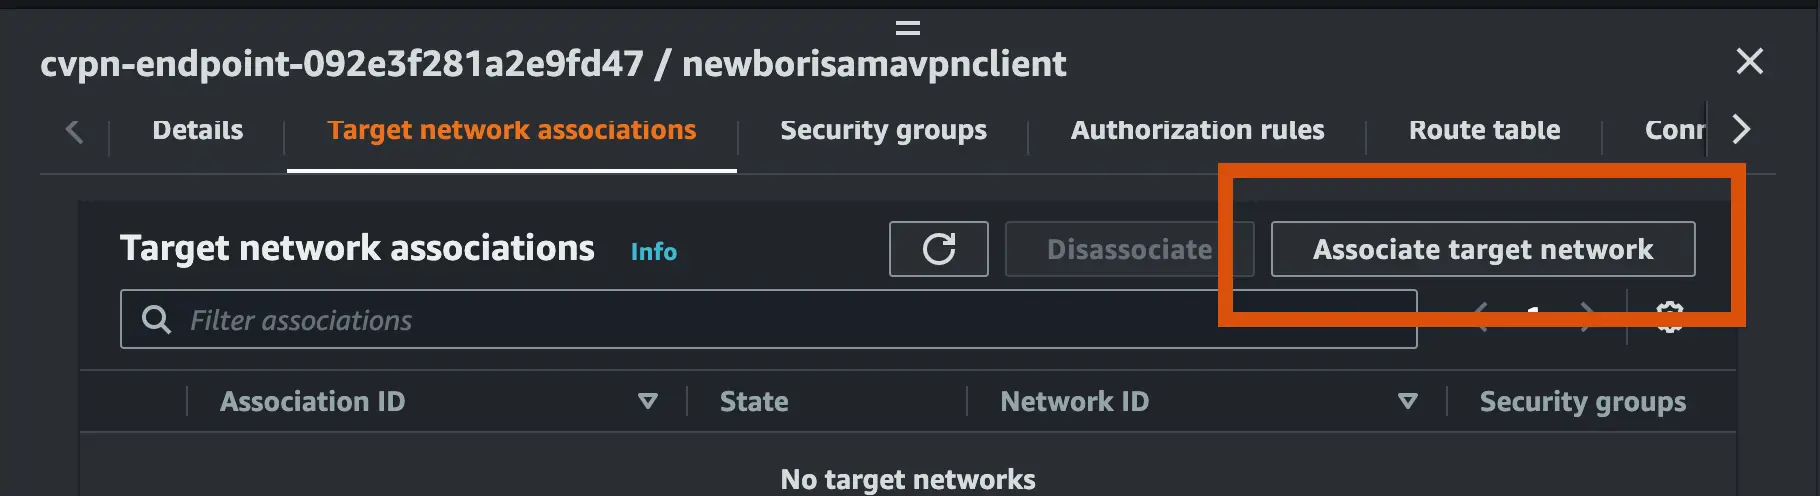
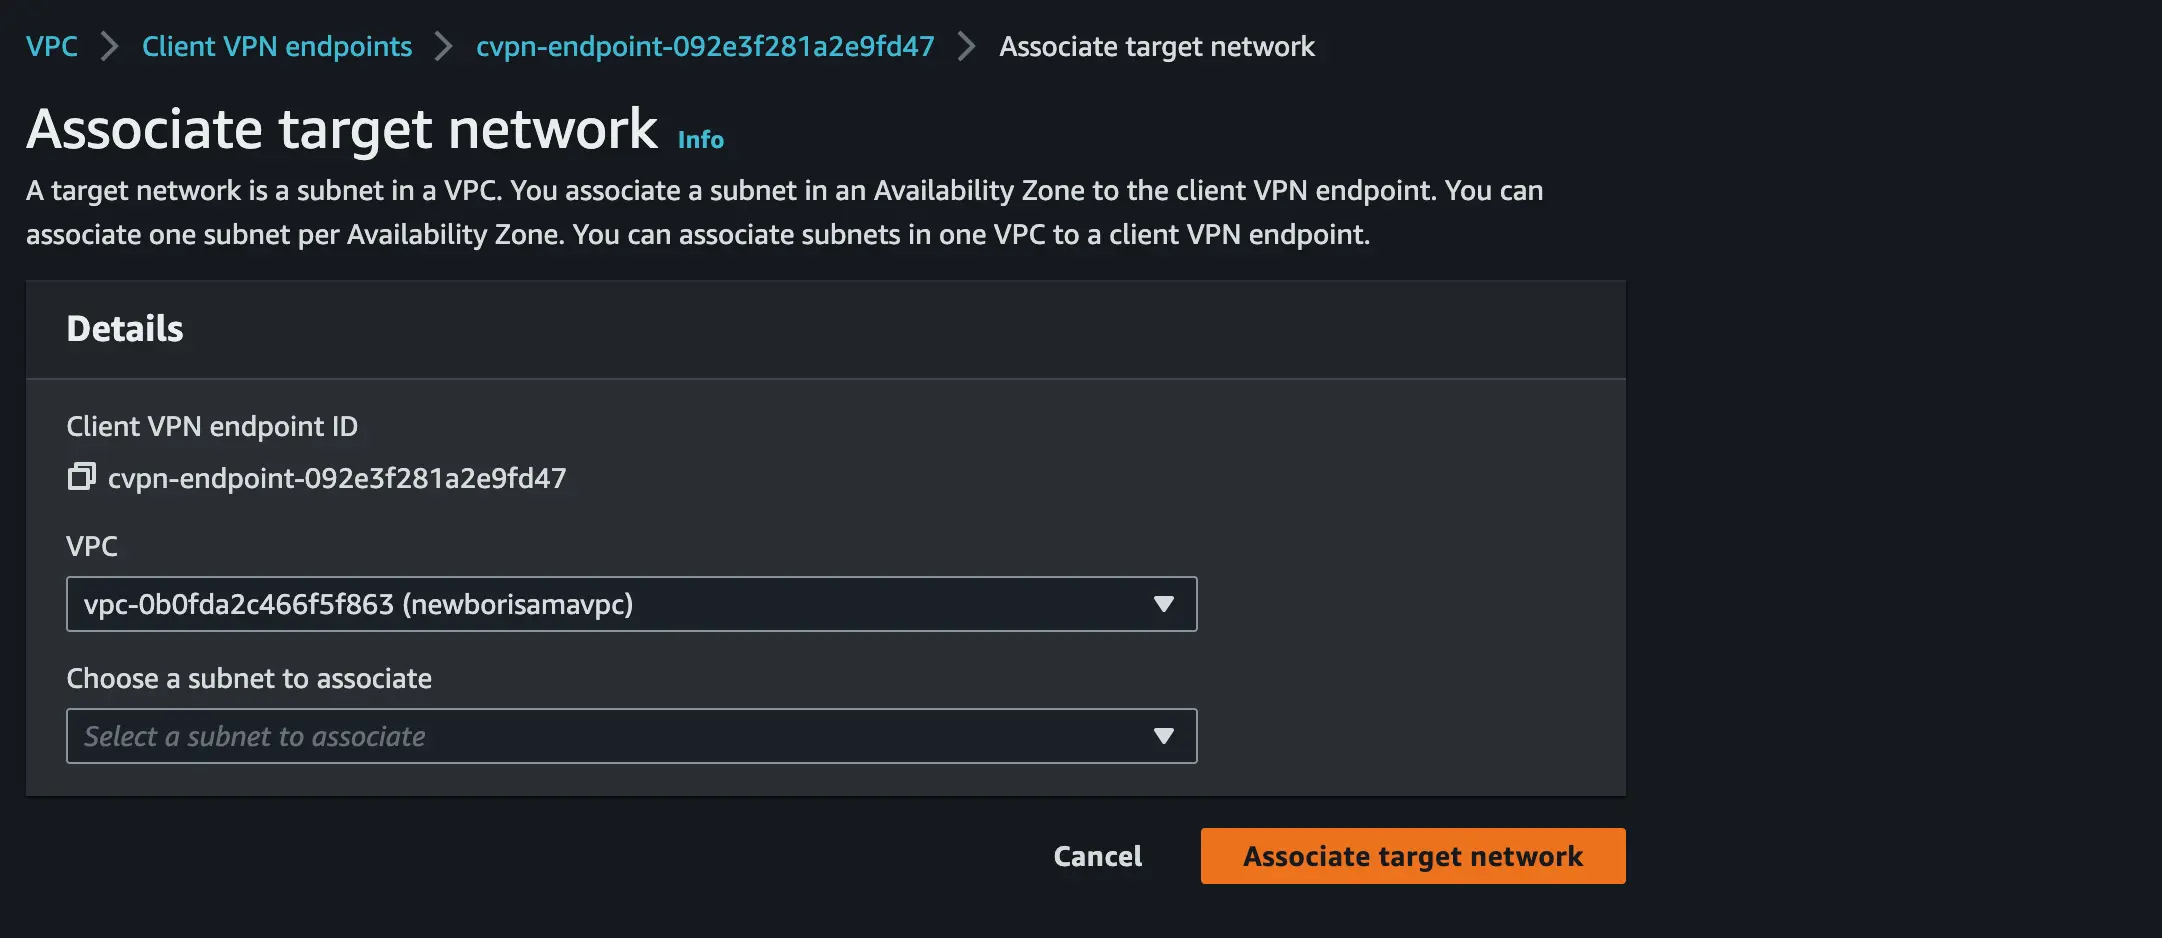
- Next, associate the load balancer subnet to the client VPN endpoint we have created
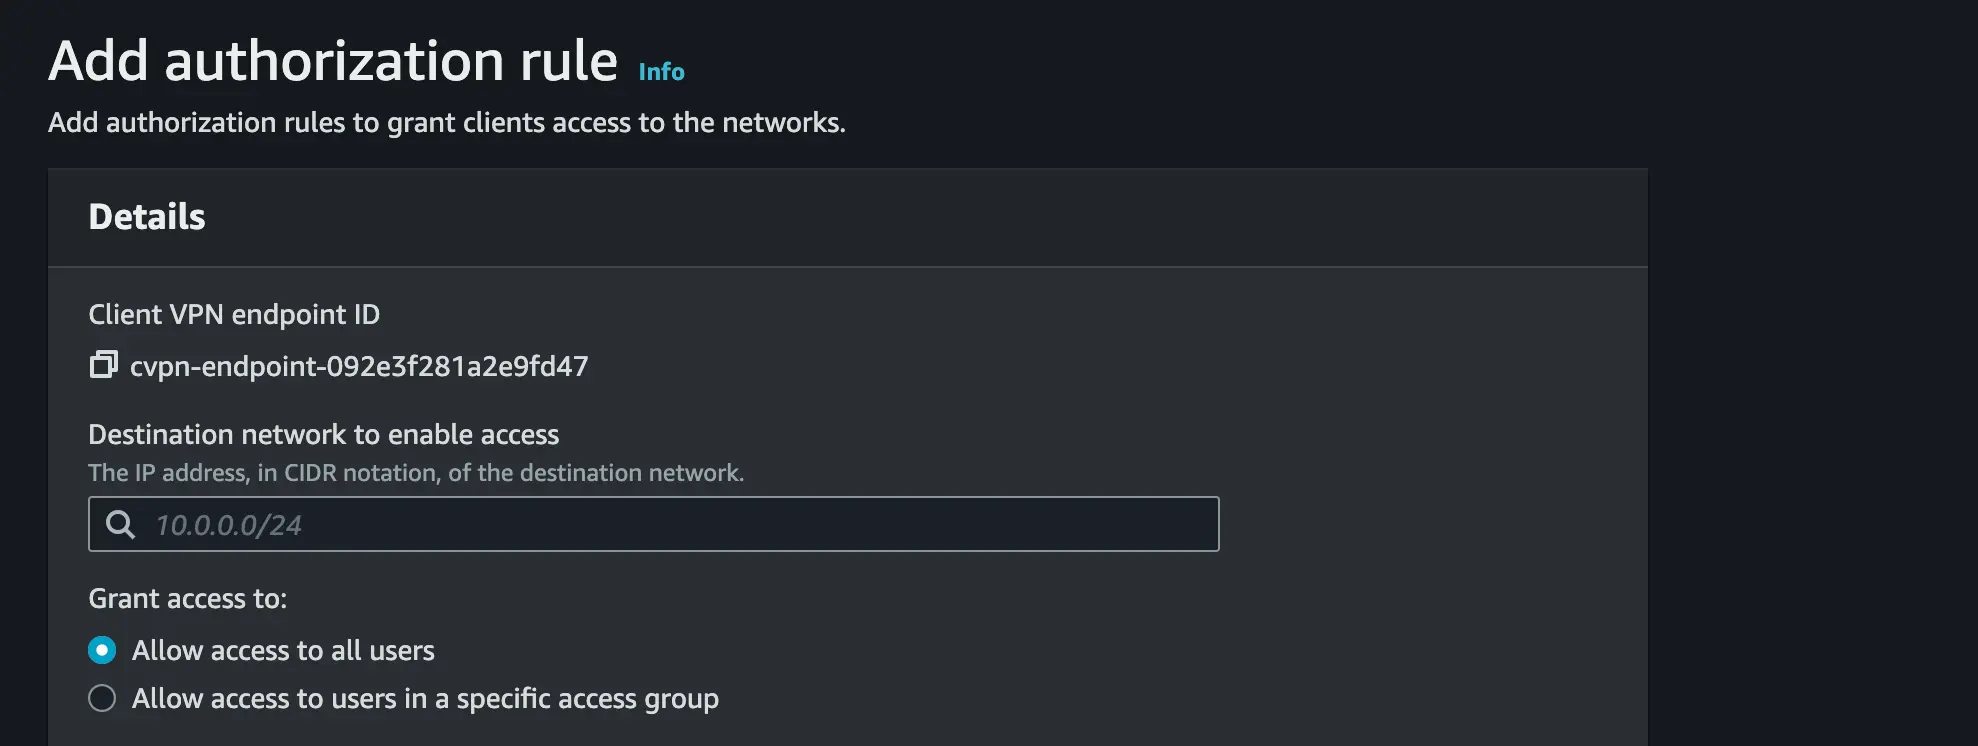
- Set the 10.6.0.0/16(not your VPC ipv4 CIDR to avoid clash) as the destination network for Authorization rule to

- Download your client VPN endpoint configuration, open it as a text file and append the code below and save the configuration file (.ovpn)

    # append this code in between the <cipher AES-256-GCM> and <verb 3>
    --cert "/Users/emekaborisama/Documents/easy_cert/client1.domain.tld.crt"
    --key "/Users/emekaborisama/Documents/easy_cert/client1.domain.tld.key"
STEP 4 :
Let’s upload our client VPN certificate to OpenVPN or AWS VPN and ping the client VPN endpoint to be sure our authentication works well.
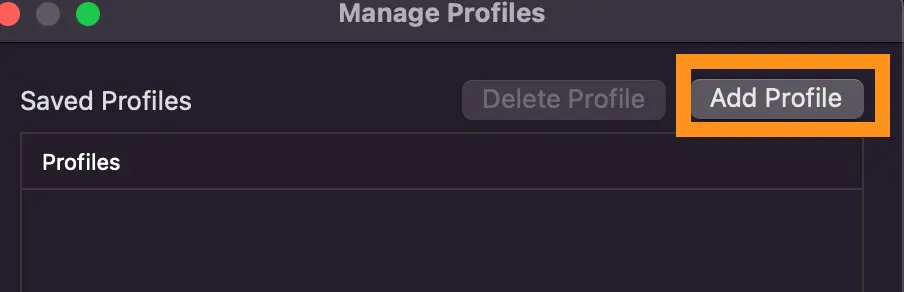
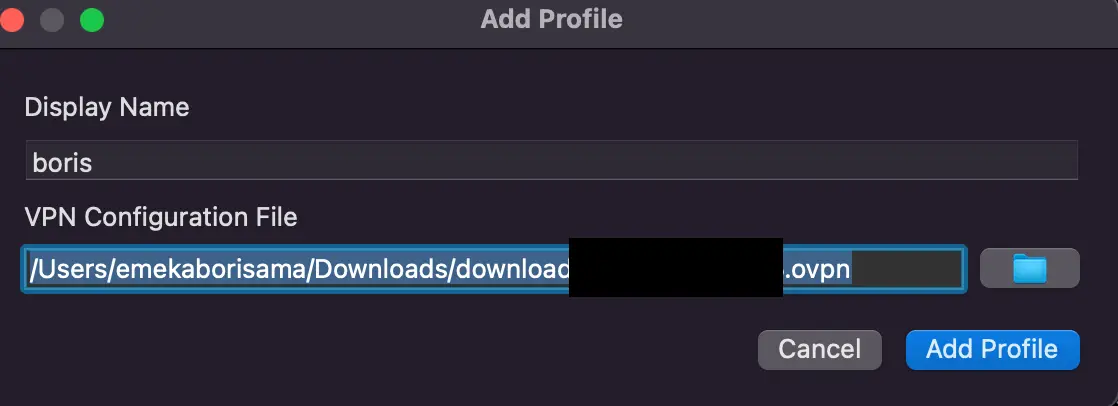
- Using AWS VPN, add a new profile and add the Saved AWS Client VPN Endpoint configuration

- Connect and navigate to the Client VPN endpoint » Connection and validate if your connection shows

STEP 5:
Instance inside out private subnet
Open your AWS VPC console
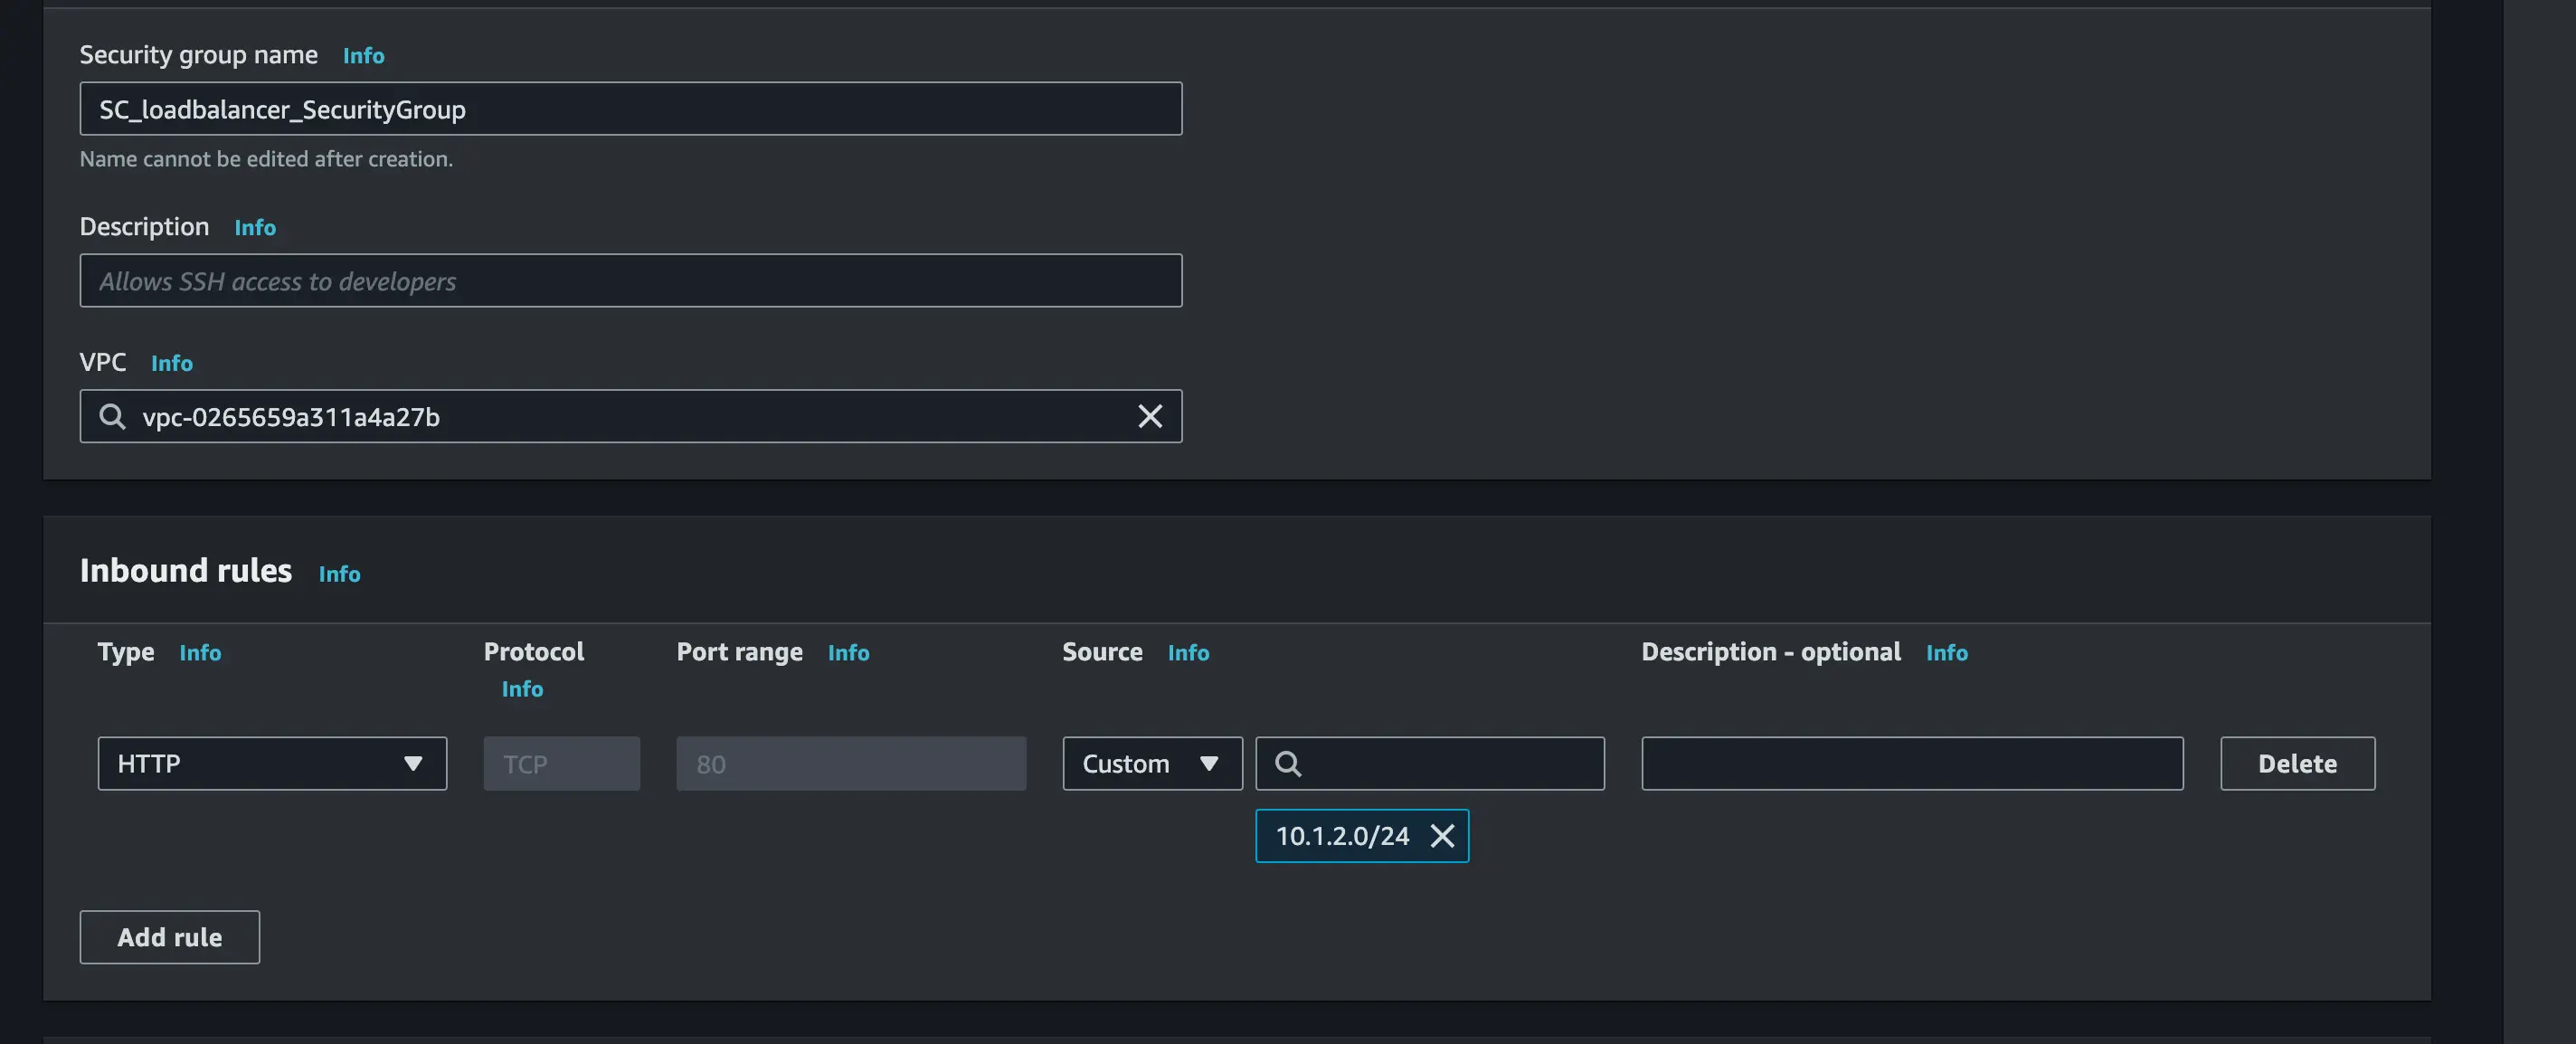
Navigate to EC2 and on the navigation pane, you will see Security Group» Create a Security Group.
For our load balancer and set the Inbound Rule to HTTP with the load balancer subnet IP as the source
Next, navigate to EC2 and on the navigation pane, you will see Target Group» Create a Target Group.
On the Basic configuration input your preferred Target Group name and register Target

After that, navigate to EC2 and on the navigation pane, you will see load balancer » Create a load balancer.
Create a new application load balancer
On the Basic configuration, set the scheme to Internal
in the Network mapping, select the VPC you created and set the load balancer and load balancer2 subnet to the multiple availability zones
in the Security group, choose the default
for Listeners and routing, Set the target group to be the target group you created

Step 6:
Create and Installing JupyterHub on the EC2:
There are various ways on installing JupyterHub on a subnet but for this article, we will use The Littlest JupyterHub.
Let’s proceed with the installation
On your AWS Console search for EC2 instance
Launch a new instance
Set your preferred name and tag
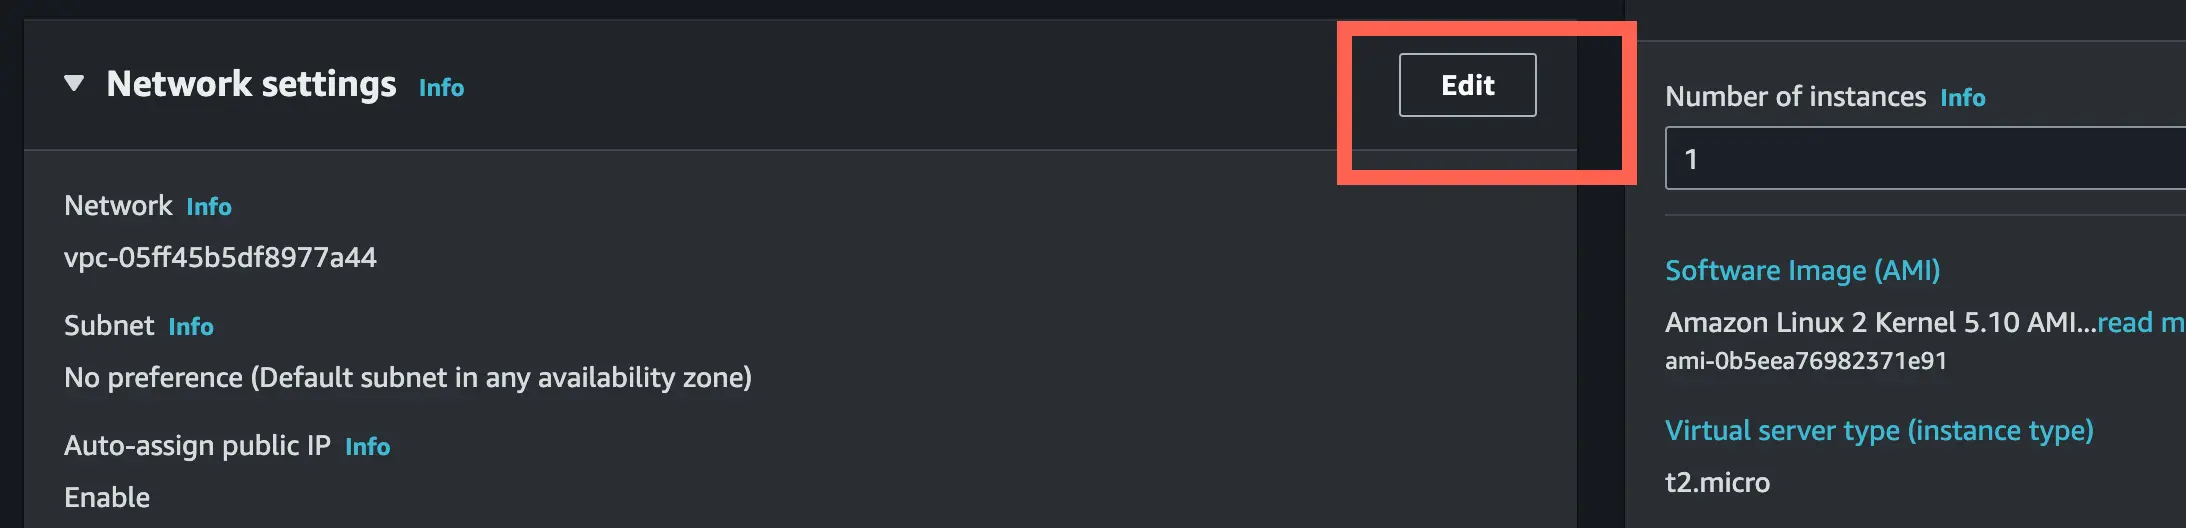
select Ubuntu 22.4 VM with t2.micro instance type
Create a new key pair or use an existing one
Edit the network setting to associate the instance to a subnet
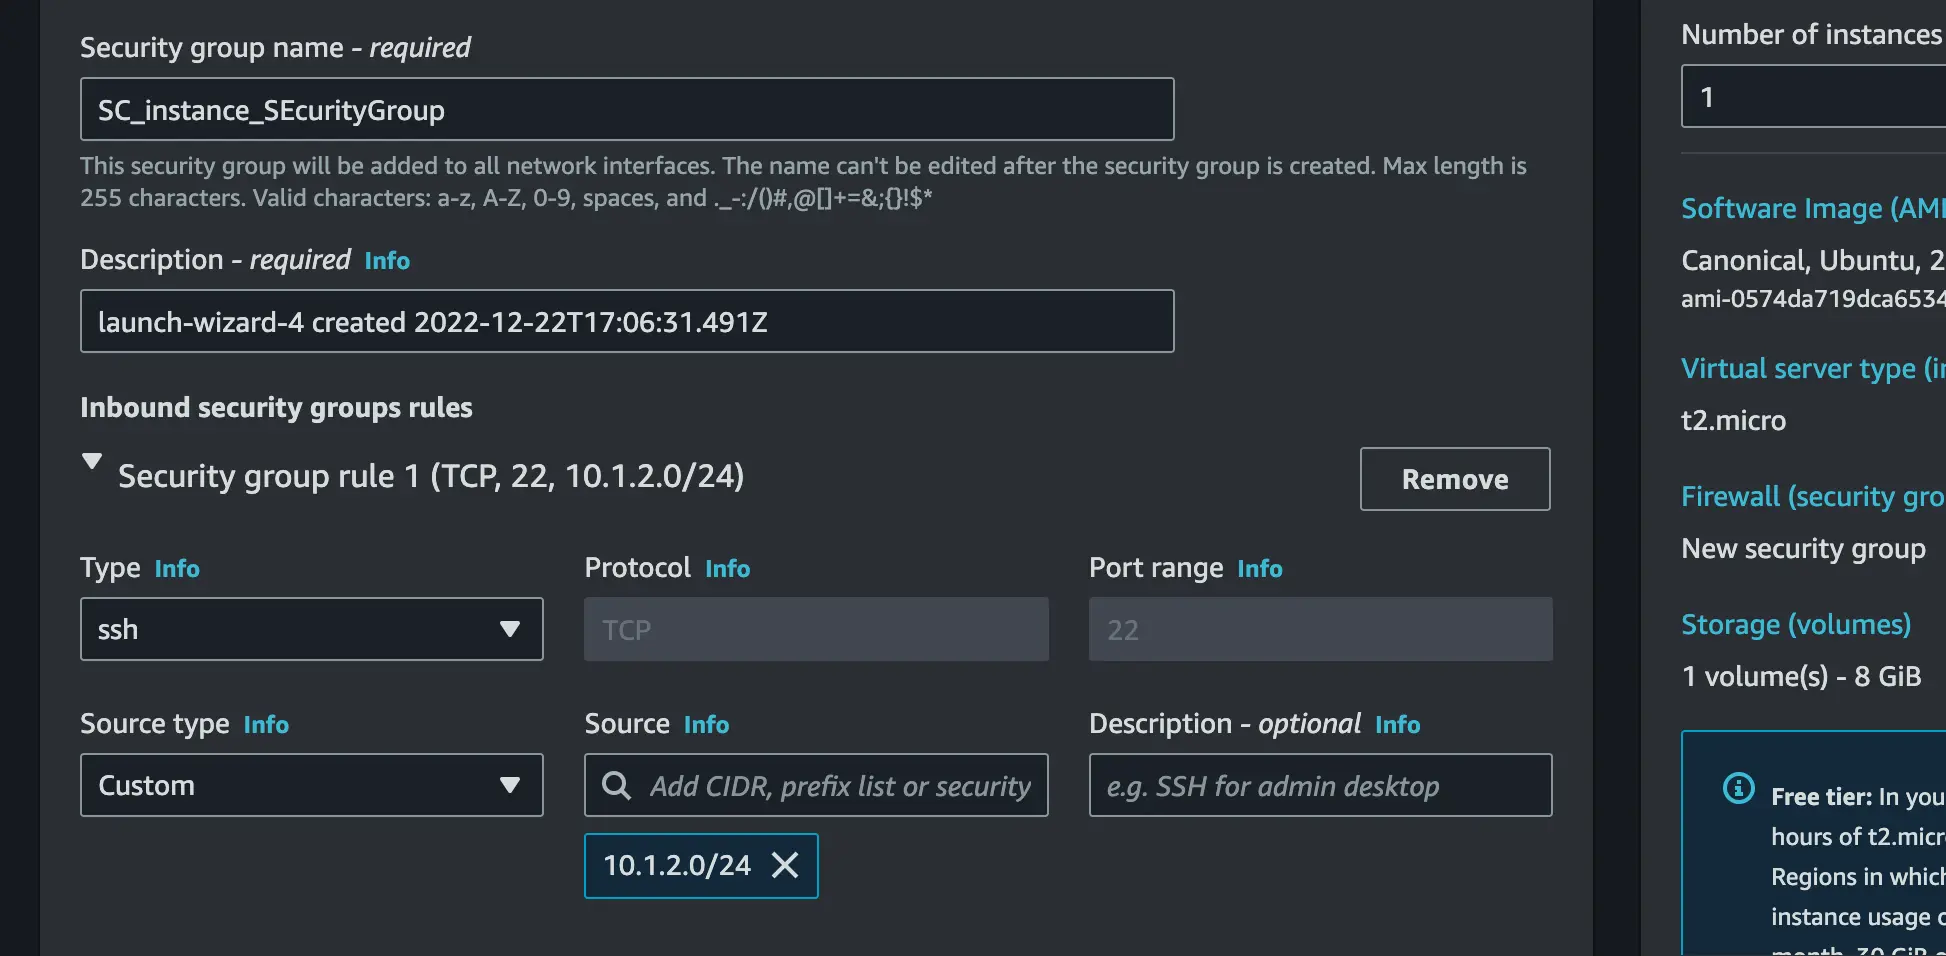
Create a new security group. In this section, we will create three security groups;
- Set the first security group type to SSH, set custom as source type and the source should be 10.0.8.0/24 which is the CIDR of your VPC
- Set the second security group type to Custom -ICMP IPV4 and set the source to 0.0.0.0/0 which means any computer to ping the server
- Set the last security type to HTTP and then set custom as source type and the source should be the security group of the load balancer (sg-xxxxxxx)
Associate the EC2 with the VPC
Toggle down the Advanced details paste the code below and done forget to replace
with yours
    #!/bin/bash
    curl -L https://tljh.jupyter.org/bootstrap.py \
      | sudo python3 - \
        --admin <username>
Hurraaayyyyyyyy!!!!!
In Conclusion, you can turn on your VPN and test the connection using your Load balancer DNS name

Summary of the Workflow
We create a VPN Endpoint which will be associated with the Subnet where the load balancer is placed.
A VPN Elastic network interface(ENI) is created in the subnet and this is what enables the VPN connection to communicate with resources in the subnet.
We then have the client computer that will be running some VPN software e.g openVPN, Aws Client VPN
The client software will establish a connection with the VPN endpoint over SSL/TLS(443) and that will be via the internet.
The VPN Endpoint will perform SNAT(Source Network Address Translation) from the CIDR Block Associated with the VPN client to the CIDR block that is associated with the internal load balancer subnet.
Now the user will be able to access the resources in the private subnet.
Saturn Cloud provides customizable, ready-to-use cloud environments
for collaborative data teams.
Try Saturn Cloud and join thousands of users moving to the cloud without having to switch tools.


