
This article was published when data science tooling like Dask and R was a primary focus for Saturn Cloud. Today, Saturn Cloud is the enterprise AI platform for any GPU infrastructure.
Photo credit: Uriel SC on Unsplash
Introduction
Kubeflow is an open-source platform designed to manage the lifecycle of machine learning (ML) models in a Kubernetes environment. Kubeflow enables the creation, deployment, and management of machine learning workloads in a scalable and efficient way.
Data science and machine learning (ML) are rapidly growing fields. In recent years, there has been a significant increase in companies that use machine learning to generate all sorts of intelligence. Whether companies are developing business analytics or computer vision applications, machine learning and its complexity make scaling these applications extremely cumbersome. Regarding general scaling, Kubernetes is a popular tool for container orchestration, as it allows for automatic container deployment, redundancy, scaling, load balancing, rolling updates, health monitoring, and more. With Kubernetes, machine learning engineers can use this tool to benefit their application uptime and deployment. However, Kubernetes just solves the deployment aspect. What about other steps, such as training and hyperparameter tuning?
In this article, we will guide you through creating custom pipelines using the Kubeflow Pipelines SDK and Jupyter Notebooks and show you how to deploy them to a Kubeflow cluster. By the end of the article, you should understand how to leverage Kubeflow’s powerful pipeline capabilities to build end-to-end machine learning workflows in a scalable and reproducible way.
What is Kubeflow?
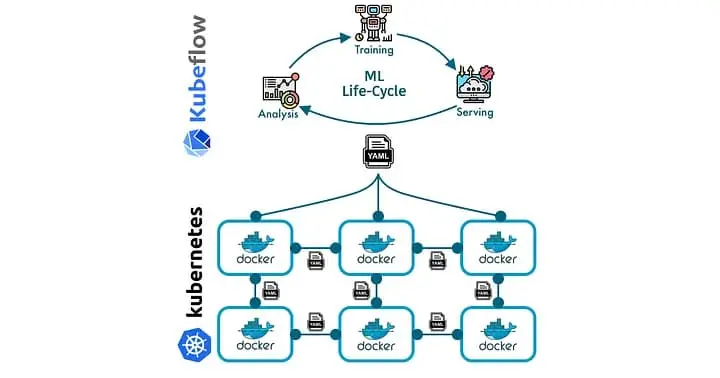
Kubernetes excels in container orchestration, but there’s a lack of capability for more ML-specific tools. As a solution, we have Kubeflow. Kubeflow is an open-source tool that extends Kubernetes to simplify the deployment and management of machine learning models. By providing an integrated platform for data engineers and scientists to easily create, update, deploy, and manage machine learning models, Kubeflow makes the Kubernetes integration more end-to-end for ML workflows. It provides significant advantages like scalability and portability, making collaboration among teams easier and fostering work reproducibility.

Kubeflow provides the following benefits:
Scalable: Kubeflow utilizes Kubernetes' resource management capabilities to achieve high scalability. Users can adjust resources for training and serving models using Kubernetes primitives, such as horizontal pod autoscaling. Using Kubernetes in the backend allows efficient distribution and management of workloads across single or multi-node setups, catering to changing processing power, memory, or storage resource requirements.
Reusability: Kubeflow supports reusability by encouraging containerization and modular design. Users can define machine learning components as Docker containers, allowing them to easily reuse code and models across projects. The standardized environment simplifies sharing and collaboration, reducing redundant work and enhancing overall productivity.
Portability: Kubeflow’s containerized approach and Kubernetes-based platform enhance portability. Models and pipelines developed in one environment can be seamlessly deployed to another, whether on-premise, cloud-based, or even hybrid ecosystems. This flexibility simplifies the migration process and minimizes operational disruptions.
Reproducibility: Kubeflow highlights reproducibility by utilizing standardized workflows and applying version control to components. Users can monitor code, data, and hyperparameters across the machine learning processes, ensuring clear traceability. Kubeflow ensures consistency and makes it easy to replicate results when revisiting experiments or sharing findings with others.
Kubeflow also supports, but is not limited to, integration with popular machine learning frameworks such as TensorFlow and PyTorch. This extensibility allows data scientists to work with their preferred tools and simplifies the adoption process for different organizations.
What Does Kubeflow Offer?
Kubeflow offers powerful tools and features that streamline machine learning projects' development, deployment, and management of machine learning projects. Its key offerings include:
Jupyter Notebooks: Kubeflow integrates with Jupyter Notebooks, providing an accessible interface for developing and collaborating with team members. Jupyter Notebook servers can also be set up to host different environments.
Kubeflow Pipelines: Kubeflow Pipelines streamline the development of end-to-end machine learning workflows. These pipelines comprise multiple components, each representing an individual step in a machine learning process, such as data preprocessing, model training, and model evaluation.
Katib: Katib is a Kubernetes-based framework for hyperparameter tuning in Kubeflow. It automates searching for the best hyperparameters, allowing users to optimize their machine learning model with minimal manual intervention.
Distributed training with TFJob and PyTorchJob: Kubeflow supports distributed TensorFlow and PyTorch training through custom Kubernetes resources called TFJob and PyTorchJob, respectively. These resources intelligently manage multiple worker nodes, ensuring the efficient training of models in parallel, leading to faster results and optimized resource utilization.
Model deployment with KFServing: KFServing is a component focused on serving machine learning models. It simplifies the rollout of new model versions and manages the complexity of scaling, monitoring, and securing model deployments.
Metadata management: Kubeflow’s Metadata component stores and organizes metadata generated during machine learning workflows. Kubeflow includes information about models, datasets, and training jobs. By tracking and managing this data, Kubeflow enables reproducibility, traceability, and easy model versioning.
Furthermore, Kubernetes' wide adoption and active development community mean that Kubeflow can take advantage of new container orchestration and management updates, giving it a significant edge over other MLOps tools that lack this integration.
How to Setup Kubeflow on AWS
In this demo, we’ll focus on how to set up a basic Kubeflow workflow on AWS. In addition, there will be more resources throughout this blog and at the bottom of the blog post to show you other services you can attach to your Kubeflow deployment. Once Kubeflow is set up, we’ll review some examples highlighting the basics of Kubeflow, as mentioned above.
There are three fundamental steps to setting up Kubeflow on AWS. The first step is setting up an EC2 instance or a Docker image with all the necessary CLI tools for Kubeflow and Kubernetes. Then, we’ll set up an AWS Elastic Kubernetes Service (EKS) cluster setup. An EKS cluster is a group of EC2 instances used to run containerized applications on Kubernetes. In an EKS cluster, Amazon manages the Kubernetes control plane, which includes the API server, etcd, and the scheduler. Automatic resource management means that users can focus on deploying their applications on the cluster without worrying about the underlying infrastructure.
More deployment options are available if you want to add additional services to your deployment. If you wish to deploy Kubeflow with minimal changes, consider the Vanilla installation (we’re also using this for our demo). If you decide to change deployment options later, we recommend that you do a fresh installation for the new deployment.
The following deployment options are available:
Prerequisites
Before we get started, ensure you have the following:
We’ll be using Python3 for this demo.
Your AWS IAM access keys (used for the AWS CLI) are readily available. Here’s a guide on how to get your keys for the AWS CLI.
- You don’t need to configure your local machine with the AWS CLI. Simply go through the process to obtain your
aws_access_key_idandaws_secret_access_keyfor use later.
- You don’t need to configure your local machine with the AWS CLI. Simply go through the process to obtain your
Creating and Preparing the EC2 Instance
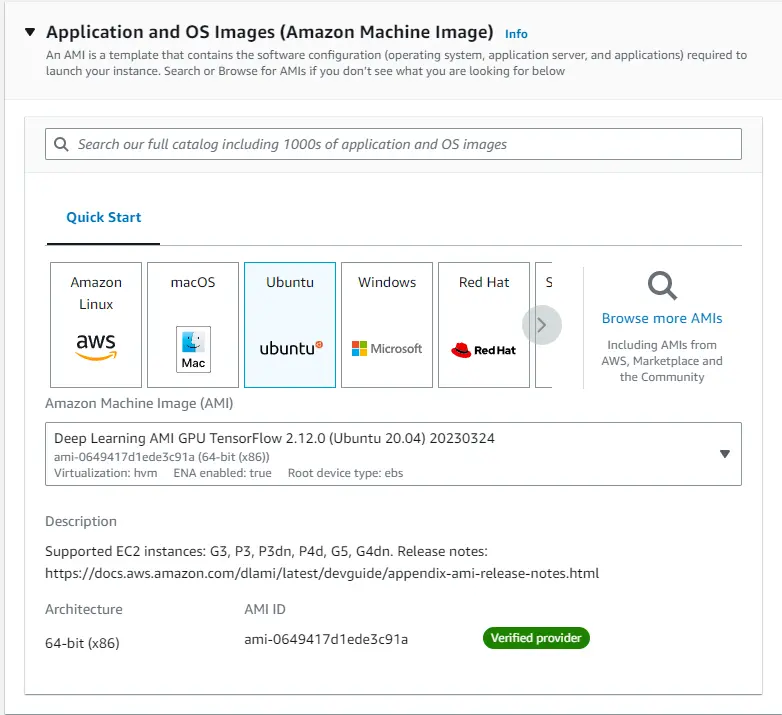
Following the Vanilla installation, the first step of setting up Kubeflow is to open an EC2 instance. You can also set up this installation through a local Docker image. To set things up via a local Docker image, follow the installation commands below in “Install Kubeflow Tools.” We’ll open an EC2 instance with Amazon’s recommended Deep Learning AMI. To open an EC2 instance, navigate to the AWS console, search for EC2, and go to the EC2 dashboard. Then, click launch instance and select the following options:
Install Kubeflow Tools
Once you’ve created your EC2 instance, ssh into the instance and run the following commands:
# install prerequisite packages
apt update && apt install -y git curl unzip tar make sudo vim wget


# Clone Kubeflow
export KUBEFLOW_RELEASE_VERSION=v1.6.1
export AWS_RELEASE_VERSION=v1.6.1-aws-b1.0.2
git clone https://github.com/awslabs/kubeflow-manifests.git && cd kubeflow-manifests
git checkout ${AWS_RELEASE_VERSION}
git clone --branch ${KUBEFLOW_RELEASE_VERSION} https://github.com/kubeflow/manifests.git upstream
At the current time of writing, Kubeflow’s documentation is based on Ubuntu 18.04. If you are using Ubuntu 20.04 or above, such as the AMI chosen in the screenshot above on EC2, be sure to unpin the jq package inside kubeflow-manifests/Makefile to prevent any installation errors. The modified Makefile should look similar to the snippet below.
...
install-yq:
	...


install-jq:
        # $(eval JQ_VERSION:=1.5+dfsg-2)
        # sudo apt-get install jq=$(JQ_VERSION) -y
        sudo apt-get install -y jq


install-terraform:
        ...
Once that’s changed, use the Makefile to install all necessary dependencies.
# Start the automatic installation process
make install-tools
If needed, add the following lines to your ~/.bashrc:
# If you have other versions of python installed
# then make sure the default is set to python3.8.
alias python=python3.8


# If you’re getting warnings about /home/ubuntu/.local/bin
# not in your $PATH
export PATH=/home/ubuntu/.local/bin:$PATH
At the current time of writing, Kubeflow’s latest version is v1.6.1. Feel free to change the version if a newer version releases, although your mileage may vary. The installation should take several minutes as it installs the following:
AWS CLI - Command line tool for interacting with AWS services.
eksctl - Command line tool for working with EKS clusters.
kubectl - Command line tool for working with Kubernetes clusters.
yq - Command line tool for YAML processing.
jq - Command line tool for processing JSON.
kustomize - Command line tool to customize Kubernetes objects through a kustomization file.
python 3.8+ - Our desired programming language.
terraform - An infrastructure-as-code tool that lets you develop cloud and on-prem resources.
helm - A package manager for Kubernetes
Configure the AWS CLI in EC2
Once you have the EC2 instance set up, it’s time to configure the AWS CLI in your instance. To do this, reference your access keys from the prerequisites above and type in the command aws configure --profile=kubeflow. Be sure to fill out the remaining fields in your terminal as the prompts pop up. Once your AWS CLI is configured, export the default AWS_PROFILE and run the command listed in the code snippet below to check if the AWS CLI has been configured correctly. If successful, the command should return a JSON listing your user ID and ARN.
# Configure AWS CLI
$ aws configure --profile=kubeflow


AWS Access Key ID [None]: <enter your access key id>
AWS Secret Access Key [None]: <enter your secret access key>
Default region name [None]: <AWS region>
Default output format [None]: json


# Set the AWS_PROFILE variable with the profile above
# This can also be set to persist by adding to ~/.bashrc
$ export AWS_PROFILE=kubeflow


# Run this to check if AWS CLI was configured correctly
$ aws sts get-caller-identity


{
    "UserId": "<redacted>",
    "Account": "<redacted>",
    "Arn": "arn:aws:iam::<redacted>:user/<redacted>"
}
Creating the AWS EKS Cluster
⚠️Important: If using an EKS version
>=1.23, install the Amazon EBS CSI driver by following the instructions here. As of1.23, Kubernetes encourages using external storage plugins that can be updated and maintained independently from the Kubernetes codebase.
Once your EC2 instance is initialized, we can create the EKS cluster. Simply execute the following commands in your EC2 instance terminal:
export CLUSTER_NAME=kubeflow-demo
export CLUSTER_REGION=us-east-1
eksctl create cluster \
    --name ${CLUSTER_NAME} \
    --version 1.22 \
    --region ${CLUSTER_REGION} \
    --nodegroup-name demo-nodes \
    --node-type m5.xlarge \
    --nodes 5 \
    --nodes-min 5 \
    --nodes-max 10 \
    --managed \
    --with-oidc
Note that for our demo, we’ll be using EKS version 1.22. Feel free to change all other flags to modify your minimum and maximum nodes and their names, but leave --version, --managed, and --with-oidc in the command. The command above should take around 20-30 minutes to complete and look like the screenshot below as the command continues to create AWS Cloudformation stacks to deploy your cluster.

During this time, the command will create the following:
- An Amazon EKS cluster with the specified name, region, and Kubernetes version.
- A managed node group with the specified name, EC2 instance type, number of nodes, and minimum and maximum scaling limits.
- VPC (Virtual Private Cloud) for your cluster and configure it with the necessary subnets, route tables, and security groups. The command will also create an IAM (Identity and Access Management) role for the EKS control plane to access your AWS resources.
💡Note: If you ever want to delete the EKS cluster for any reason:
eksctl delete cluster --region <your_aws_region> --name <your_eks_cluster_name>
Installing Kubeflow & Connecting to the Dashboard
Now that we have our EC2 instance and EKS cluster setup, we can deploy Kubeflow to the EKS cluster. Deploying can be done with a simple command using either kustomize or helm:
- Using
kustomize:
make deploy-kubeflow INSTALLATION_OPTION=kustomize DEPLOYMENT_OPTION=vanilla
- Using
helm:
make deploy-kubeflow INSTALLATION_OPTION=helm DEPLOYMENT_OPTION=vanilla
Next, you should be able to verify that all your services are running:
kubectl get pods -n cert-manager
kubectl get pods -n istio-system
kubectl get pods -n auth
kubectl get pods -n knative-eventing
kubectl get pods -n knative-serving
kubectl get pods -n kubeflow
kubectl get pods -n kubeflow-user-example-com
If all these commands have successfully returned a list of processes running, Kubeflow should be up and running!
To connect to the Dashboard to start using Kubeflow, simply ssh into your instance once more and port-forward the localhost dashboard to your machine:
ssh -i /path/to/identity_key.pem -L <desired_local_port>:127.0.0.1:8080 ubuntu@<EC2_PUBLIC_IPV4_ADDRESS>
Once you have successfully ssh‘d into your instance, cd into kubeflow-manifests and run:
- For EC2 instances:
make port-forward.
- For those using a local Docker container, make sure you enabled a forwarded port through the
-pflag in[docker](https://saturncloud.io/glossary/docker) runand use:make port-forward IP_ADDRESS=0.0.0.0instead.
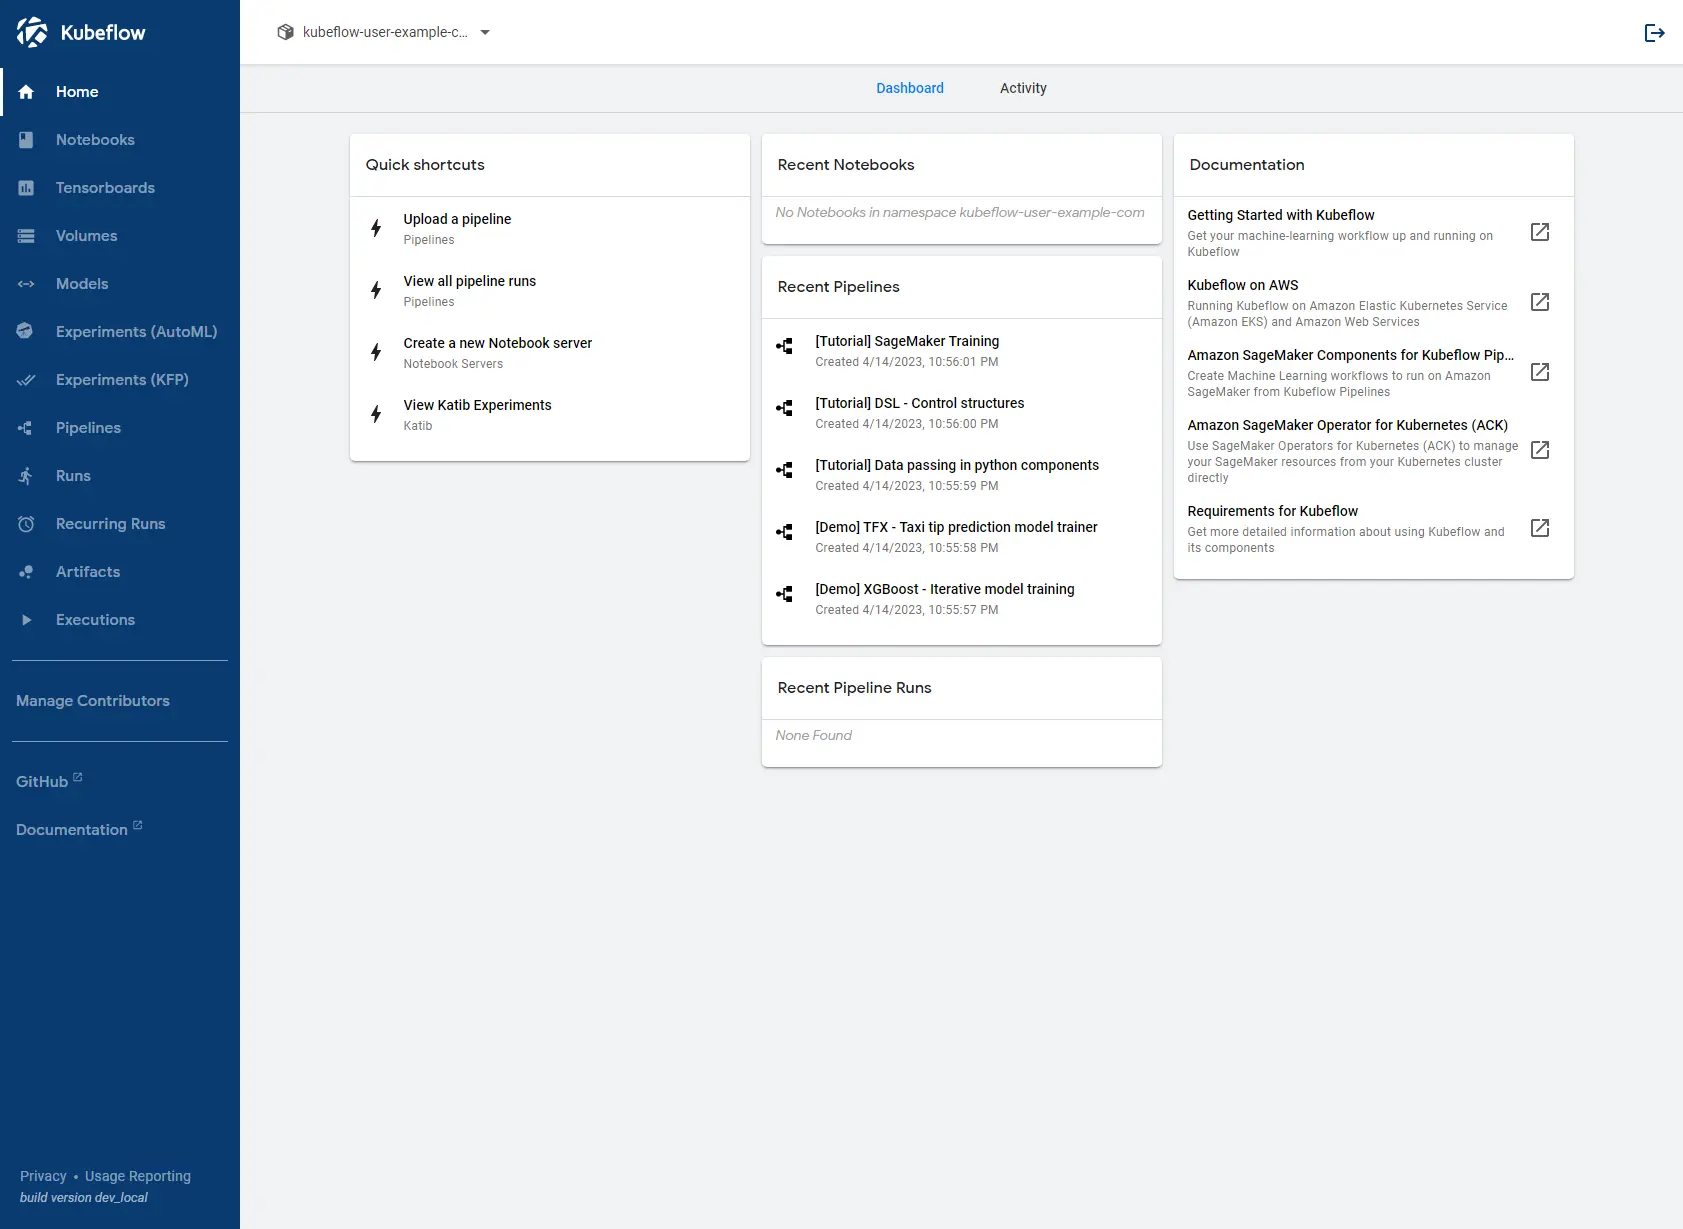
You should now be able to access the Kubeflow dashboard through 127.0.0.1:<your_desired_port> on your local browser. As default, the login is:
Username: user@example.com
Password: 12341234
If you wish to change the username and password, click here to learn how.
Additional Resources
If you are interested in learning more about building custom machine learning pipelines in Kubeflow using Jupyter Notebooks, check out our upcoming article on the topic. Stay tuned, and happy learning!


