
This article was published when data science tooling like Dask and R was a primary focus for Saturn Cloud. Today, Saturn Cloud is the enterprise AI platform for any GPU infrastructure.
Introduction
As an ML engineer or Data Scientist, you should be familiar with JupyterHub.
In as much as many organizations or Data Science teams prefer to host their JupyterHub production environment on their on-premise or cloud server, there is also a chance of it being comprised when authentication is one set of user credentials(User name and password). SSO(Single sign-on) plays a significant role in helping the team increase the security layer for their code and data.
In this article, we will learn how to set up JupyterHub on AKS (Azure Kubernetes Services) and use Azure AD to authenticate our JupyterHub.
Before we move into the practical part, let’s understand what SSO and Azure AD are.
Saturn Cloud provides customizable, ready-to-use cloud environments
for collaborative data teams.
Try Saturn Cloud and join thousands of users moving to the cloud without having to switch tools.
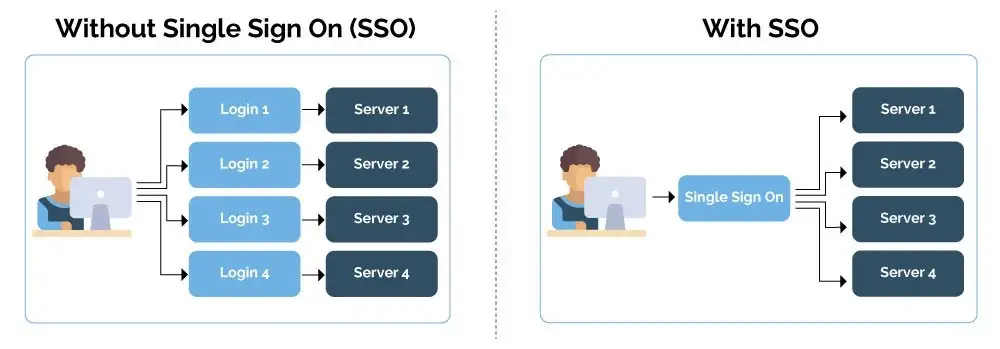
What is SSO (Single Sign-on)
Single sign-on (SSO) is a system that enables users to securely authenticate with multiple applications and websites using just one set of credentials.
It is considered to be a standard enterprise feature for any software used in modern corporate environments.
In a nutshell, SSO builds a trust relationship that is often based upon a certificate that is exchanged between the identity provider and the service provider. some examples include; Azure AD, Google Sign on, Github Sign on, etc
With SSO, you can employ passwordless sign-in for your users, Simplifies username and password management, improve security, and optimize your system.
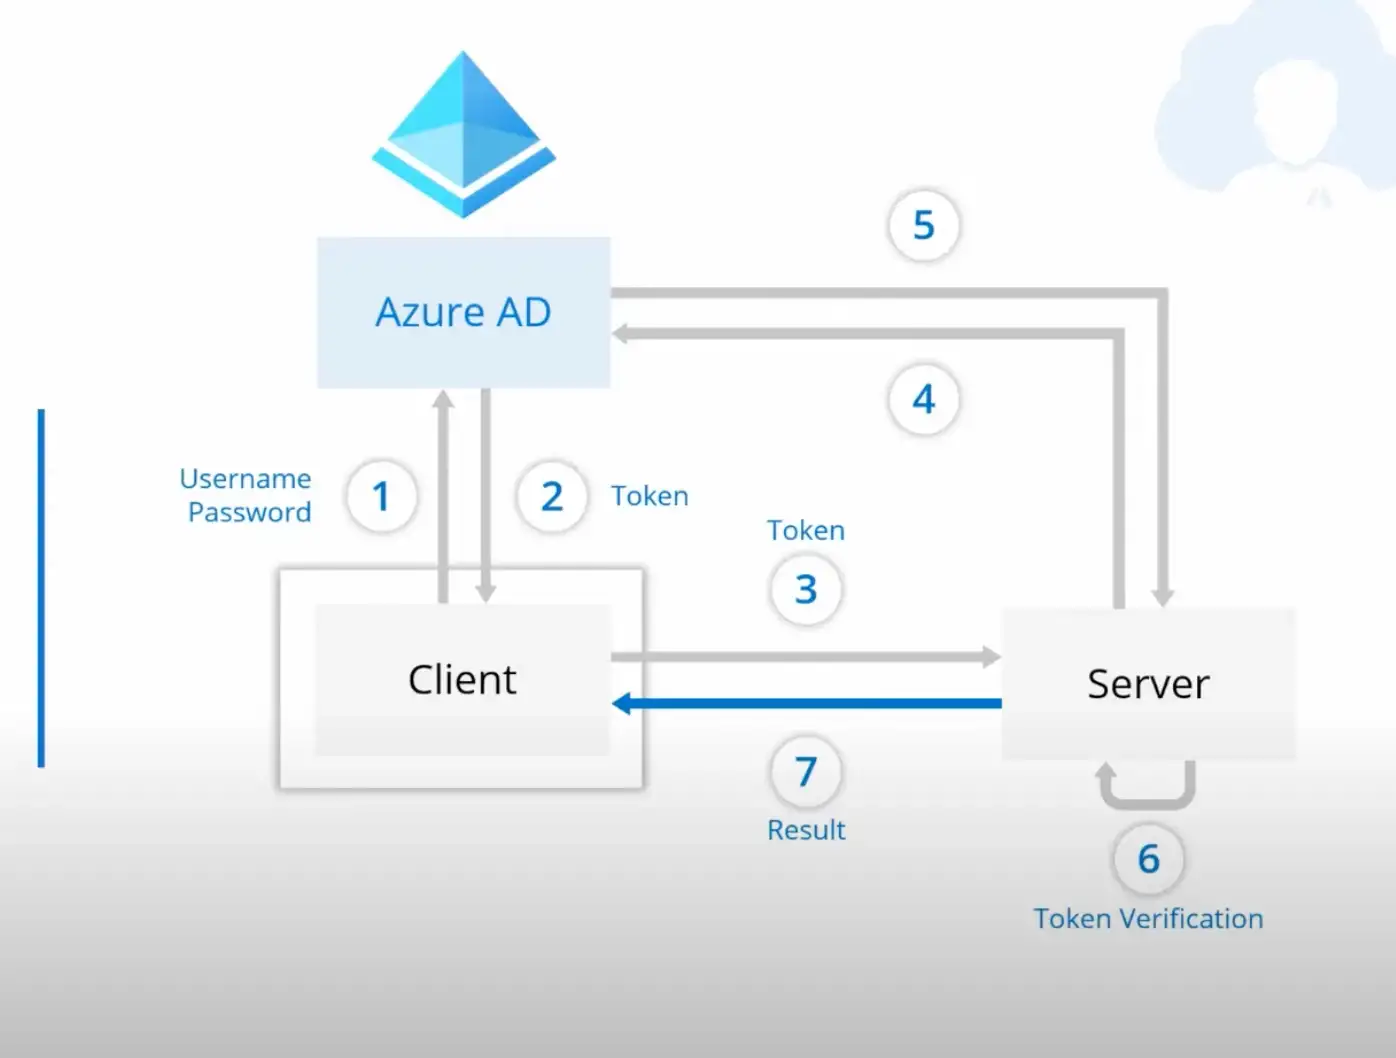
What is Azure AD
Azure AD is an SSO (Built by Microsoft) that allows you securely provide authentication for your application.
Azure Active Directory (Azure AD) is Microsoft’s enterprise cloud-based identity and access management (IAM) solution. Azure AD is the backbone of the Office 365 system, and it can sync with on-premise Active Directory and provide authentication to other cloud-based systems via OAuth.
In a nutshell, when you use Azure AD, it generates tokens from the user connection and builds a trust relationship between the server token and the client token
How to setup Azure AD for JupyterHub
Before we begin with setting up the authentication, we need to first setup Azure AD and get out credentials for the authentication process or system
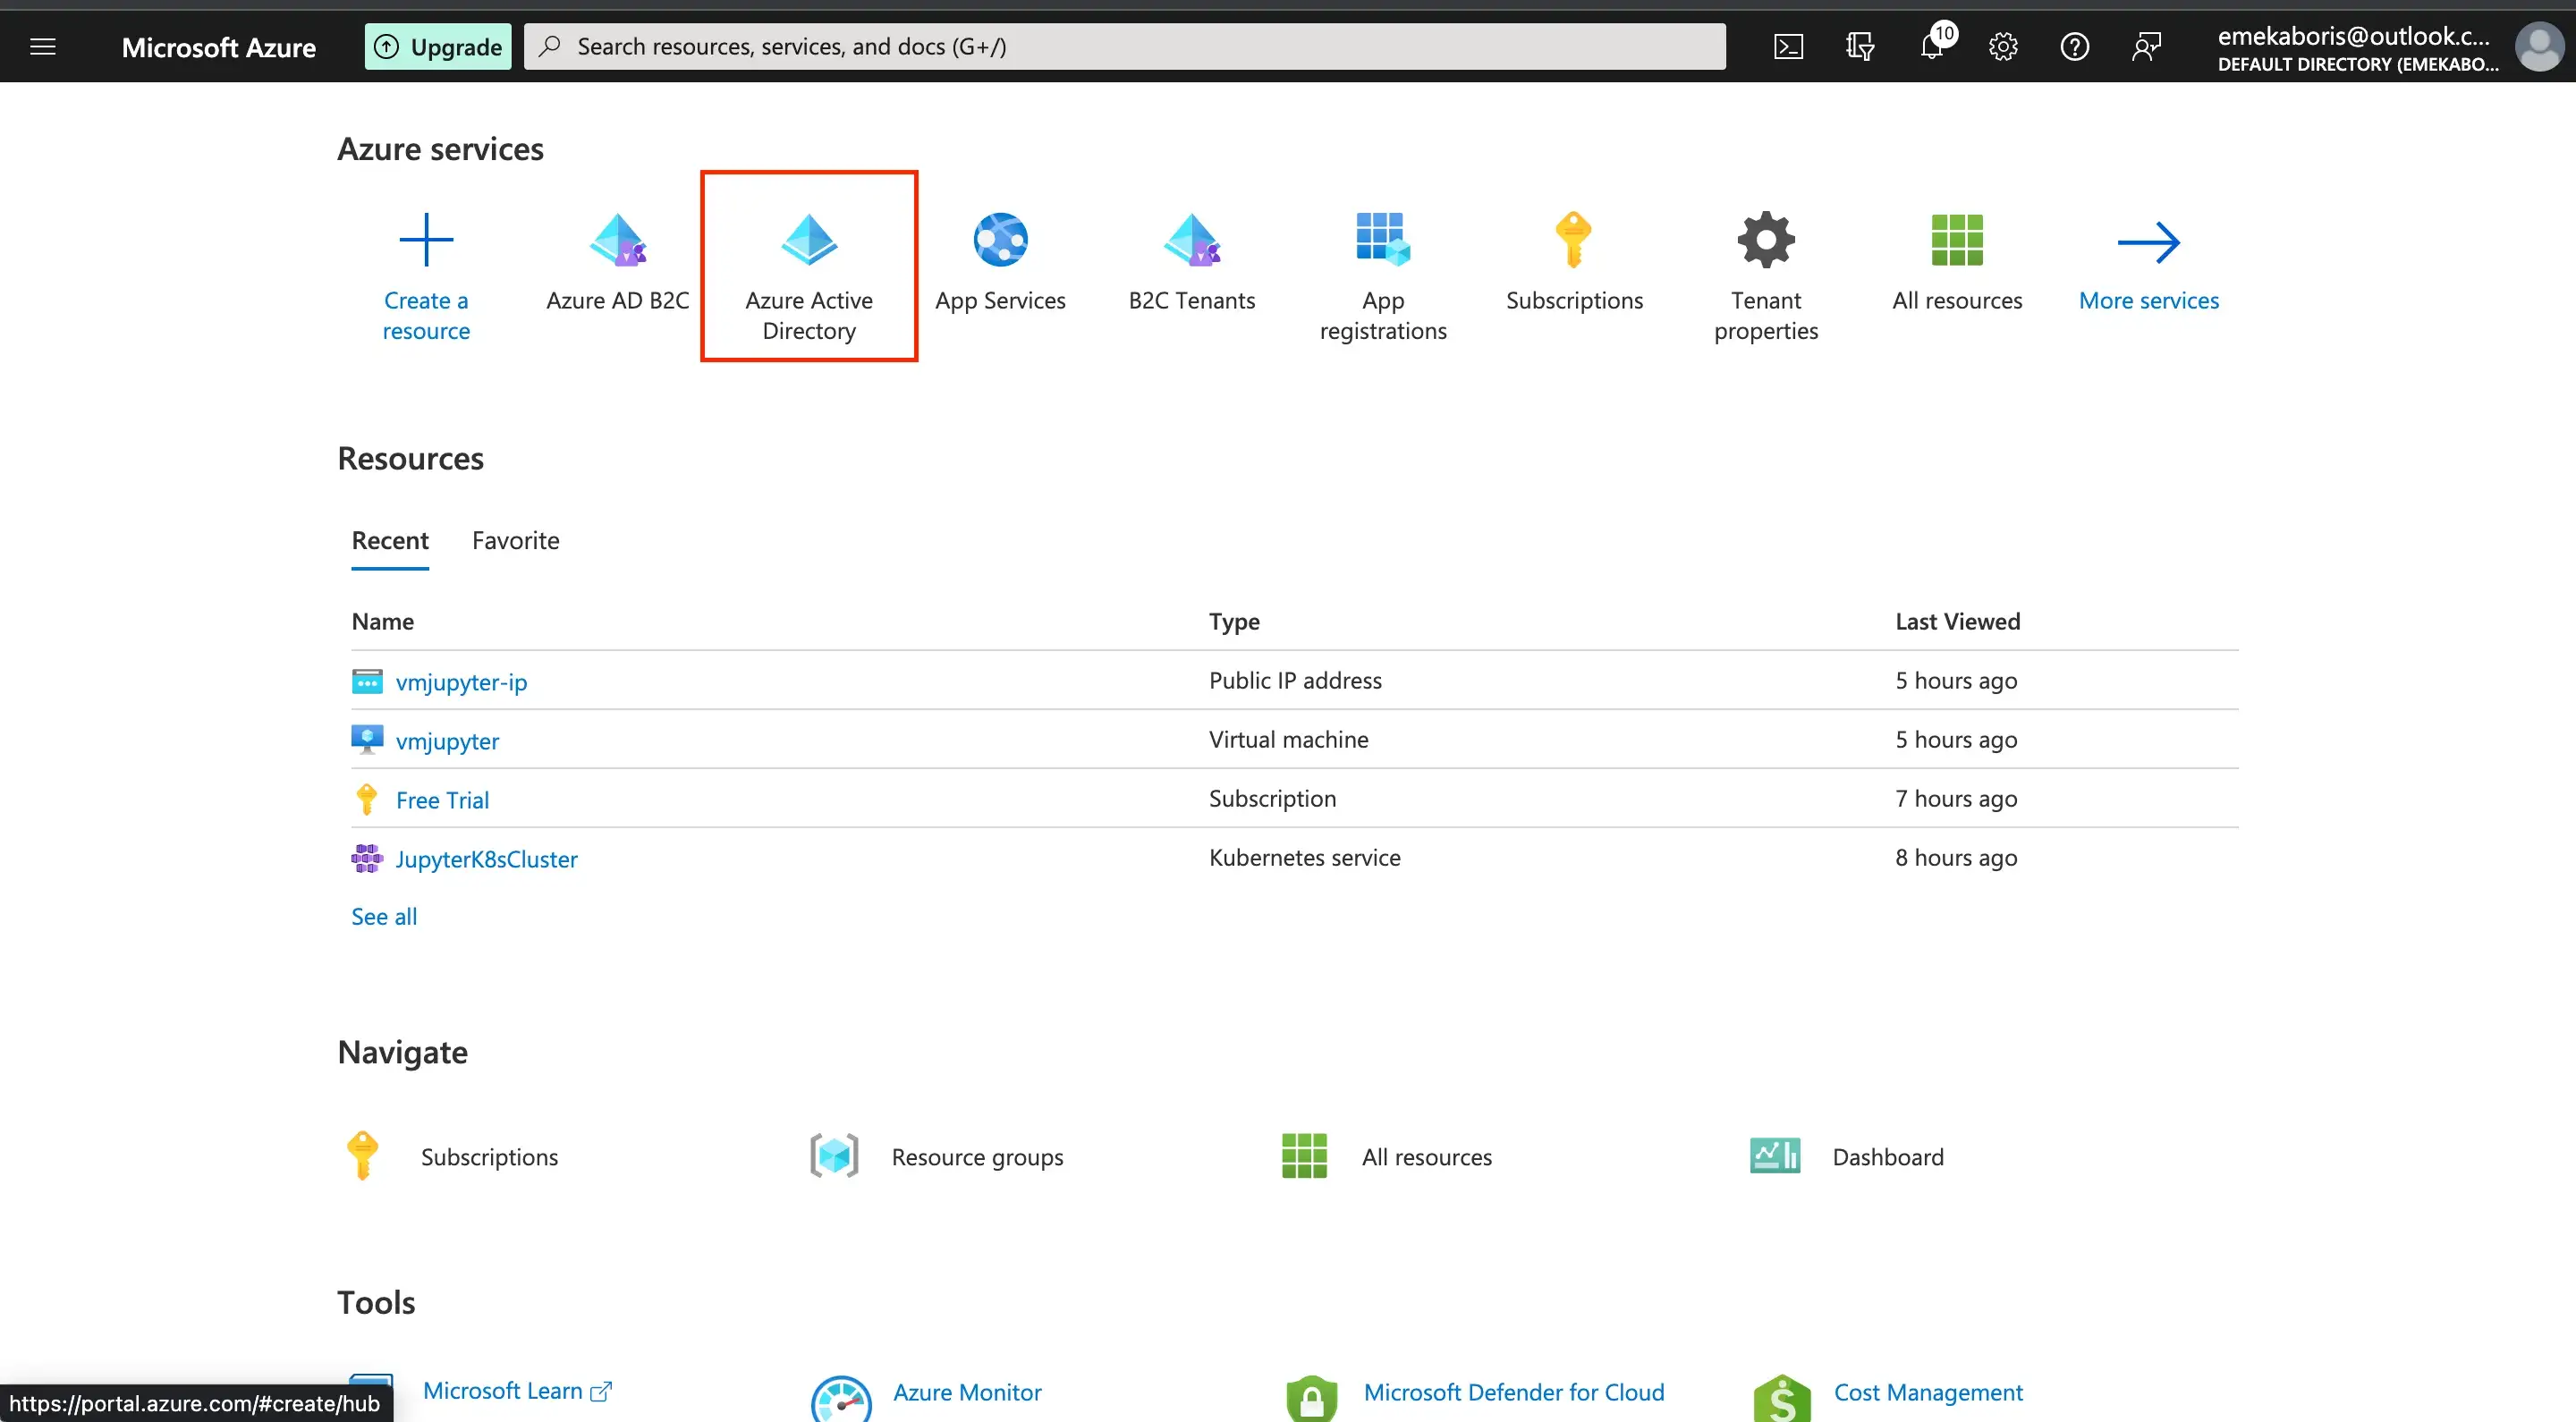
Steps:
Navigate to Azure portal and search for Azure AD Directory
Click on New registration, fill in your preferred name for your Azure AD and pick the supported account type
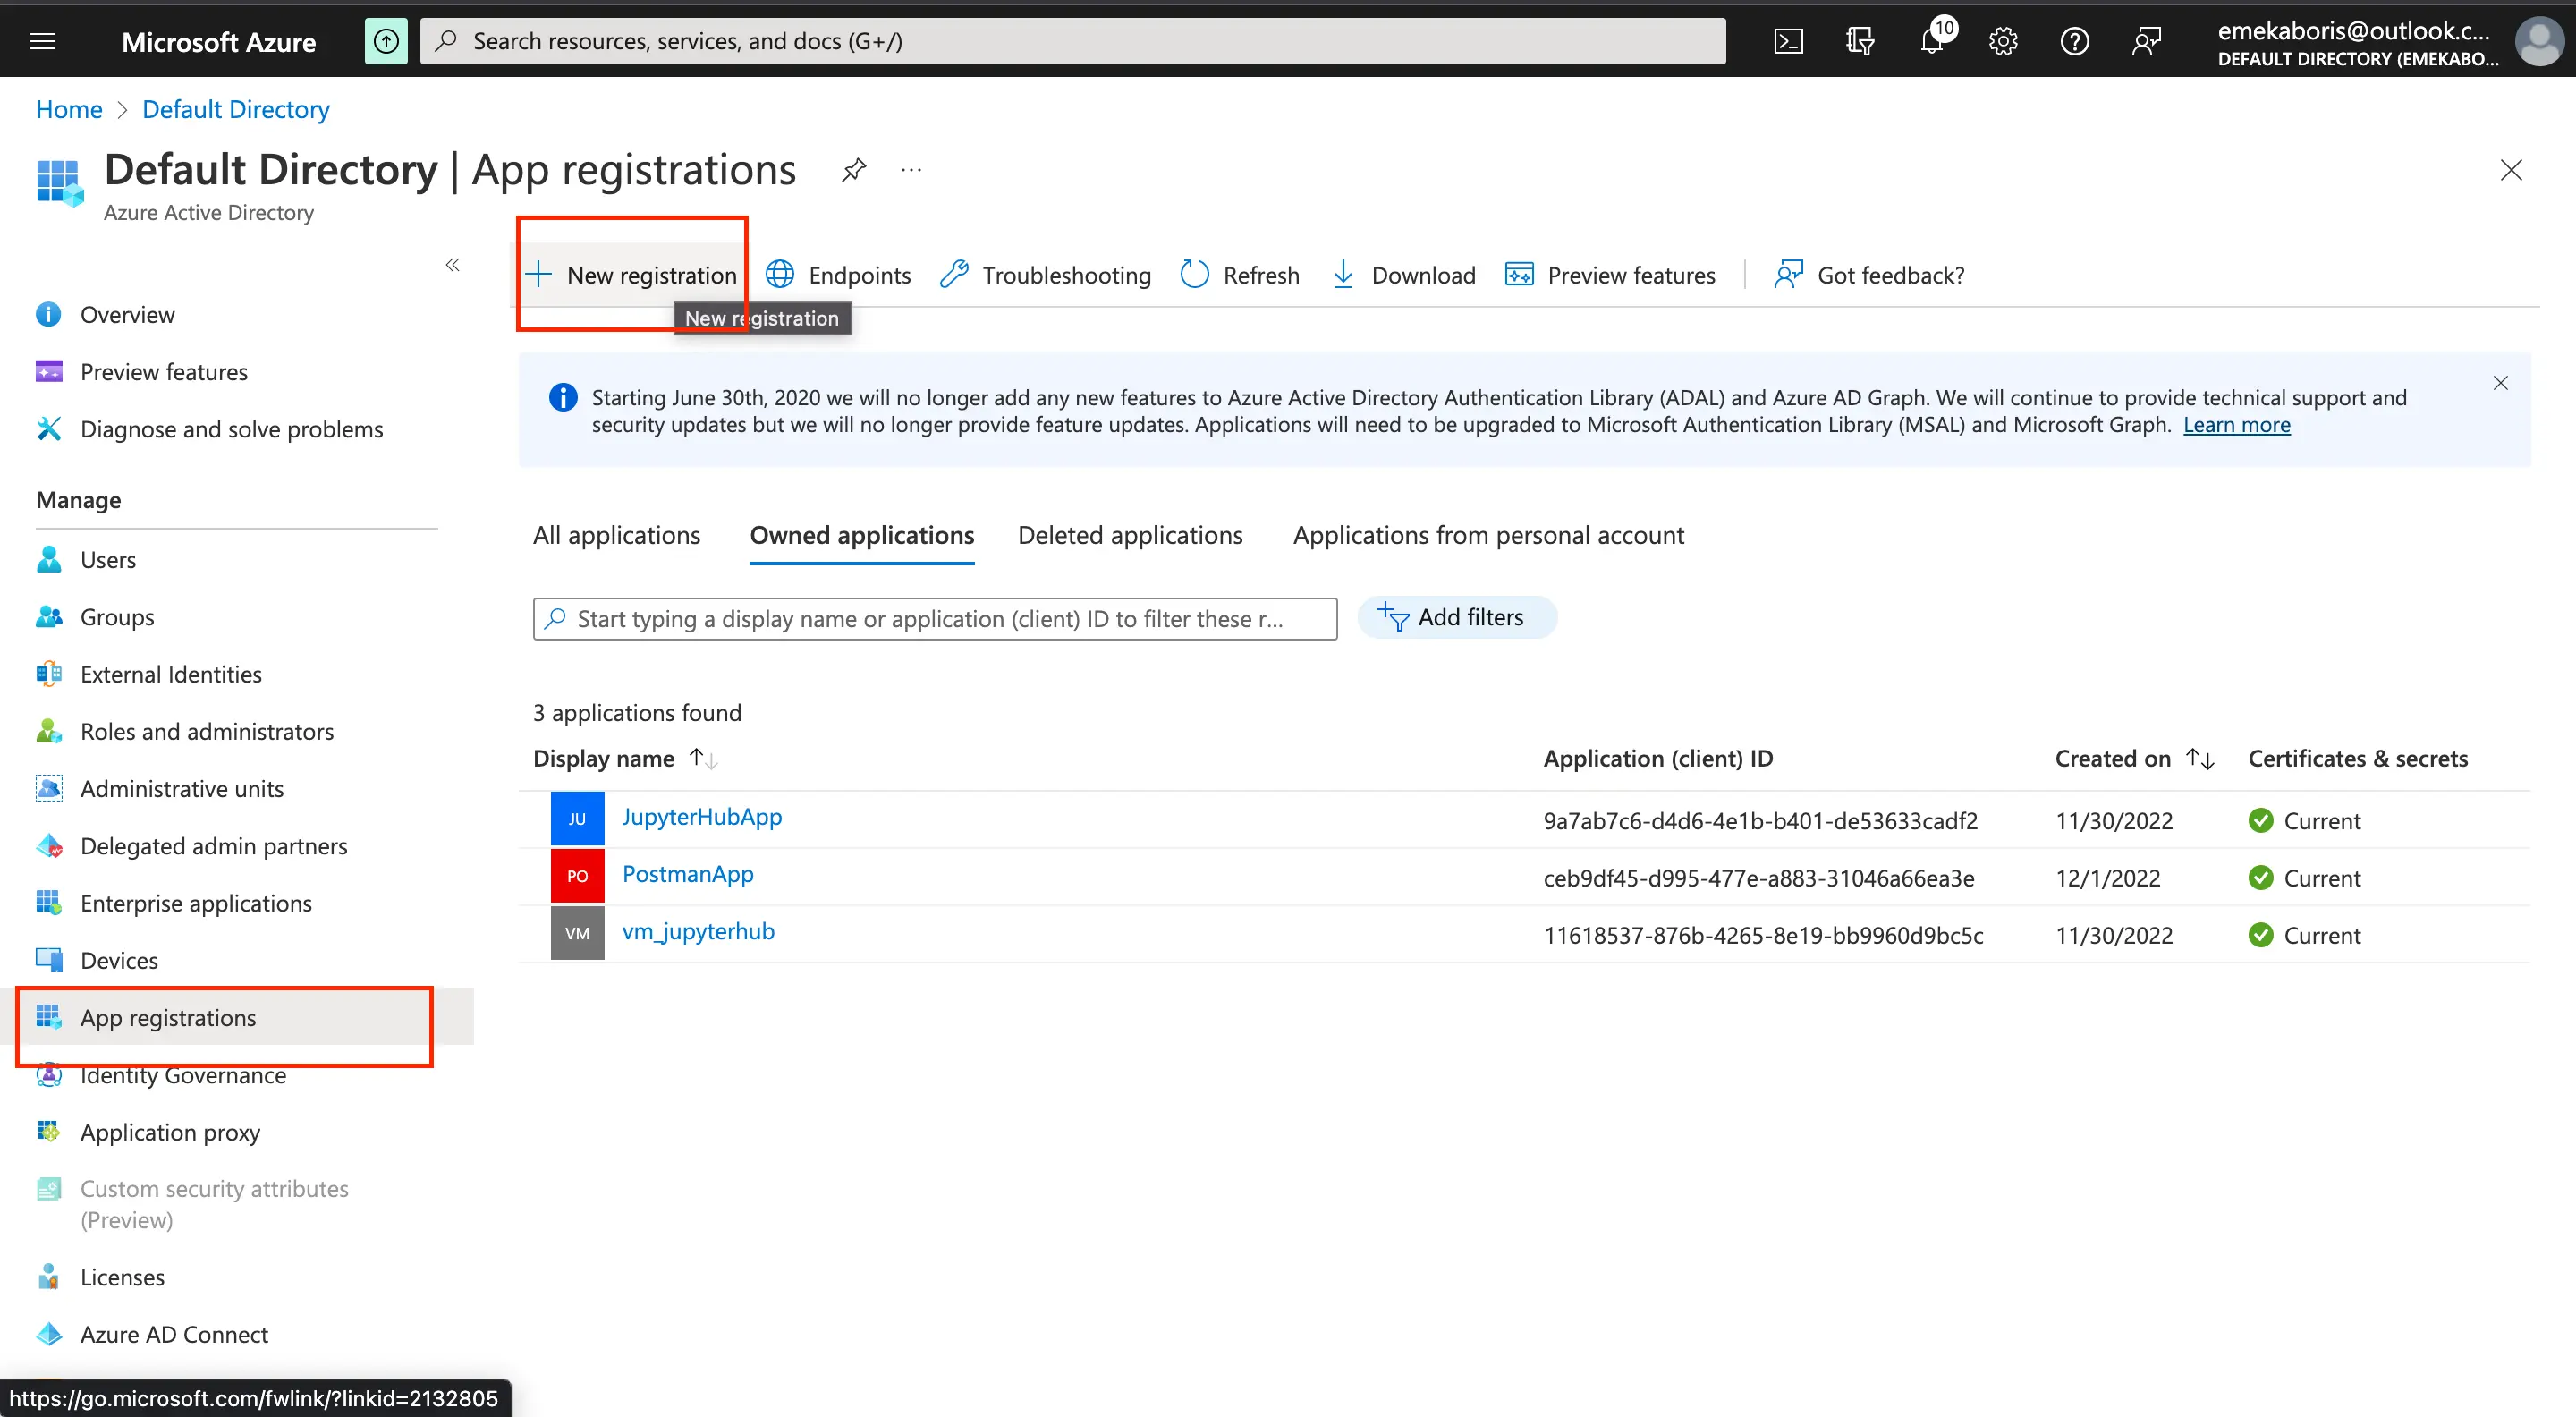
Name: The preferred name for your Azure AD application
Supported Account type: Specify your sign-in audience. What kind of user can access your application e.g Only an account within your Directory can sign in, a personal account, Azure School and Work account can sign in, etc.
Let’s get our credentials from our registered app
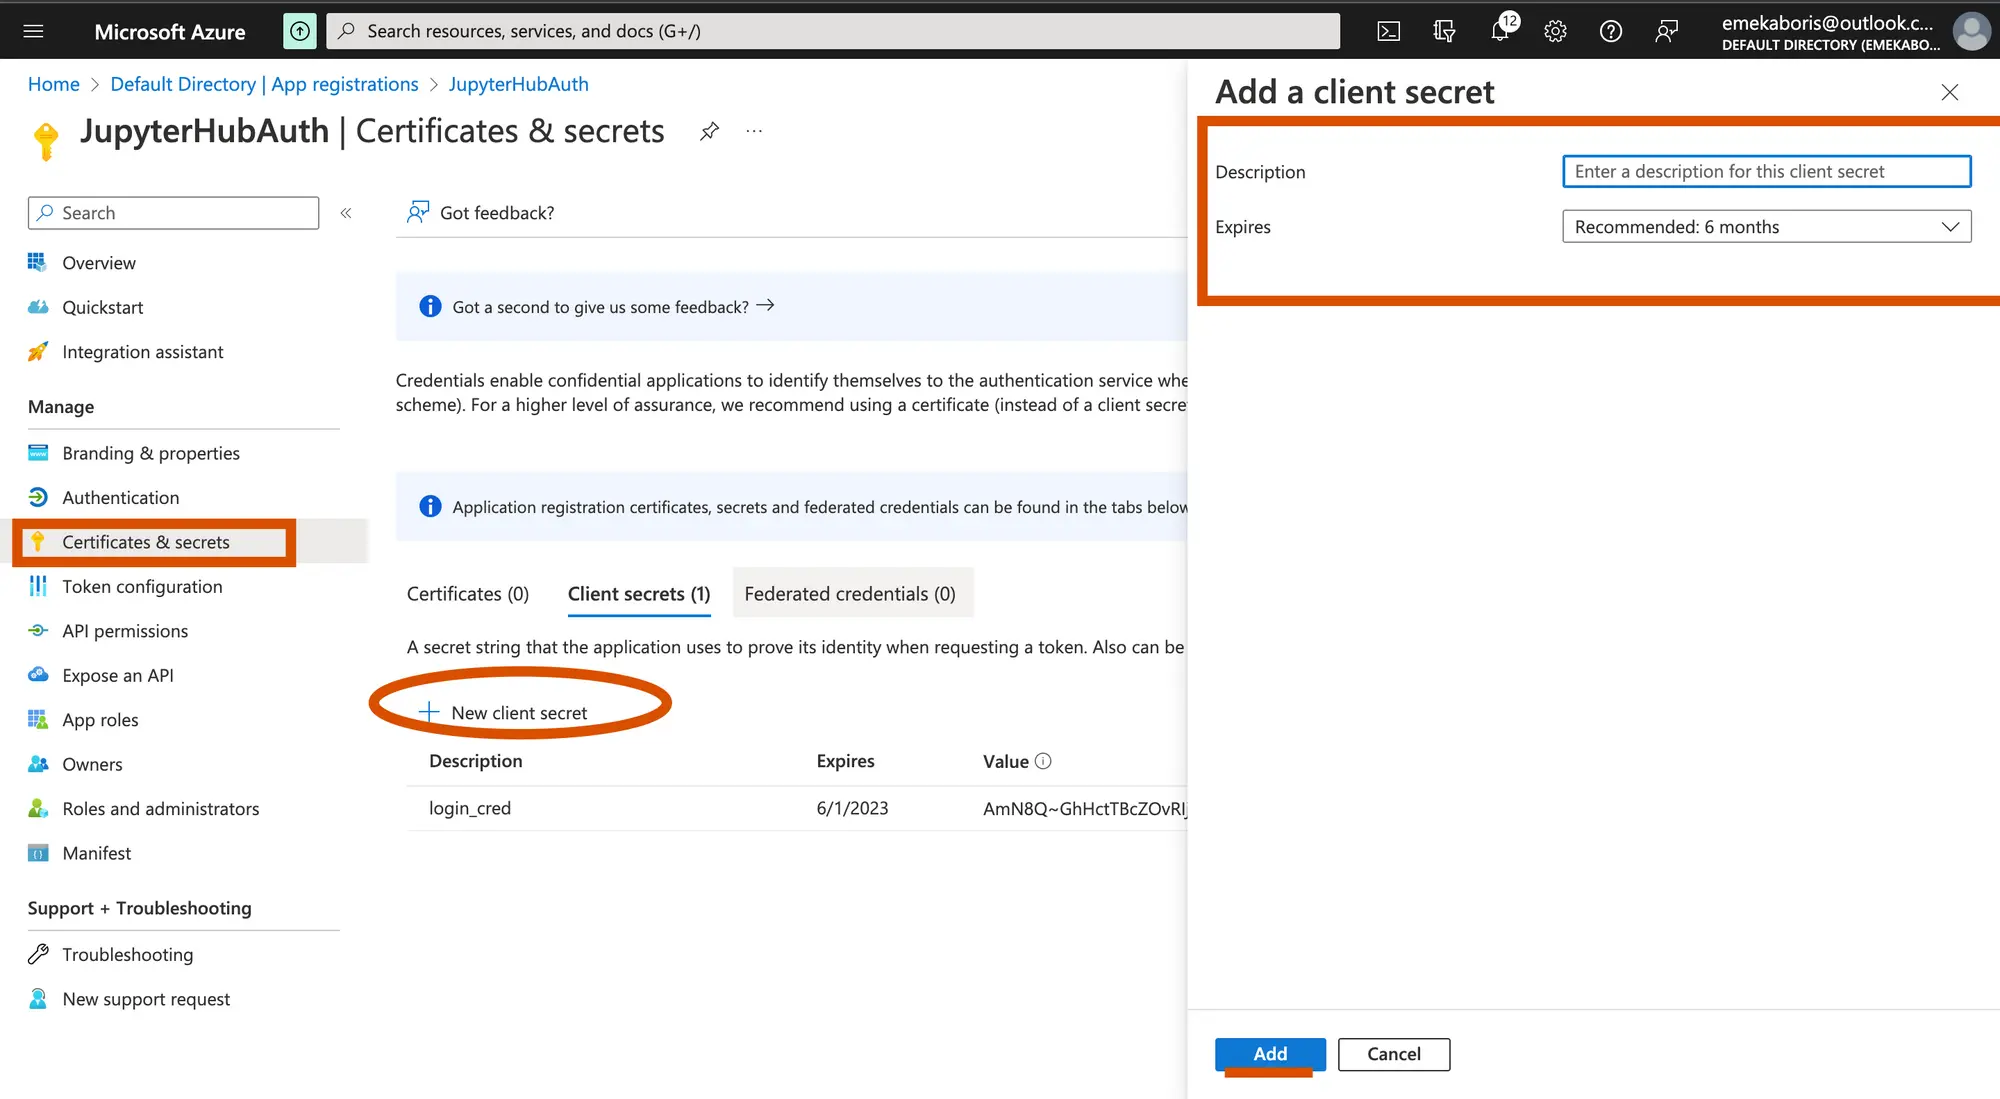
- Description: Name of your client’s secret
- Expires: Timeline or Duration of the secret key
After getting our credentials, you should store them in a notepad because you will need the keys to configure your JupyterHub.
Let’s create a scope and add an authorize the scope with our client ID
By registering your web API and exposing it through scopes, you can provide permissions-based access to its resources to authorized users and client apps that access your API.
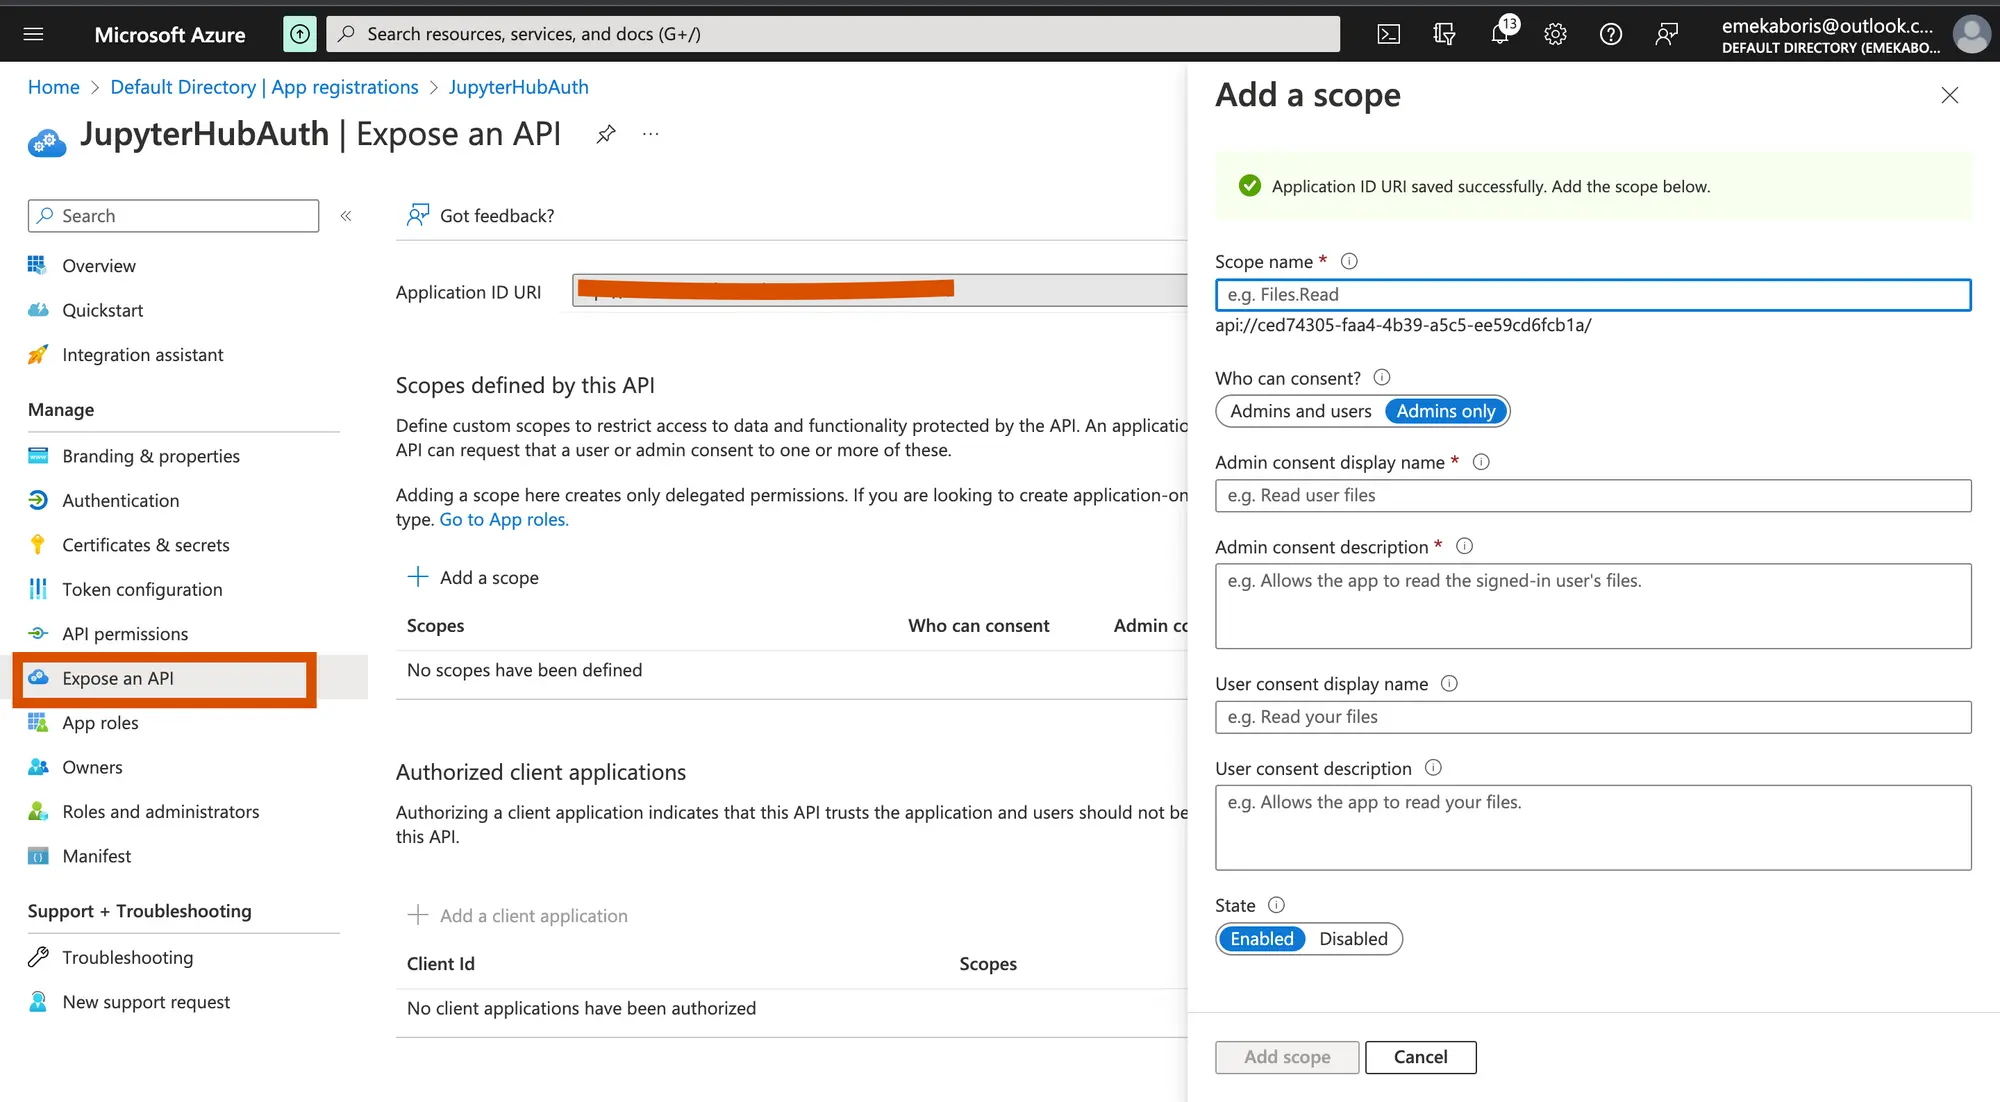
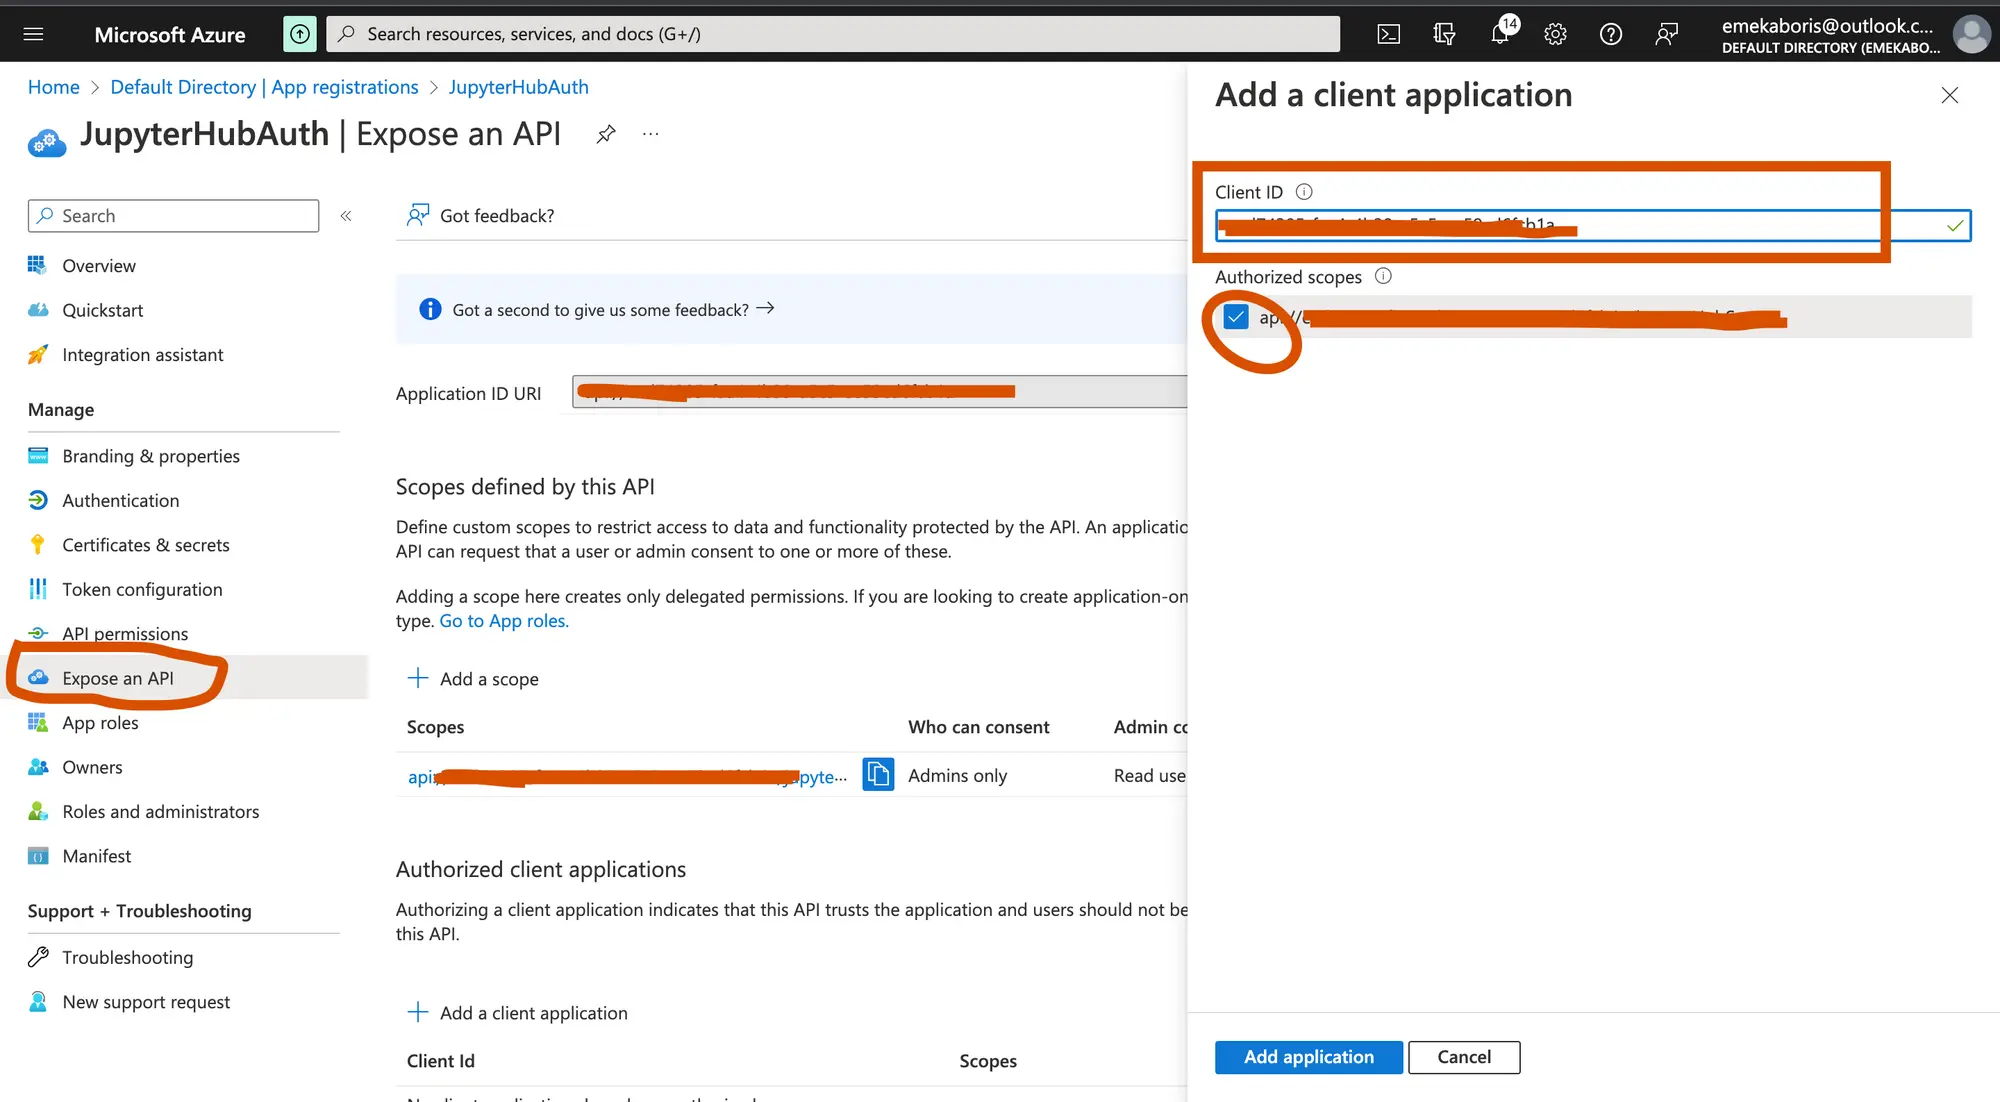
Authorize the scope with our client ID
- Scopes Name: Name of the scope/permission
- Who can consent: This determines whether users can consent to this scope in directories where user consent is enabled. Select “Admins only” for higher-privileged permissions.
- Admin consent display name: This is the consent display name
- Admin consent description: This is the description for the Admin consent
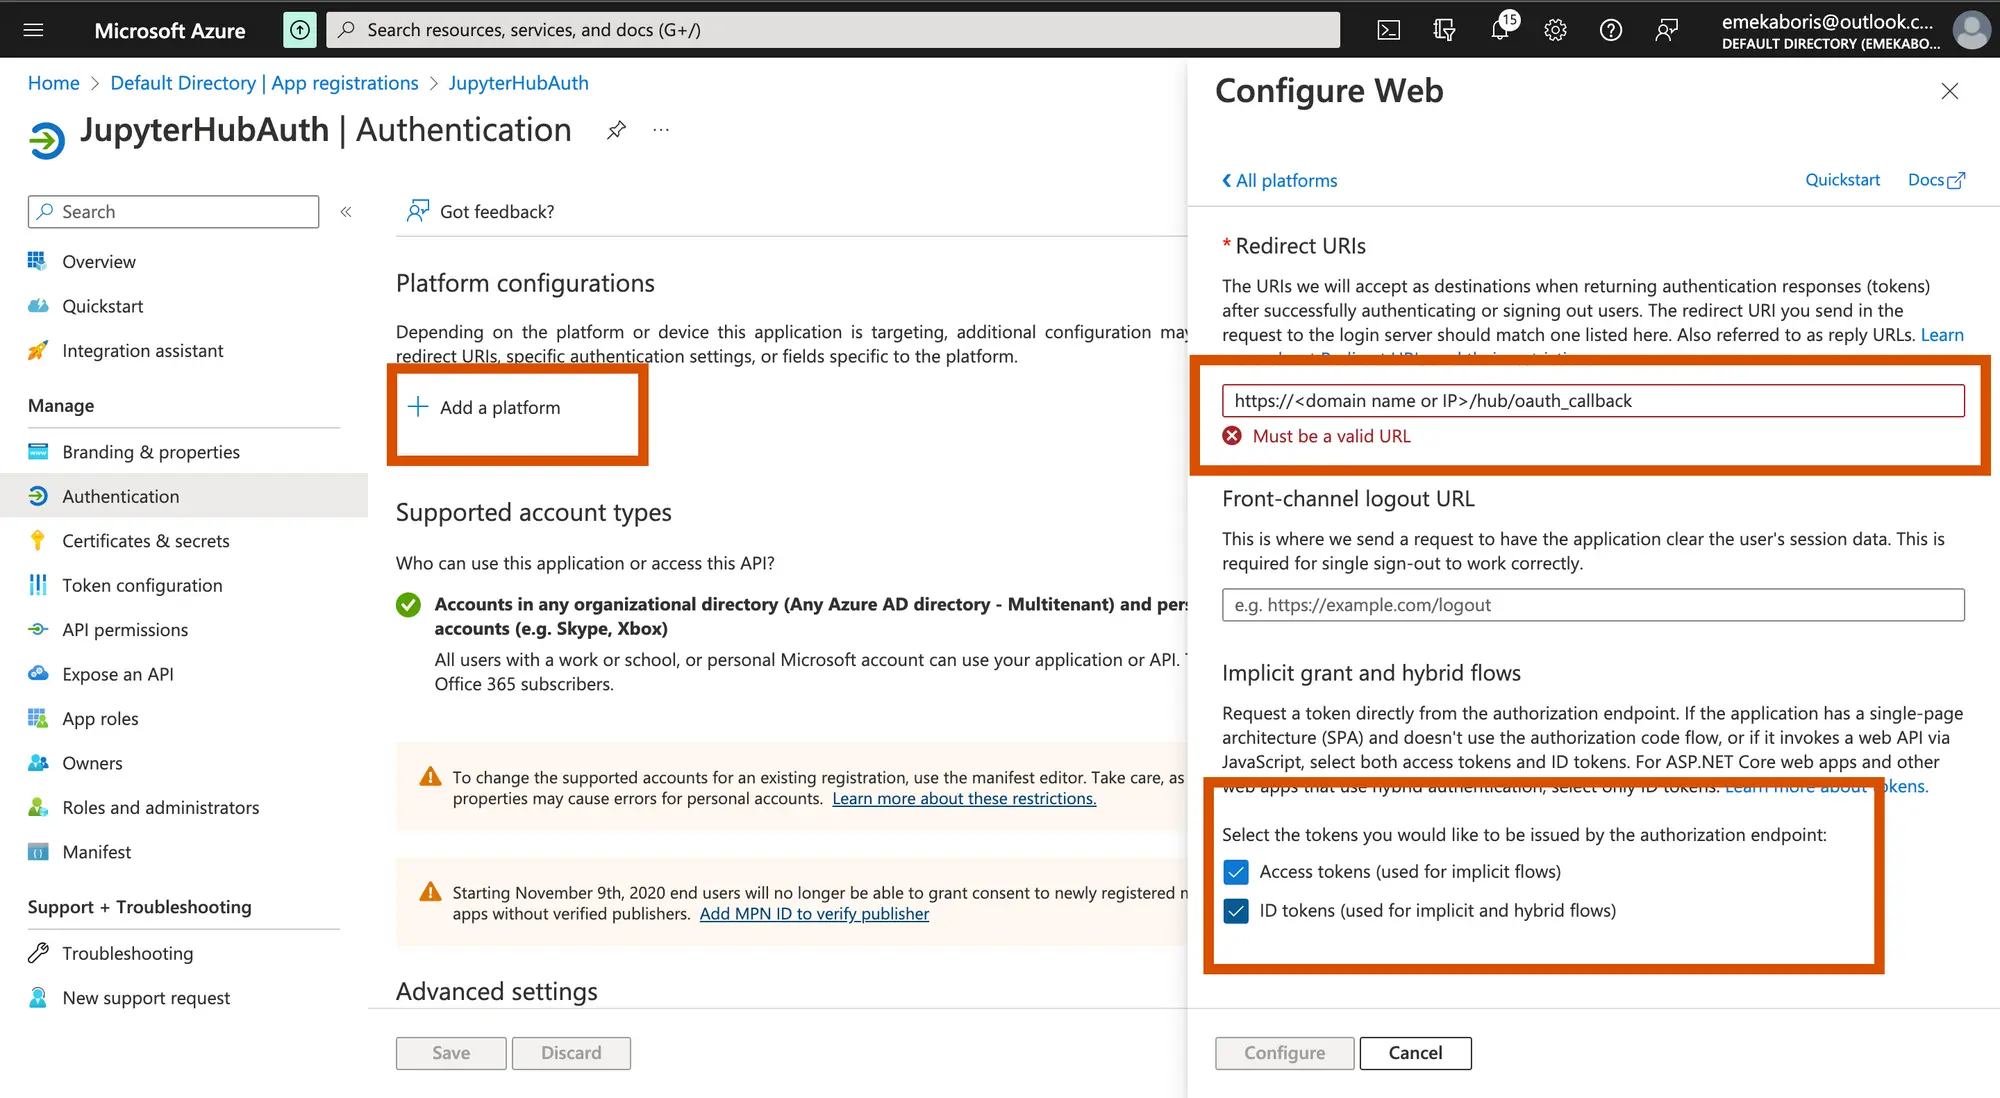
Let’s configure our redirect URI in platform configuration.
This part allows you to set up a redirect link that will display to the user after the authentication is completed. The link here should be the same as the redirection link on your JupyterHub configuration.
Registering your application establishes a trust relationship between your app and the Microsoft identity platform. The trust is unidirectional: your app trusts the Microsoft identity platform, and not the other way around.
Configuring JupyterHub for authentication with Azure Active Directory(AD)
JupyterHub can be setup on AWS on EKS. You can also install Jupyterhub on Azure with AKS.
Both of these instructions use helm to install JupyterHub. Configuring the helm chart to use the SSO that you just setup is just a matter of tweaking the jupyterhub configuration.
Generate and save the JupyterHub configuration file
$ helm show values JupyterHub/JupyterHub > /tmp/JupyterHub.yamlInstall JupyterHub via Helm
$ helm install JupyterHub JupyterHub/JupyterHub \\ --values /tmp/JupyterHub.yamlNavigate or open the config file using this command$sudo nano tmp/JupyterHub.yaml and append Azure AD authentication configuration.
By default, JupyterHub authentication comes with a Name and Password authentication but we will have to change it and use Azure AD script. Let’s proceed by appending the script below to our configuration file so we can securely connect to your JupyterHub with Azure AD
you don’t need to delete anything from the configuration file
before with user name and password authentication:
hub:
  revisionHistoryLimit:
  config:
    JupyterHub:
      admin_access: true
      authenticator_class: dummy
after with Azure AD:
hub:
  revisionHistoryLimit:
  config:
    AzureAdOAuthenticator:
      client_id: <Your-Application/client-id>
      client_secret: <Your-client-secret-value>
      oauth_callback_url: <http://localhost:8080/hub/oauth_callback>
      tenant_id: <Your-tenant-id>
      enable_auth_state: true
    JupyterHub:
      authenticator_class: azuread
After modifying our configuration file according, let’s update our JupyterHub Kubernetes
$ helm upgrade JupyterHub JupyterHub/JupyterHub \\
--values /tmp/JupyterHub.yaml
#output W1202 00:13:36.016636 6132 azure.go:92] WARNING: the azure auth plugin is deprecated in v1.22+, unavailable in v1.26+; use <https://github.com/Azure/kubelogin> instead. To learn more, consult <https://kubernetes.io/docs/reference/access-authn-authz/authentication/#client-go-credential-plugins> Release "JupyterHub" has been upgraded. Happy Helming! NAME: JupyterHub LAST DEPLOYED: Fri Dec 2 00:13:45 2022 NAMESPACE: default STATUS: deployed REVISION: 29 TEST SUITE: None NOTES: . __ __ __ __ __ / / __ __ ____ __ __ / /_ ___ _____ / / / / __ __ / /_ __ / / / / / / / __ \\ / / / / / __/ / _ \\ / ___/ / /_/ / / / / / / __ \\ / /_/ / / /_/ / / /_/ / / /_/ / / /_ / __/ / / / __ / / /_/ / / /_/ / \\____/ \\__,_/ / .___/ \\__, / \\__/ \\___/ /_/ /_/ /_/ \\__,_/ /_.___/ /_/ /____/
Saturn Cloud provides customizable, ready-to-use cloud environments
for collaborative data teams.
Try Saturn Cloud and join thousands of users moving to the cloud without having to switch tools.
Check out other resources on setting up JupyterHub:


