
This article was published when data science tooling like Dask and R was a primary focus for Saturn Cloud. Today, Saturn Cloud is the enterprise AI platform for any GPU infrastructure.
Saturn Cloud provides customizable, ready-to-use cloud environments
for collaborative data teams.
Try Saturn Cloud and join thousands of users moving to the cloud without having to switch tools.
Introduction
JupyterHub is an Open-Source solution to provide access to computational environments without having users actively manage DevOps challenges. System Administrators can customize and manage JupyterHub to provide isolated or shared resources to data science teams. Not only is it scalable and customizable but also provides the option to improve privacy, by providing users with their own workspaces. Since, it can be hosted on various cloud services, virtual machines, and even local machines, users can leverage customizable compute power from anywhere in the world.
Organizations can choose from the following two types of distributions offered by JupyterHub as per their own requirements -
- The Littlest JupyterHub (TLJH)
The Littlest JupyterHub (TLJH) is a lightweight JupyterHub distribution for a single Virtual Machine (VM). It is designed for smaller deployments and allows users to access shared resources. While it may be a good starting solution for smaller Data Science Teams running experiments that do not require the availability of more compute power, it is not scalable for larger teams performing varying degrees of tasks. If one of the users utilizes most of the VMs compute power, it might hinder the work of someone else trying to carry out their own tasks.
- Zero to JupyterHub (ZTJH)
Zero to JupyterHub (ZTJH) allows DevOps teams to deploy JupyterHub on Kubernetes using Docker. It provides the convenience of scaling and managing it efficiently for a larger number of users. Due to containerization, users are able to choose their own compute power (CPU, RAM, GPU, etc.) without having to worry about how their usage might affect the work of others.
The Littlest JupyterHub on Azure
In this section of the article, we are going to figure out how to install The Littlest JupyterHub (TLJH) on Azure. Once you have created a Microsoft account, you’ll be able to access the Azure Portal.
Create an Azure Virtual Machine (VM) & Install JupyterHub
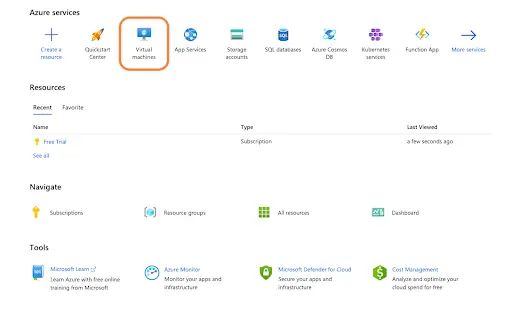
Figure 1: Azure Portal Landing Page
When we login into the portal, we are greeted with the Azure Landing Page as shown in Figure 1. In this step, we are going to set up our Virtual Machine to install JupyterHub. Click on the Virtual Machines option.
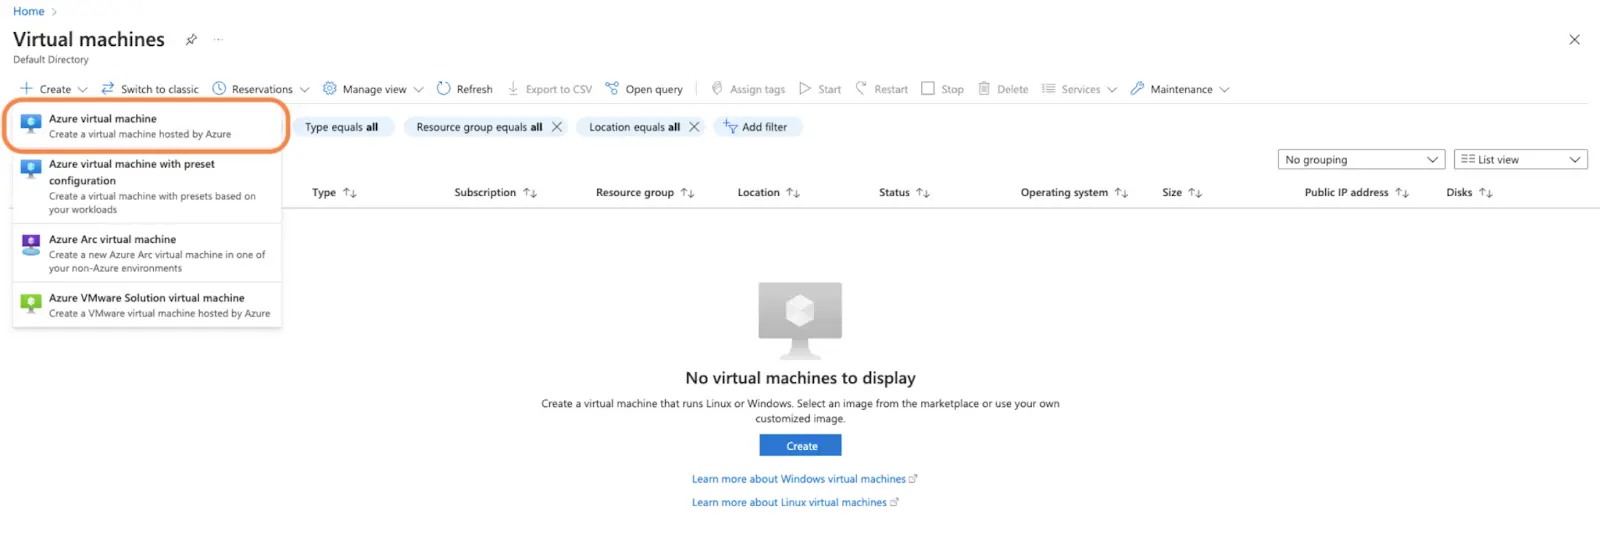
Figure 2: Spawning a Virtual Machine
We’ll click on Create > Azure virtual machine as shown in Figure 2 in order to bring up the configuration form (Figure 3(a)).
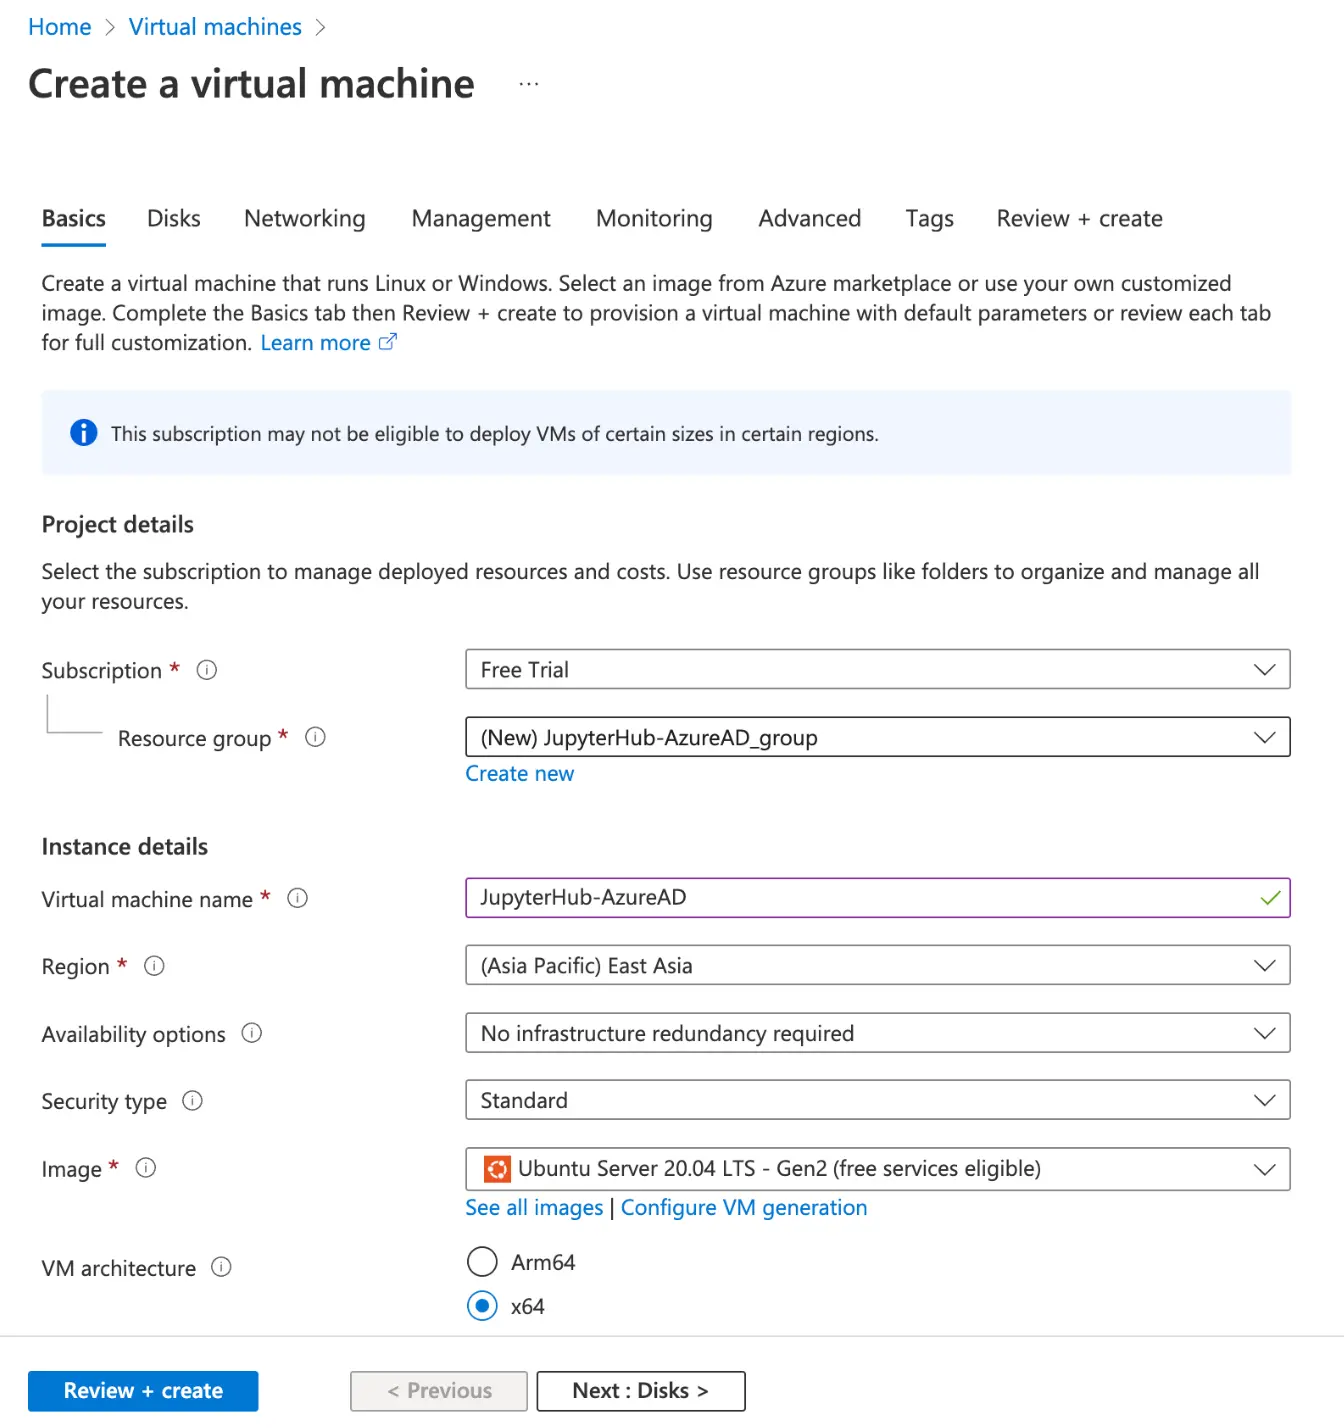
Figure 3(a): Virtual Machine Configuration
As a part of the basics, we will enter the following information -
Resource Group - We can either create a new Resource Group, as we’ve done here, or select from a pre-defined template. Let’s call this Resource Group JupyterHub-AzureAD_group.
Virtual Machine Name - For demonstration purposes, we are going to name our Virtual Machine JupyterHub-AzureAD.
Region - We can choose any region at our convenience. Here we select (Asia Pacific) East Asia. The price for an active instance varies from region to region. So it is recommended to do a cost analysis before selecting one.
Image - This refers to the operating system to be installed on the Virtual Machine. We can choose from a variety of vanilla images and custom images. Here we select a fresh installation of Ubuntu Server 20.04 LTS.
VM Architecture - We can leave it as default to x64 architecture.
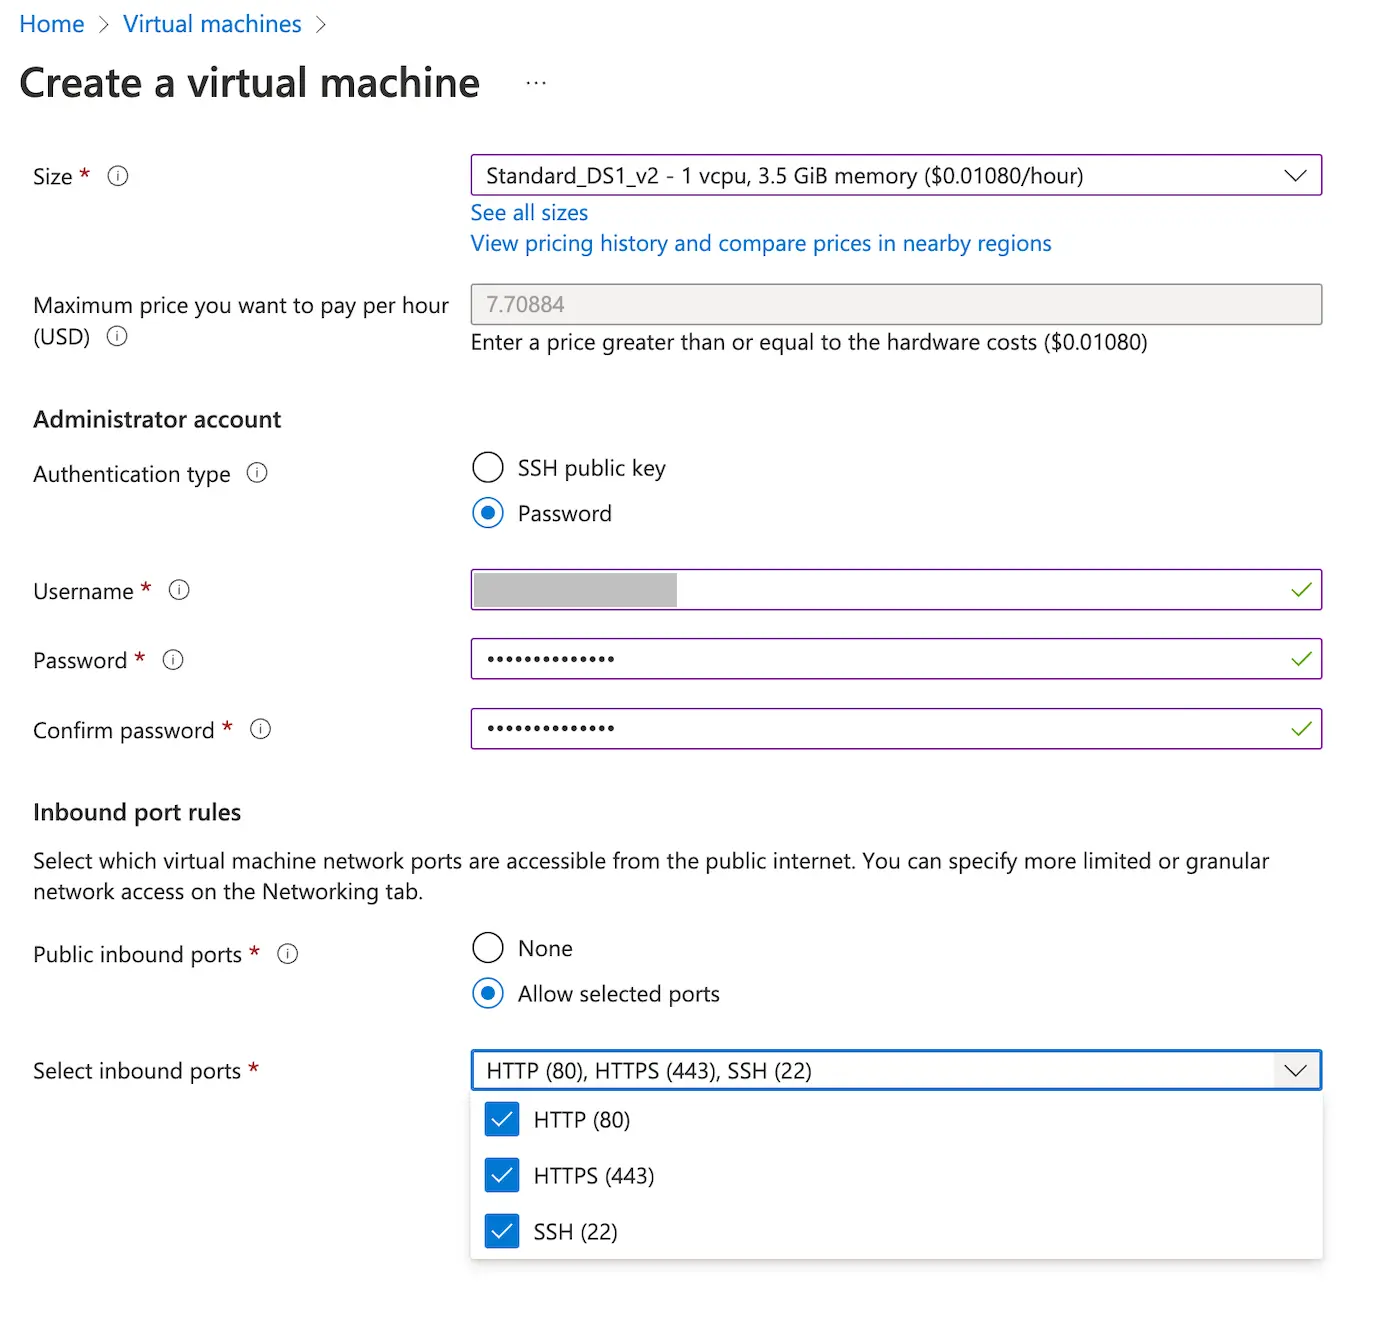
Figure 3(b): Virtual Machine Configuration
Size - There are various VM compute configurations to choose from. As per our current requirement, we select Standard_DS1_v2 which offers 3.5 GiBs of RAM and 1 virtual CPU.
Username and Password - We’d want to keep our instance secure as well.
Select Inbound Ports - We can leave this as default.
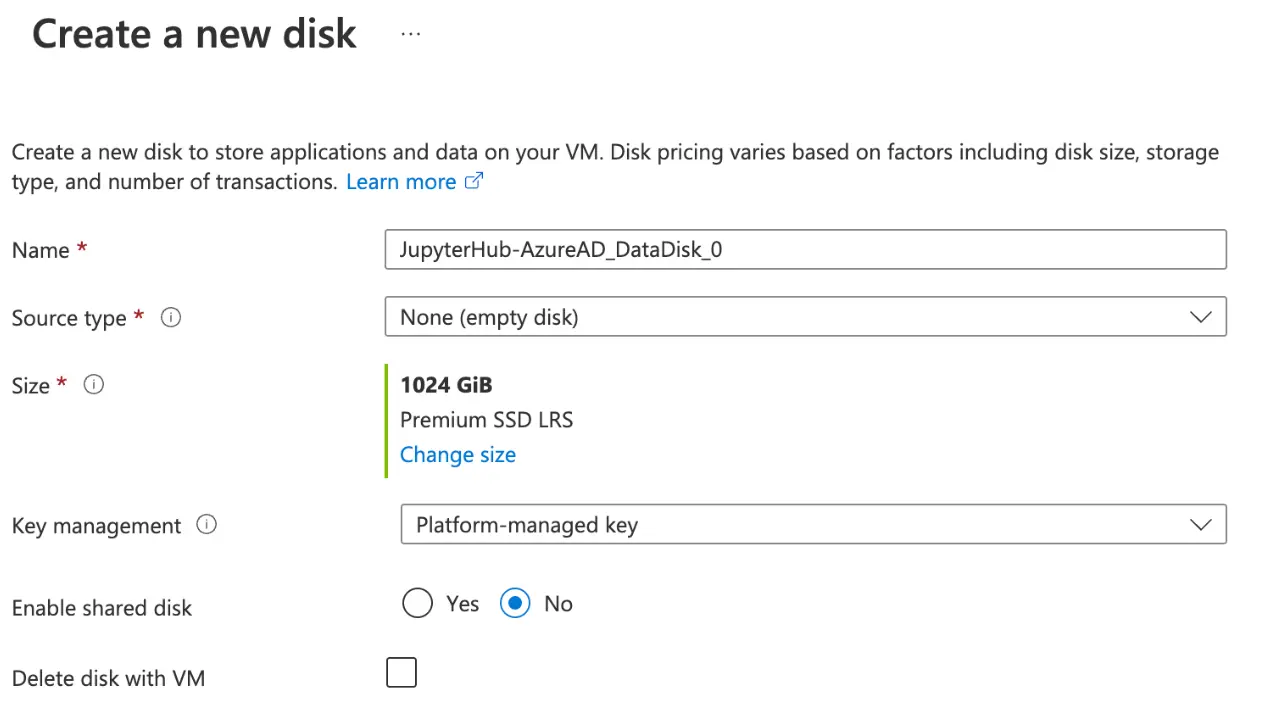
Figure 3(c): Virtual Machine Configuration
- Disk Size - You can click on Disks on the Top Panel and select a configuration as per our need. For demonstration purposes, we have selected 1024 GiBs of SSD
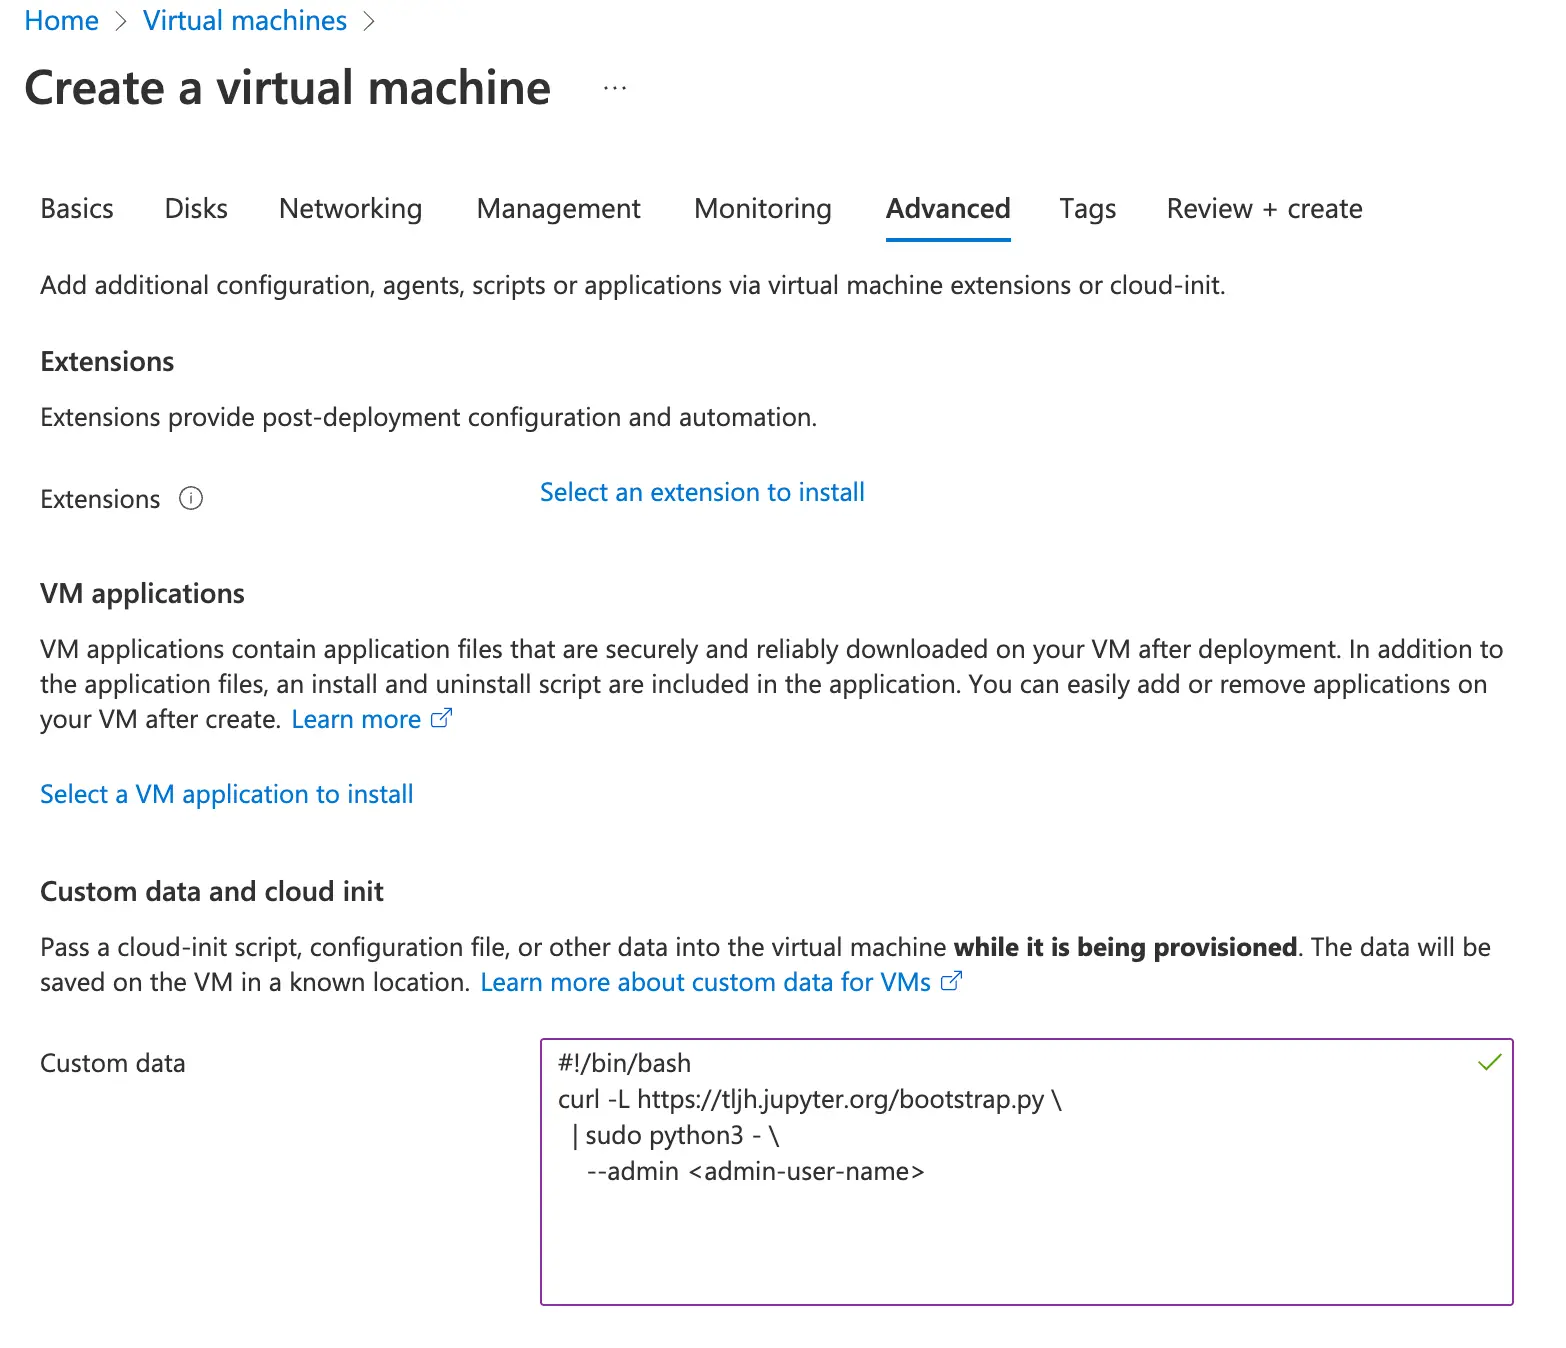
Figure 3(d): Virtual Machine Configuration
- Initialize VM with JupyterHub - Now we are going to pre-install JupyterHub on our VM by running the command as present in the Custom data field in Figure 3(d). This runs a curl command to download and install The Littlest JupyterHub onto the VM.
For all the other remaining options, we can leave them as default or configure them as per our needs. Once the configuration has been set up, click on Review + Create.
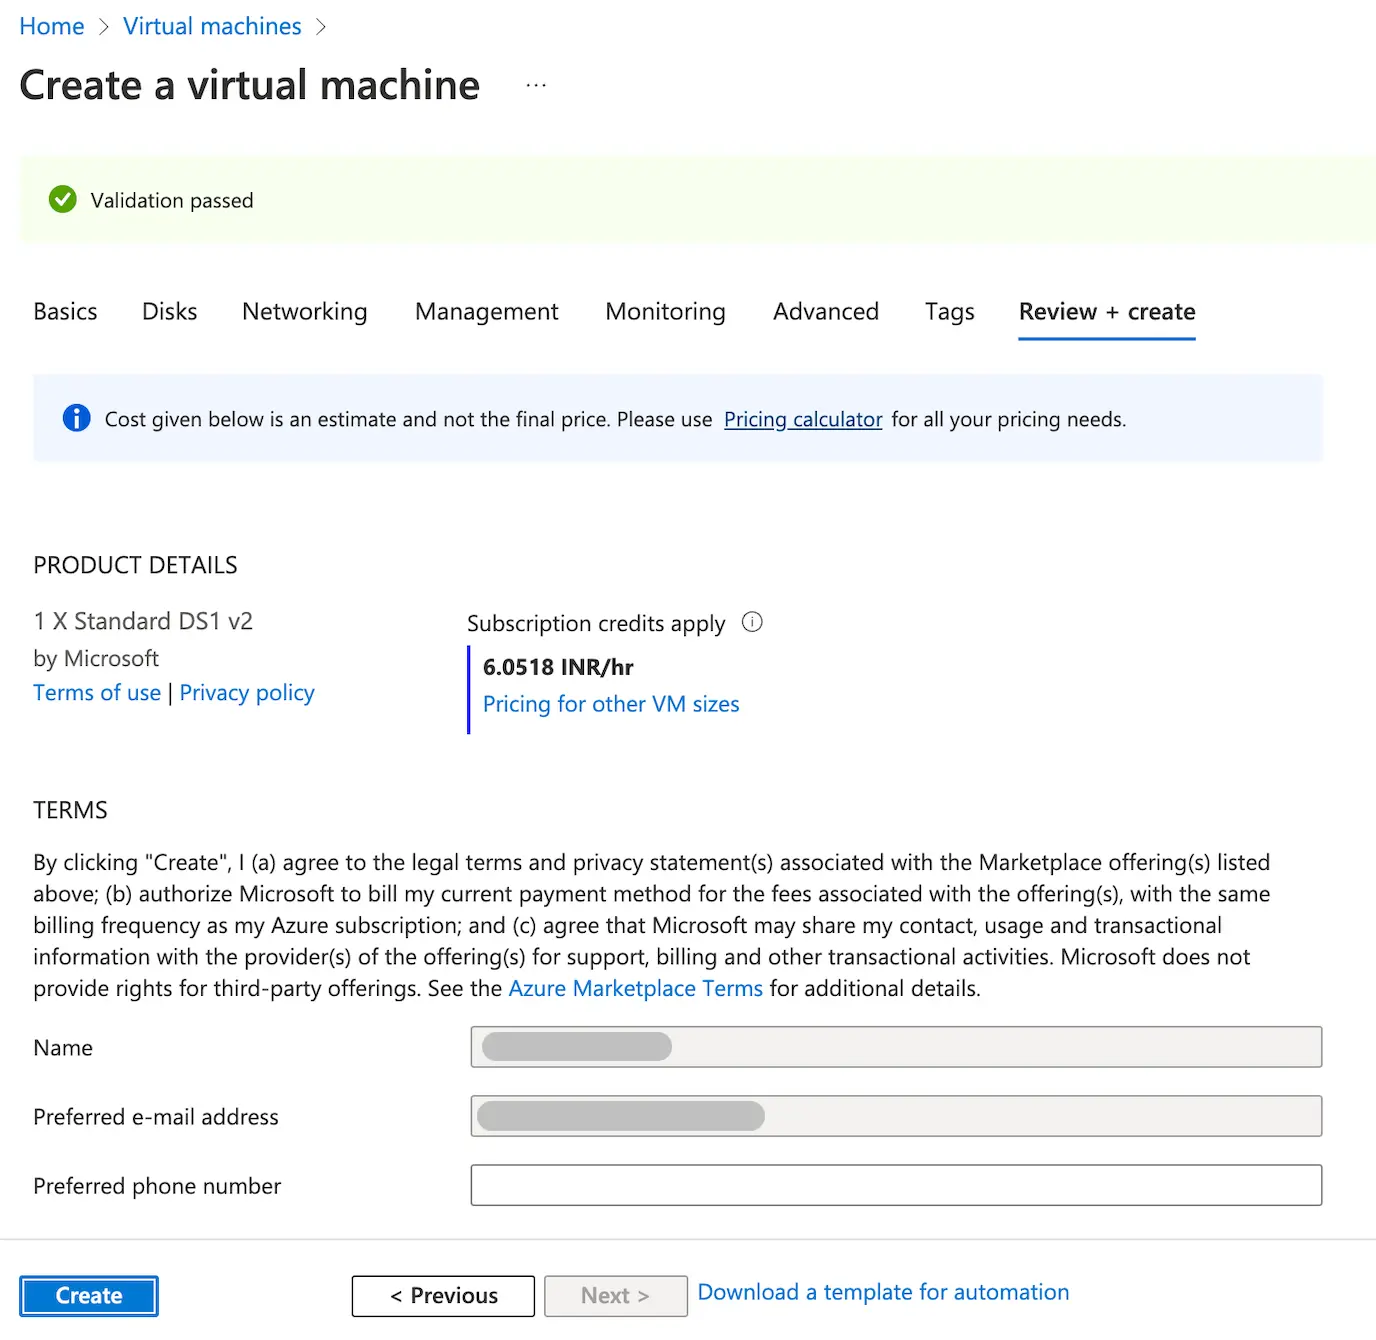
Figure 3(e): Virtual Machine Configuration
If there are no error reported after the validation process takes place, we’d be shown the message “Validation passed” as shown in Figure 3(e), else an error with the error message is shown to help us resolve the issue. Once the validation passes, we click on Create and this starts the deployment process.
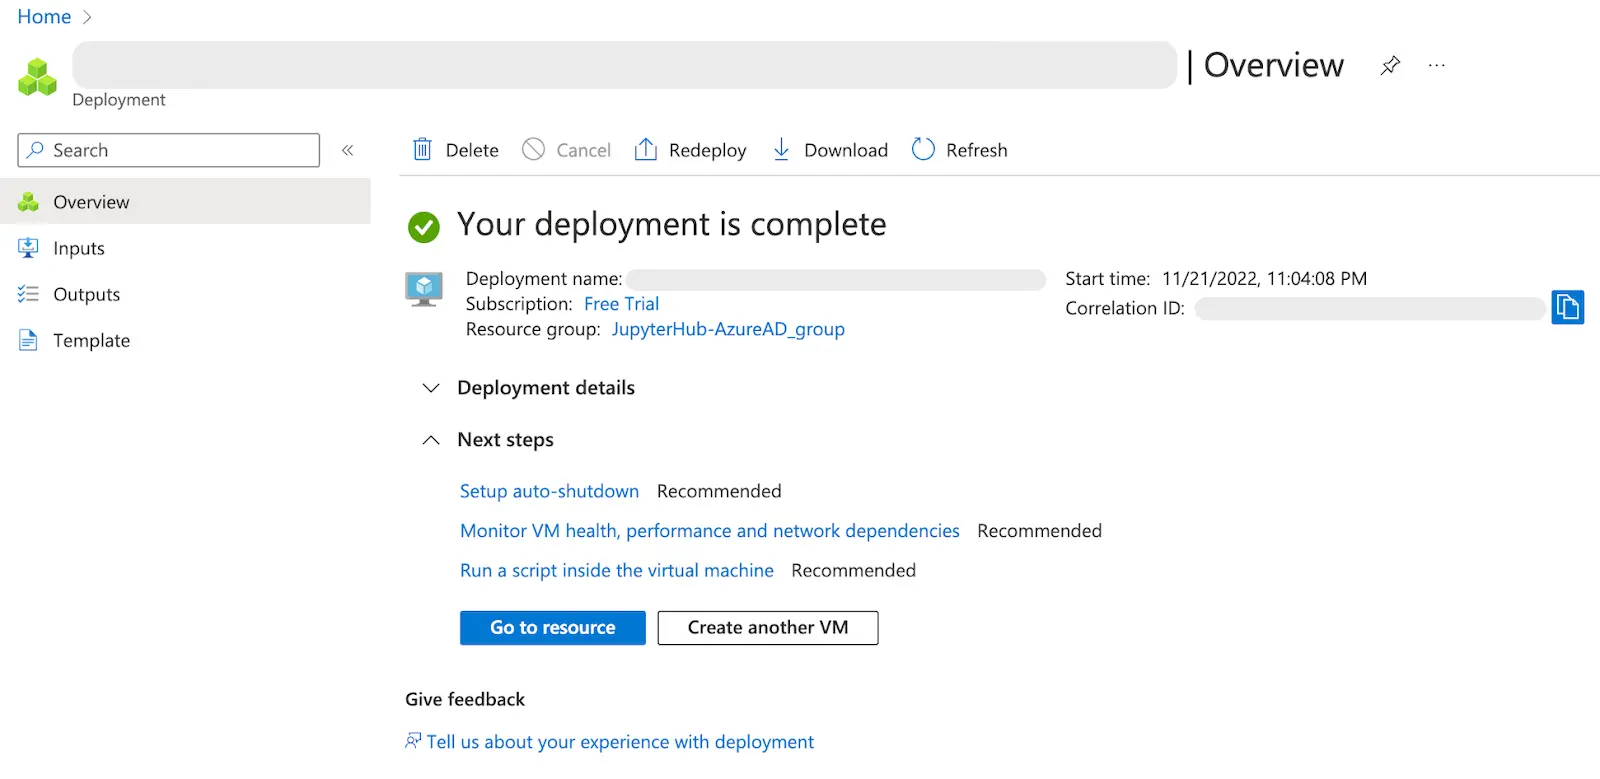
Figure 3(f): Virtual Machine Configuration
After the deployment is successful, we receive the page which would look like Figure 3(f). To find out how to access JupyterHub, we click on Go to resource and on the right-hand side, we’ll see a public IP address. In my case, it was, 20.198.5.7, and we open up a new tab and enter this address into the URL bar.
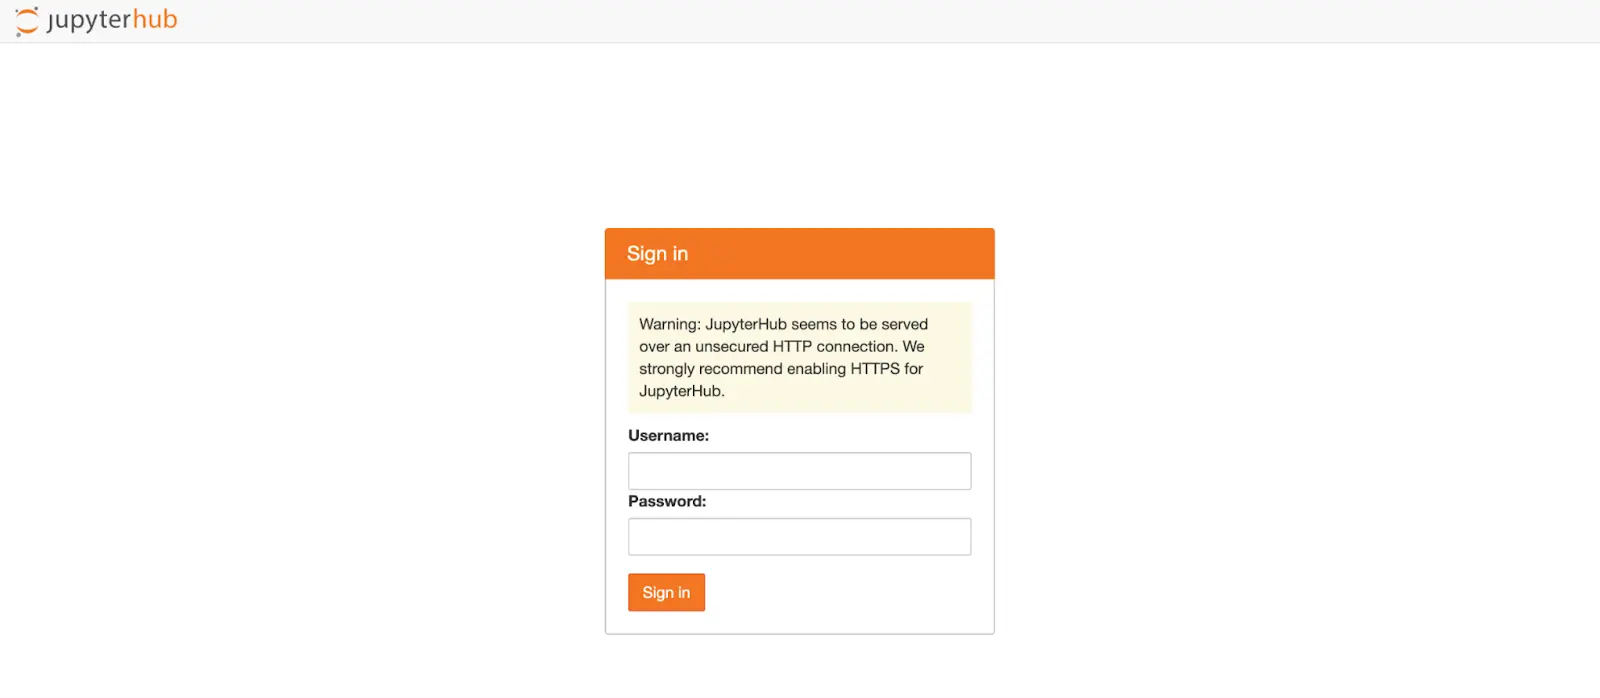
*Figure 4(a): The Littlest JupyterHub Installation is complete *
We’ll be greeted with this page to which we can enter a Username and Password, which would be used as User Account Creation credentials for a unique username. We can add more users by going to Control Panel > Admin > Add Users.

Figure 4(b): The Littlest JupyterHub Installation is complete
We have successfully installed The Littlest JupyterHub (TLJH) on Azure AD.
Zero-to-JupyterHub on Azure Kubernetes Services (AKS)
In this section of the article, we are going to figure out how to deploy the Zero to JupyterHub distribution to a Kubernetes (K8s) Cluster on Azure AD. For the sake of simplicity and demonstration, we’ll be mostly using the portal to do our setup.
Azure Kubernetes Services (AKS)
Figure 5: Azure Kubernetes Services (Source)
Azure Kubernetes Servies (AKS) offers a simple and convenient way to set up deployments through containerization. Using various tools we can actively manage resources centrally and with better visibility. There are multiple ways of accessing and managing a Kubernetes cluster on Azure, i.e. via the Command Line Interface (CLI), PowerShell, and Azure Portal. For starters, the Azure Portal offers enough customization, but to have better control we could use either of the other options.
Set up a Kubernetes (K8s) Cluster
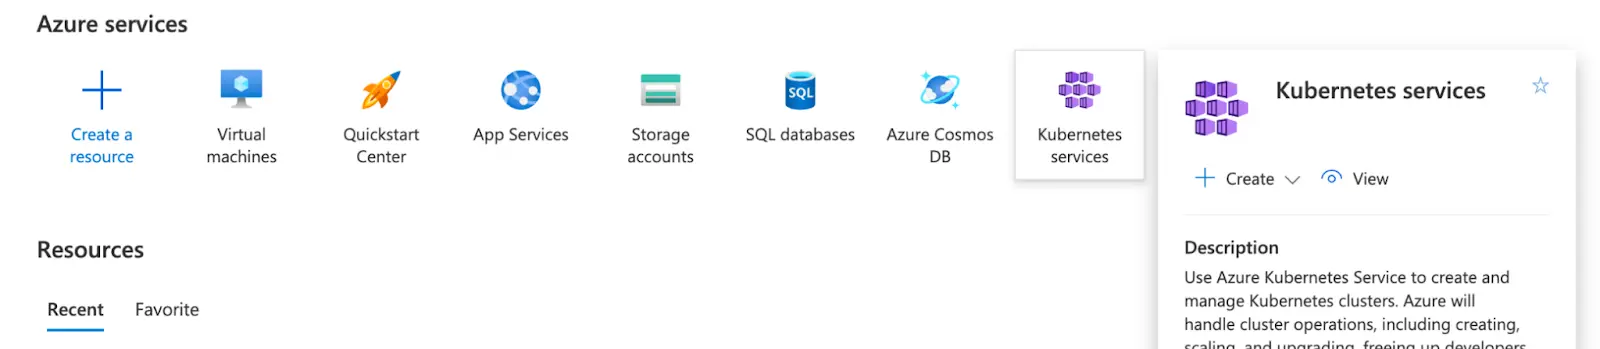
Figure 6(a): Setup a K8 Cluster

Figure 6(b): Setup a K8 Cluster
To set up a Kubernetes Cluster, we select the Kubernetes services option on the Azure Portal Landing Page. Then we click on Create > Create a Kubernetes cluster, after which we’d be presented with the configuration page for the K8 Cluster.
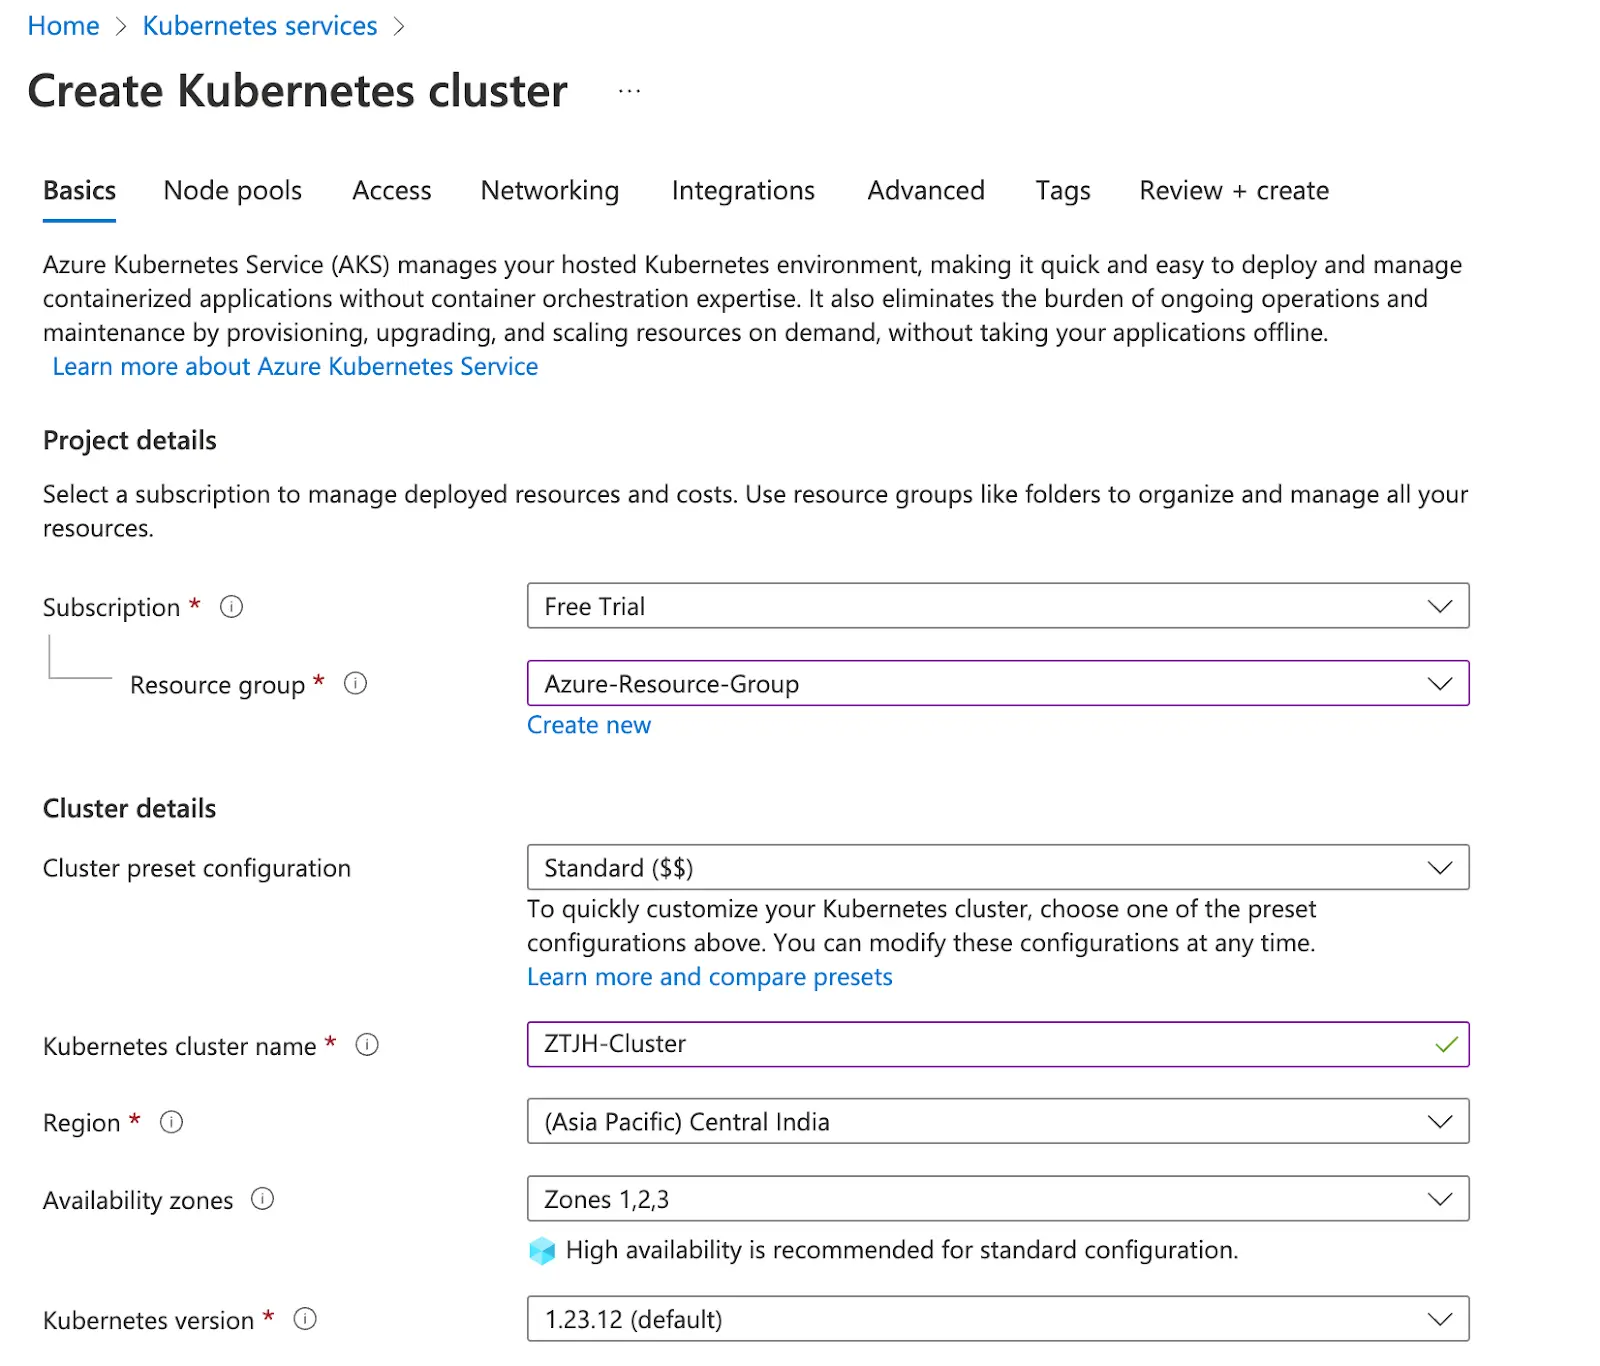
Figure 7(a): K8 Cluster Configuration
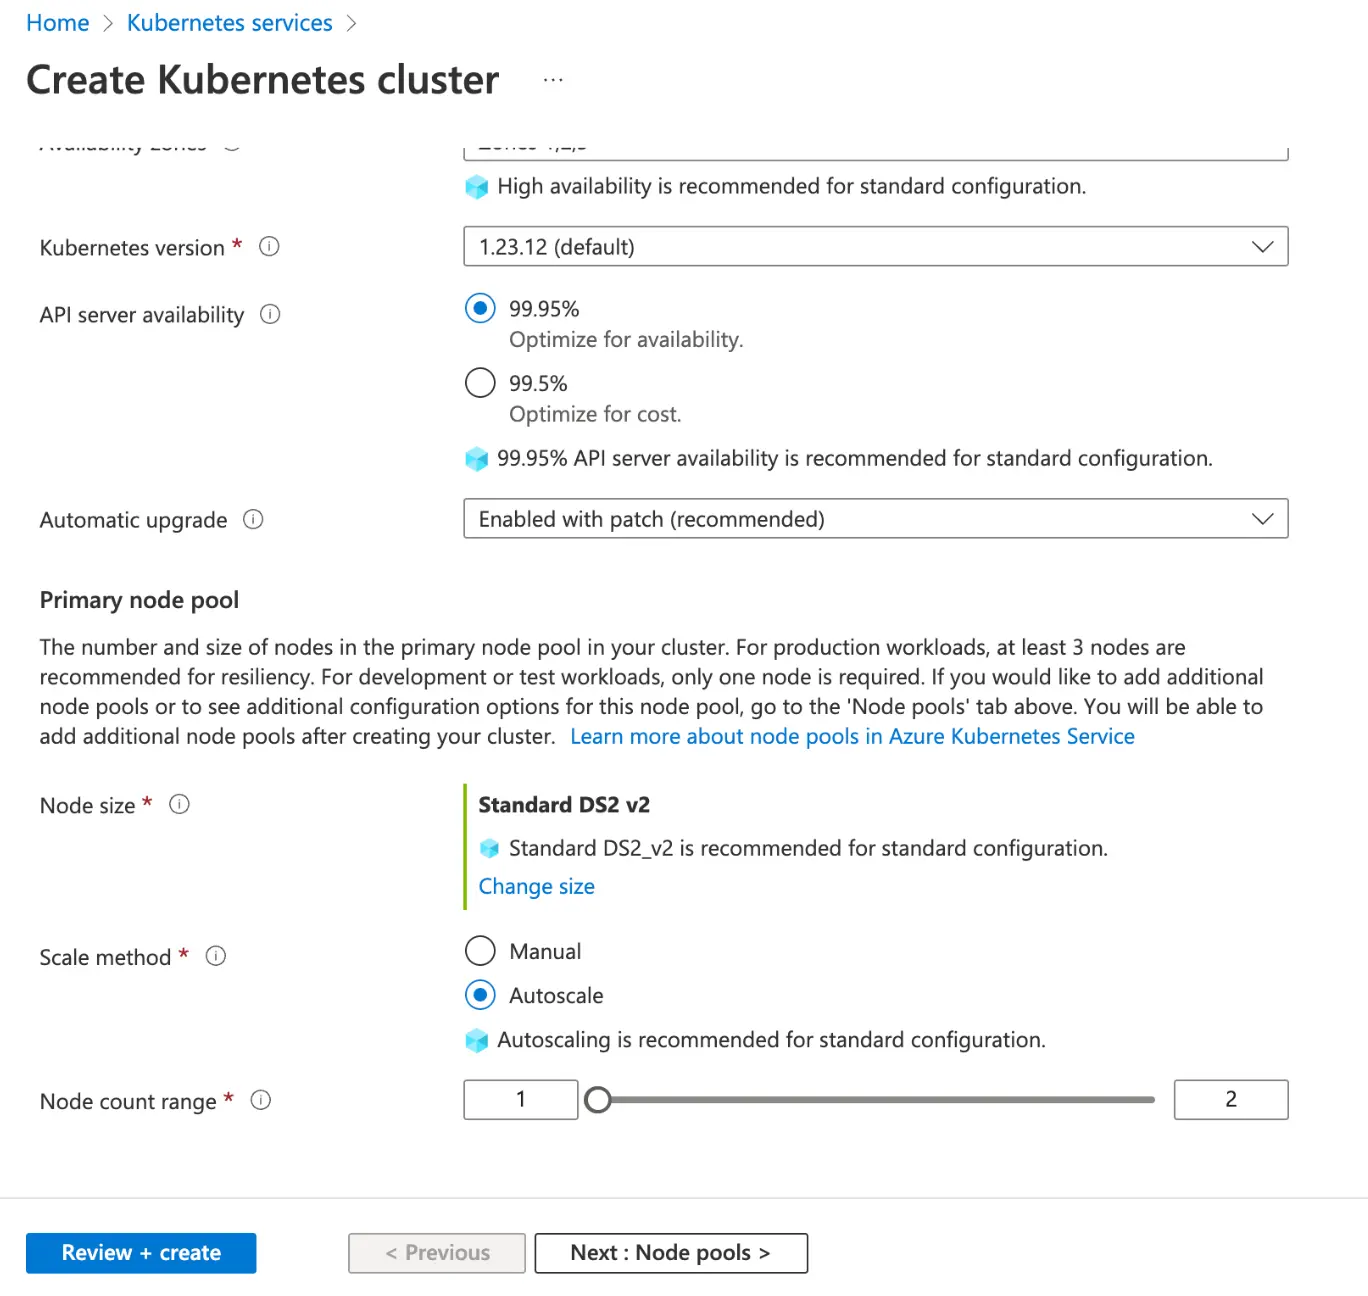
Figure 7(b): K8 Cluster Configuration
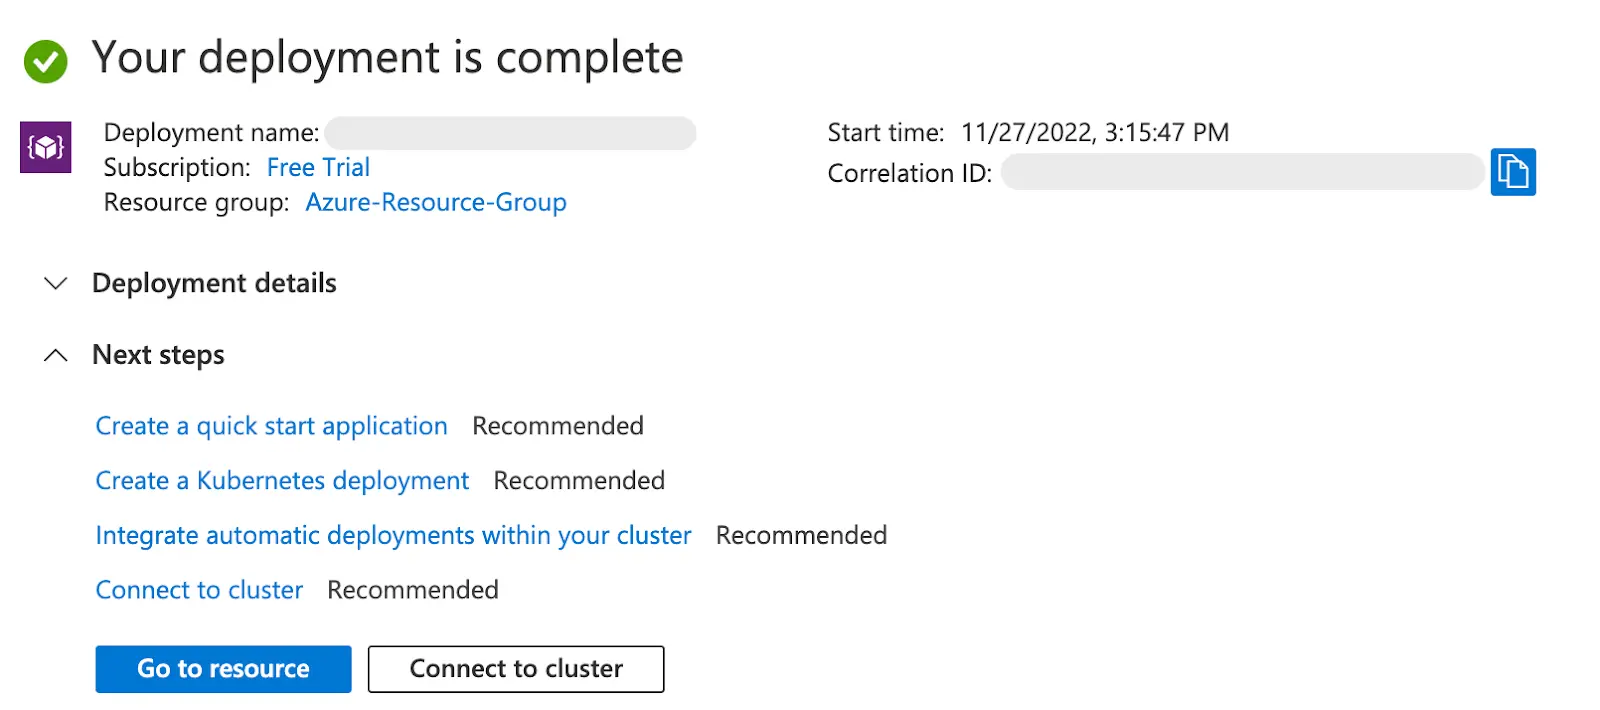
Figure 7(c): K8 Cluster Deployment
As a part of the basics, we enter the following information -
Resource Group - This is similar to what we explored during installing The Littlest JupyterHub. Either we can create a new Resource Group or select from existing ones.
Kubernetes Cluster Name - We can name our K8 Cluster anything we like. Here we call it ZTJH-Cluster.
Region - Similar to what we did during installing TLJH, we can do our own research to figure out which region would be okay for our needs.
Node Size - We can select the compute power that we want to deploy to our cluster of nodes.
Node Count Range - Since we’d want to scale up and down by a unit, we can select how many nodes we can upscale to. For this article, we select it as 2.
We can leave the rest of the options as default and click on Review + create. Once validation is successful, we wait for it to deploy. A successful deployment status looks like Figure 7(c).
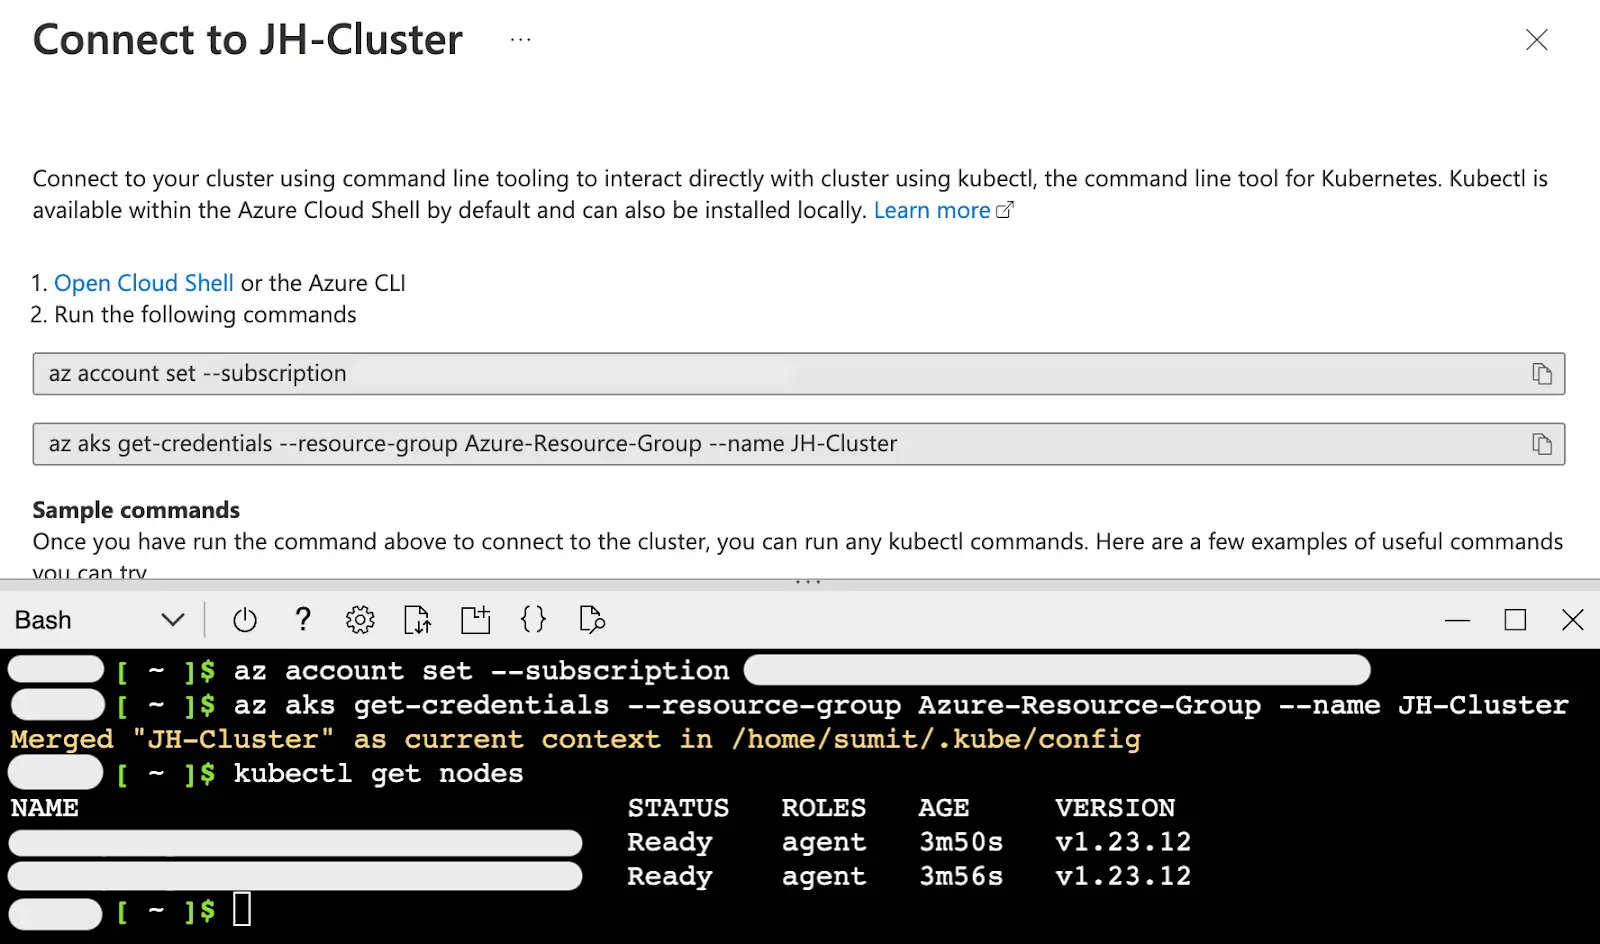
Figure 8: Connect to K8s Cluster
From Figure 7(c), we select Connect to cluster after which we are presented with Figure 8. We can reveal the terminal by clicking on the Cloud Shell icon right to the search bar at the top. After we run the commands as present in the terminal, we can check how many of our nodes are active. Since we have selected 2 during configuration, we see 2 nodes returned in the terminal.
We have successfully set up our Kubernetes (K8s) Cluster. Now we are going to install a package manager called Helm.
Install Helm - a package manager for Kubernetes

Figure 9: Helm
Helm is a package manager for Kubernetes designed to manage K8s applications. It uses Helm Charts, which are configuration files to define, install, and upscale complex applications.
If you’re using the Azure Terminal, Helm might already be installed. Check by running -
helm version
We can install helm by running -
curl https://raw.githubusercontent.com/helm/helm/HEAD/scripts/get-helm-3 | bash
Run helm version after installing to verify.
Now that Helm is installed, we are going to create a config.yaml file that helm would use to configure and set up JupyterHub. We can create the file using the command -
nano config.yaml
To which we can add a boilerplate such as -
# This file can update the JupyterHub Helm chart's default configuration values.

# For reference see the configuration reference and default values, but make

# sure to refer to the Helm chart version of interest to you!

# Introduction to YAML: https://www.youtube.com/watch?v=cdLNKUoMc6c

# Chart config reference: https://zero-to-jupyterhub.readthedocs.io/en/stable/resources/reference.html

# Chart default values: https://github.com/jupyterhub/zero-to-jupyterhub-k8s/blob/HEAD/jupyterhub/values.yaml

# Available chart versions: https://jupyterhub.github.io/helm-chart/

# Install JupyterHub on K8s Cluster
Before installing JupyterHub, we have to make helm aware of its repository. We do it by running the following commands on the terminal -
helm repo add jupyterhub https://jupyterhub.github.io/helm-chart/
helm repo update
The output should look something like -
Hang tight while we grab the latest from your chart repositories...

...Skip local chart repository

...Successfully got an update from the "stable" chart repository

...Successfully got an update from the "jupyterhub" chart repository

Update Complete. ⎈ Happy Helming!⎈
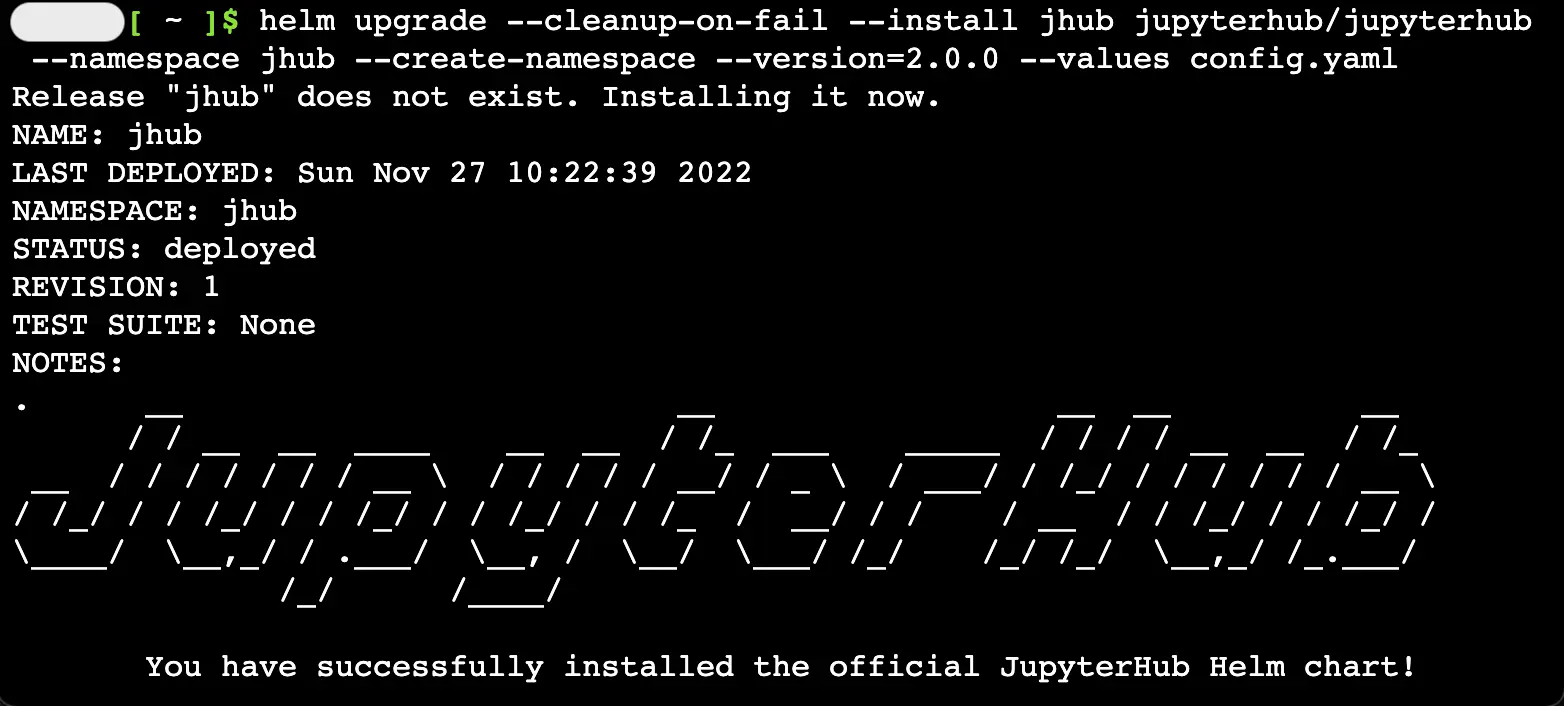
Figure 10: Installing JupyterHub using Helm
Now we can install JupyterHub using the command in Figure 10. The jhub written after –install and –namespace should be unique for every helm release. Version 2.0.0 refers to the version of JupyterHub and worlds with Helm version 3.0.0 details of which can be found in the Helm Chart Repository.
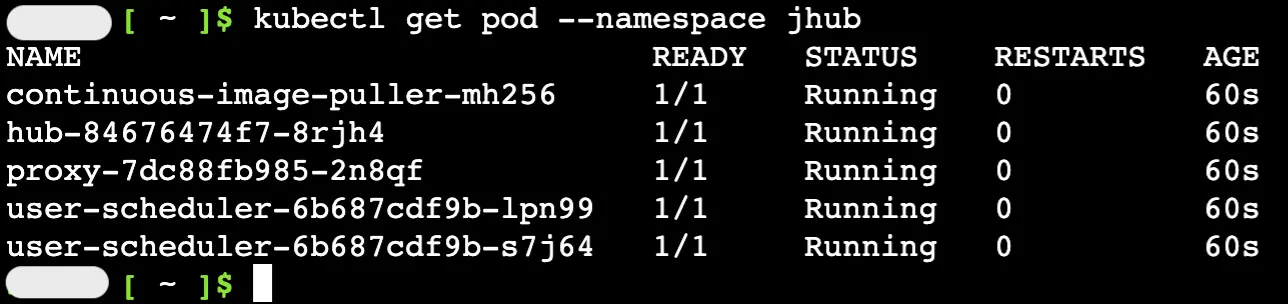
Figure 11: Check active pods

Figure 12: Check IP to access
We can check the active pods by running the command in Figure 11. We then run the commands in Figure 12, to get the External IP address that we are going to use to access JupyterHub. Once we access the URL, we are presented with the landing page for JupyterHub. We enter a Username and Password which would be the Sign Up credentials for a unique username.

Figure 13(a): Access JupyterHub
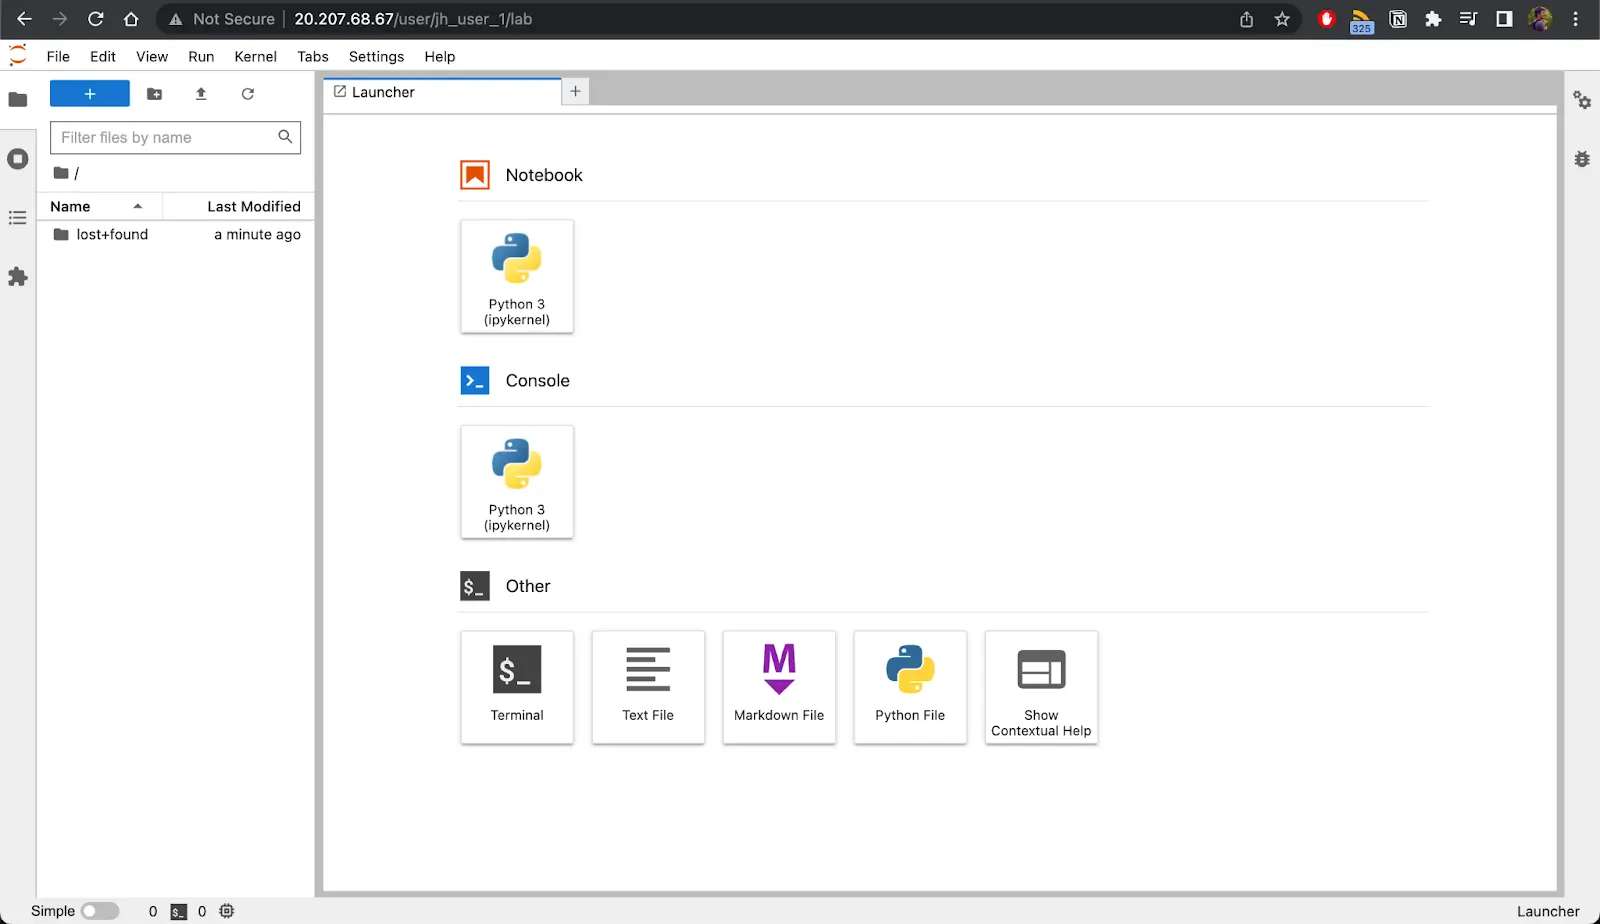
Figure 13(b): Access JupyterHub
We have successfully installed Zero to JupyterHub on an Azure Kubernetes Cluster.
Conclusion
In this article, we have explored how to install The Littlest Jupyter and Zero to JupyterHub for varying Data Science requirements. I hope this helps you in making a complex process simpler.
Saturn Cloud provides customizable, ready-to-use cloud environments
for collaborative data teams.
Try Saturn Cloud and join thousands of users moving to the cloud without having to switch tools.
Check out other resources on setting up JupyterHub:


