Setting up JupyterHub on AWS

Saturn Cloud provides customizable, ready-to-use cloud environments for collaborative data teams.
Try Saturn Cloud and join thousands of users moving to the cloud without
having to switch tools.
Dealing with large datasets and tight security can make it difficult for a data science team to get their work done. A shared computational environment that scales for big data, and a single place to establish security protocols, makes it much easier. Enter JupyterHub.
JupyterHub is a computational environment that provides shared resources to a team of data scientists. Each team member can work on their own tasks while accessing common data sources and scaled computational resources with minimal DevOps experience.
In this blog, we’ll share tips on installing and setting up a light-weight version of JupyterHub on Amazon Web Services (AWS). We’ll go through two standard approaches:
- The Littlest JupyterHub (TLJH), a single node version of JupyterHub.
- Zero-to-JupyterHub (ZTJH) a multi-node version of JupyterHub based on Kubernetes.
The official JupyterHub documentation covers much of what follows but it often times points users to other resources, which can be a bit disorienting. In the following tutorial we tried to outline all the necessary steps it takes to get started with JupyterHub on AWS EKS. It also comes complete with helpful screenshots and common pitfalls to avoid.
Although you can run JupyterHub on a variety of cloud providers, we will limit our focus to AWS. At the time of writing, AWS is still the largest and most widely used cloud provider on the market.
Compare and Contrast JupyterHub versions
Before diving into the details on how to deploy JupyterHub, let’s compare The Littlest JupyterHub and Zero-to-JupyterHub.
The Littlest JupyterHub is easy to set up, but probably not suitable as a long-term production data science environment. On the home-page it even calls out that that it’s currently in a beta state and not ready for production.
One of the main reasons it isn’t suggested for production is the scaling limitation of TLJH. Although TLJH can theoretically handle many users, as more users logon the resources of TLJH get stretched between them. At one point or another the resource sharing will impact your users. For example, a large analysis run by one person could impact the model training of another. This will eventually cause people to waste time as their work crashes at unexpected times.
That said, TLJH is a great way to get an understanding of how JupyterHub works and to get a feel for it’s user interface. It also might be good for hobbiest and those who are interested in getting up and running quickly, say for a demo or training purpose. You can read more about when to use TLJH on the TLJH docs pages.
Zero-to-JupyterHub is a containerized solution, so that all users are working in isolation of each other, and any particular set of work can be run on arbitrary hardware. This allows users to get the right amount of CPU, RAM, and GPUs for their particular work, and avoids the scenario where one user’s work could impact another. A containerized solution (i.e. Kubernetes) might be right for you if you need to scale to potentially thousands of users or if you prefer to have more control on how your JupyterHub is administered, then ZTJH is the better option.
The table below summarizes some of the major similarities and differences.
| TLJH | ZTJH | |
|---|---|---|
| Can run on remote servers (AWS) | x | x |
| Run in a containerized environment (Kubernetes) | x | |
| Ability to auto-scale | x | |
| Ability to add preferred authentication providers | x | x |
| Ability to enable HTTPS | x | x |
| Production ready | x | |
| Max number of users | up to ~100 | up to 1000+ |
The Littlest JupyterHub on AWS EC2
The Littlest JupyterHub is an environment that runs on a single server, and as the name implies, is the smallest and simpliest way to get started. Jupyter’s documentation for installing TLJH is thorough, so we recommend following it, but keep in mind these points:
- Be sure to have AWS IAM permissions so that you can create an AWS EC2 resource.
- When choosing an Amazon Machine Image (AMI), they reference Ubuntu version 18.04 LTS. However feel free to choose the more recent Ubuntu 20.04 LTS version instead.
- When choosing an instance type (EC2 instance size), keep in mind how many users plan to work on the platform simultaneously. JupterHub offers a guide on how to properly size your instance.
- When configuring the instance details, remember to add an admin user to the JupterHub install script. This admin user is not tied to any authentication provider so any username you chose should be fine.
Once TLJH is up and running, navigate the JupyterHub endpoint (URL). The first time you log in (as admin), you will be prompted to create a password.
From there you can start adding users and installing conda/pip packages.
Zero-to-JupyterHub on AWS EKS
Whereas the TLJH runs on a single EC2 instance, ZTJH can be configured to run on a Kubernetes cluster so that your team can scale calculations and handle very large datasets. The setup is more involved, but this allows for broader customization.
Kubernetes on AWS EKS
Creating a Kubernetes cluster can be a daunting task, but we will walk through the AWS guide, “Getting Started with Amazon EKS” and help you create it. Once the cluster is created, JupyterHub can be deployed on top of it.
This post is intended for readers with some experience working with cloud resources and the command line interface (CLI). Many of the steps can be done within the AWS Management Console or from your local terminal using the AWS CLI.
Most of the AWS docs will have you create and interact with AWS resources using the aws CLI tool, so to add another perspective, we’ll go through several of the same steps using the AWS Management Console.
There are many ways to setup a Kubernetes cluster on EKS so keep in mind that this is not the only way of doing so. We’ll highlight a few places where you might want to set things up differently.
Here’s what you need before starting:
- Be sure to have AWS Identity and Access Management (IAM) permissions so that you can create AWS EKS and EC2 resources, create IAM roles, and run the AWS CloudFormation tool. Although IAM is beyond the scope of this tutorial, it’s safe to say that whoever is creating this EKS cluster will need elevated permissions, like an admin user or similar.
- Install
kubectl, the Kubernetes command line tool used to interact with EKS cluster.k9sis an optional tool that complimentskubectland makes cluster adminstration a lot easier. - Install
aws, the AWS CLI tool used to create and interact with AWS resources.
By the time we’re done, the following AWS resources will have been created:
- IAM Roles (x2):
- EKS cluster IAM Role
- EKS node-group IAM Role
- EC2 VPC (virtual private cloud, i.e. a network)
- EKS cluster
Create your Amazon EKS cluster
Log into the AWS Management Console and ensure you are in the AWS Region you would like your AWS resources created in. They should be close to your users if possible.
Create an EC2 VPC with both public and private subnets by navigating to the AWS CloudFormation tool.
NOTE: Creating a VPC with both public and private subnets is recommended for any production deployment.
Specify template
Copy this CloudFormation template URL and paste it in the “Amazon S3 URL” field. This template creates both public and private subnets, don’t let the name confuse you.
https://amazon-eks.s3.us-west-2.amazonaws.com/cloudformation/2020-10-29/amazon-eks-vpc-private-subnets.yamlClick “Next”.
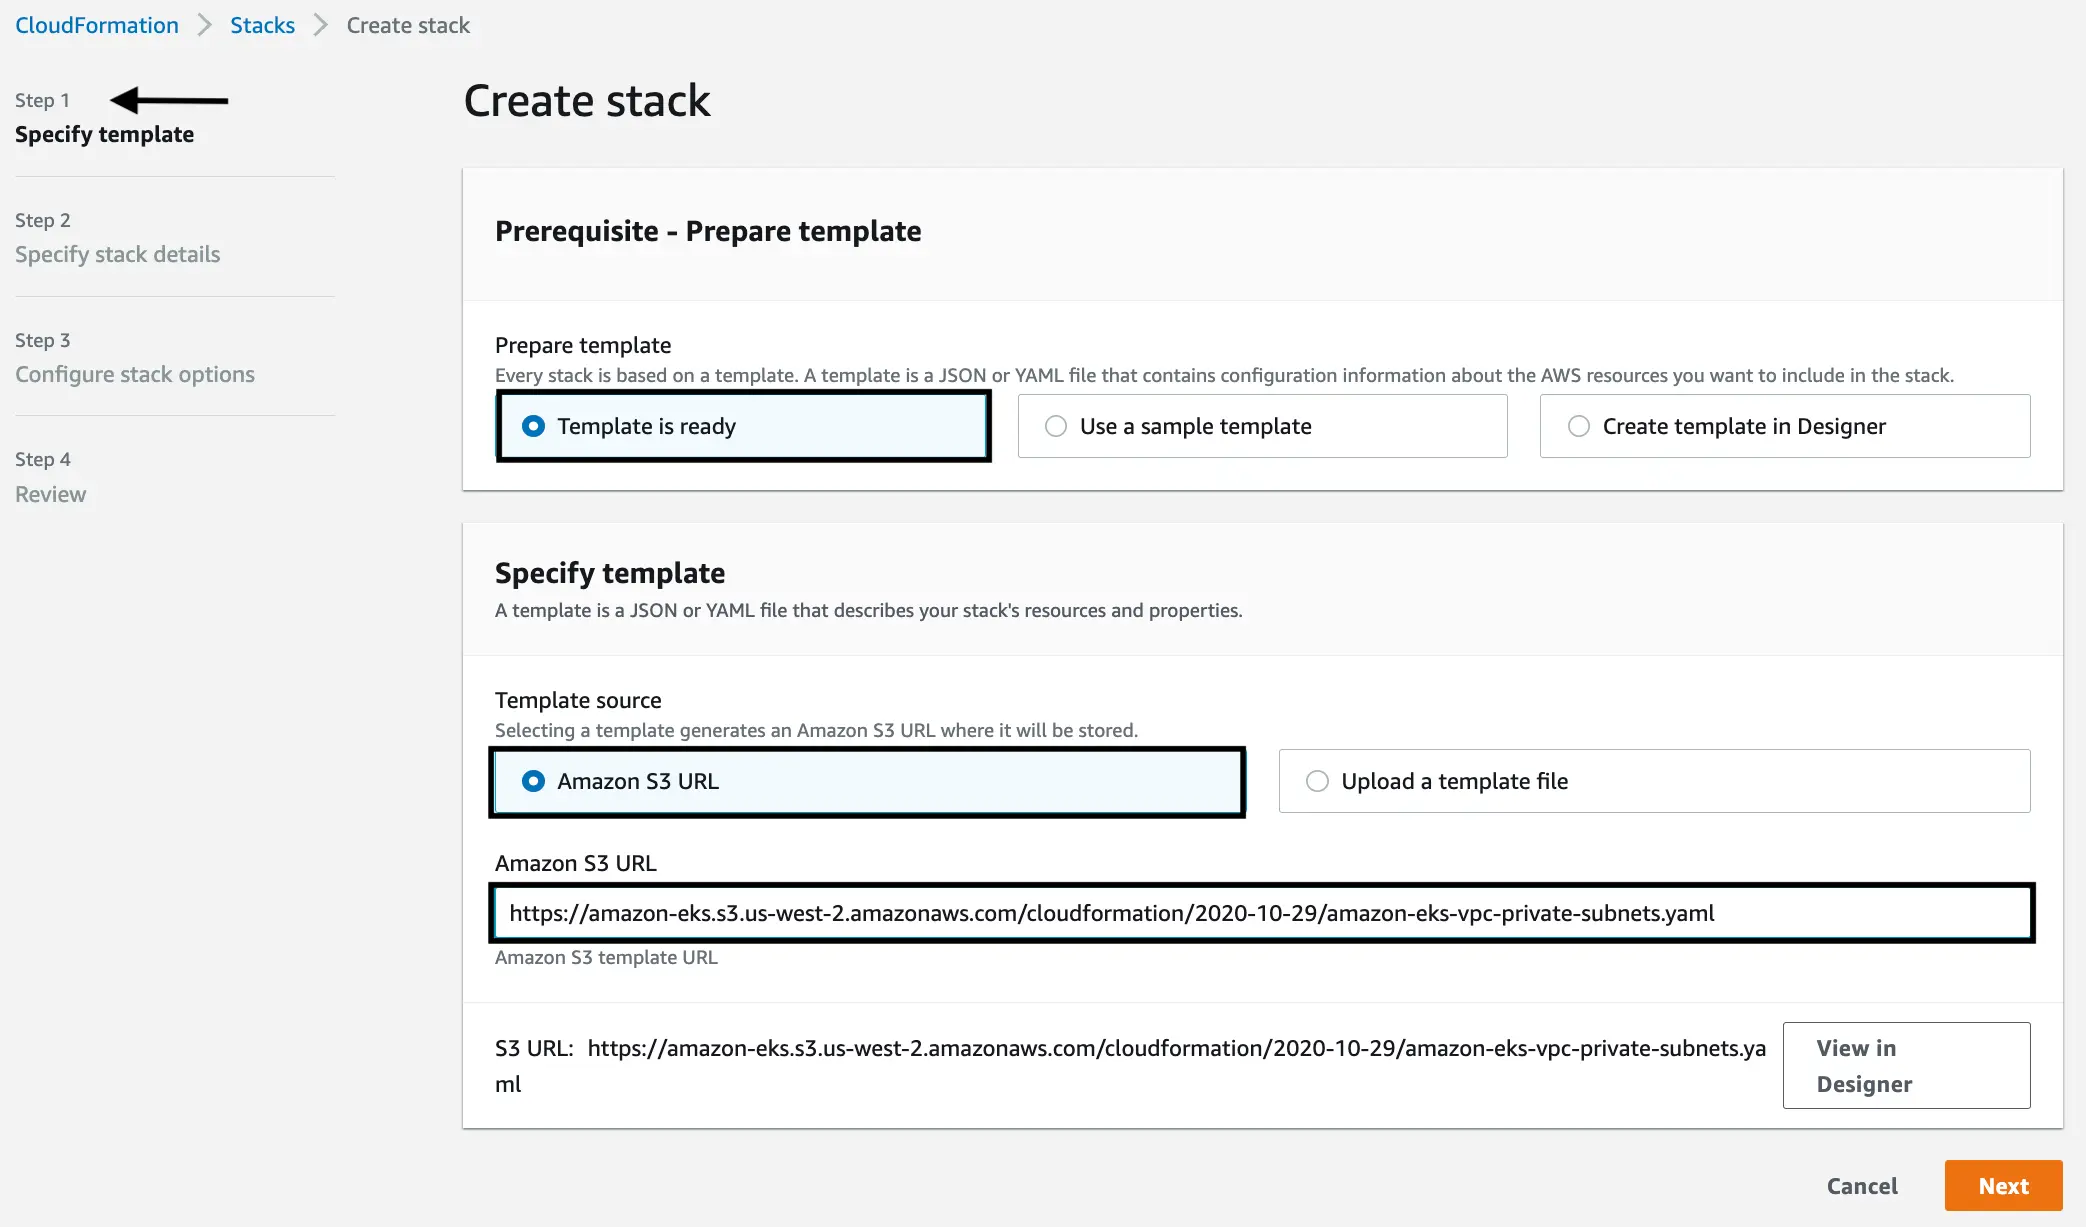
Specify stack details
Give your VPC a name, something that clearly indicates what kind of resource it is (i.e. a VPC) so that it is easily identifiable in later steps. In our case, we gave it the name
ztjh-vpc.You can keep the remaining “Parameters” set to their default values.
Click “Next”.

Configure stack options
Use the default options and click “Next”.
Review
This last page allows you to review the configurations you have made. From here, click “Create” and let CloudFormation create the VPC for you. This shouldn’t take more than a few minutes.
Create an EKS cluster IAM Role by navigating to the
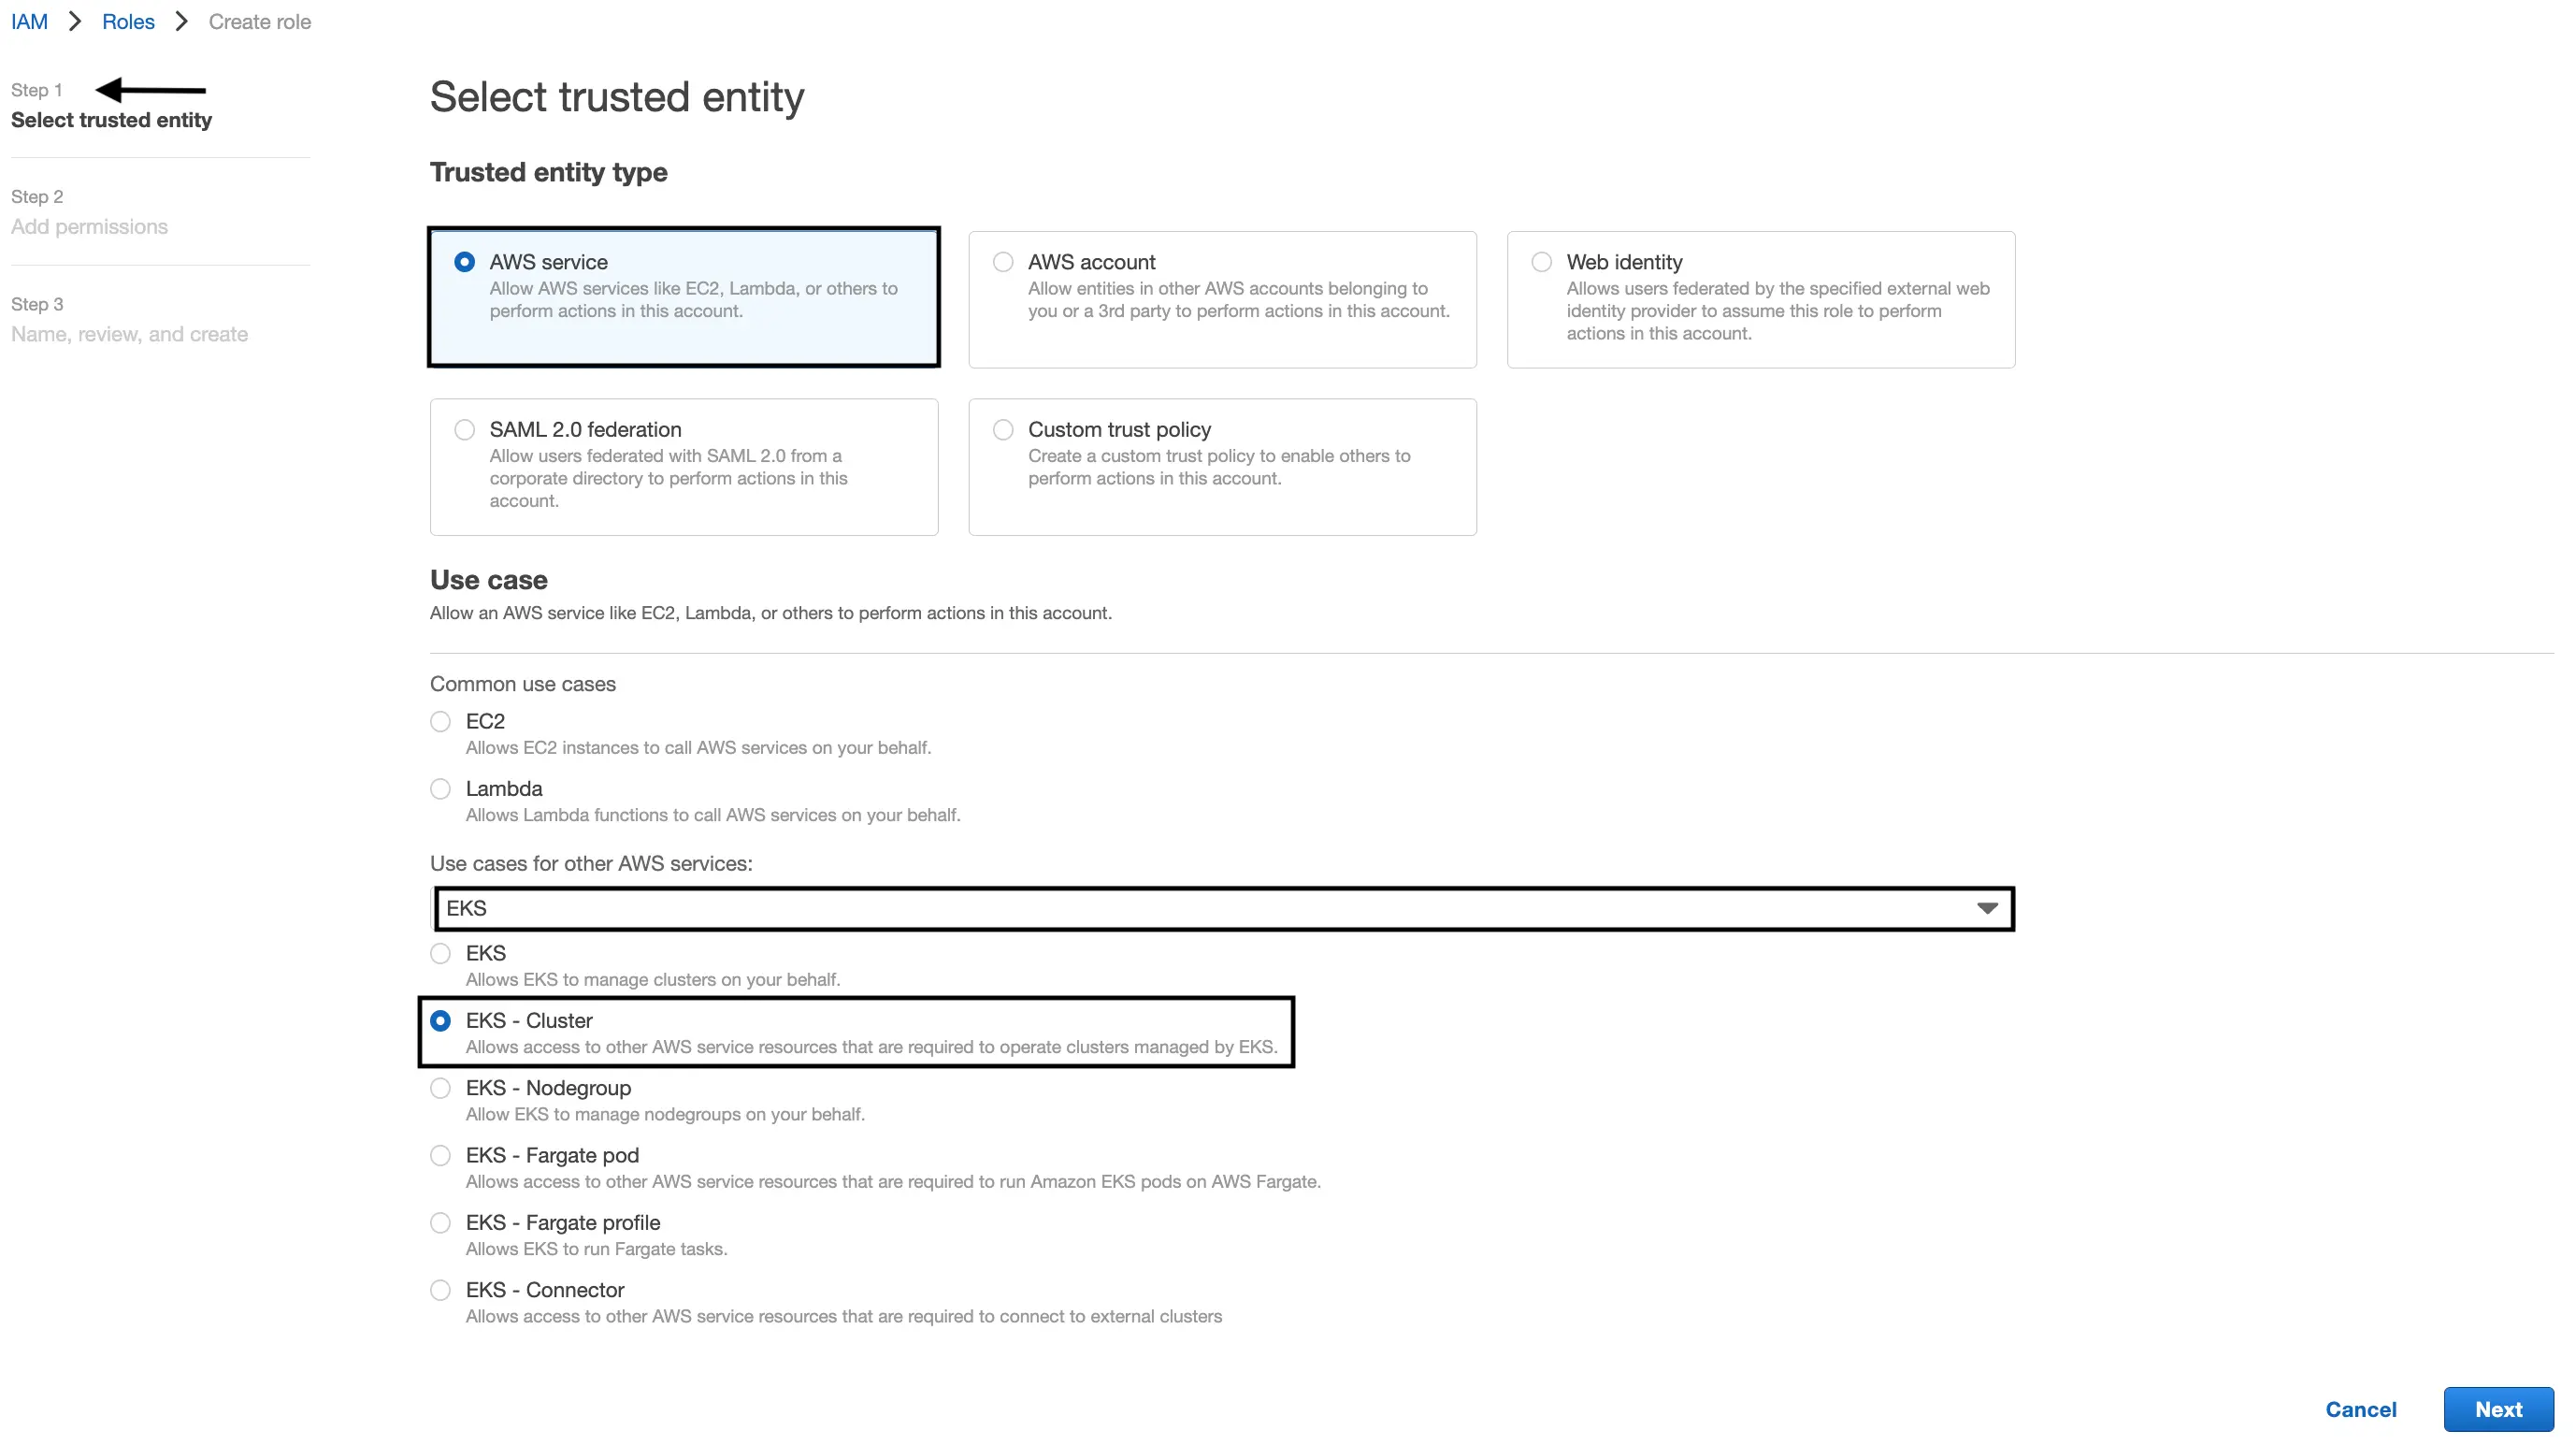
IAM > Roles page.Select trusted entity
Select “AWS Service” as the “Trusted entity type”.
Then search for “EKS” under the “Use case”.
Select the radio button next to “EKS cluster”.
Click “Next”.
Add permissions
Confirm the
AmazonEKSClusterPolicypermissions are attached. No other permissions are needed.Click “Next”.

Name, review, and create
Give your EKS role a name, something that clearly indicates what kind of resource it is (i.e. an EKS role) so that it is easily identifiable in later steps. Then click “Create”, and your role should be instantly available. In our case, we gave it the name
ztjh-eks-role.
Navigate to the EKS console and create an EKS cluster.
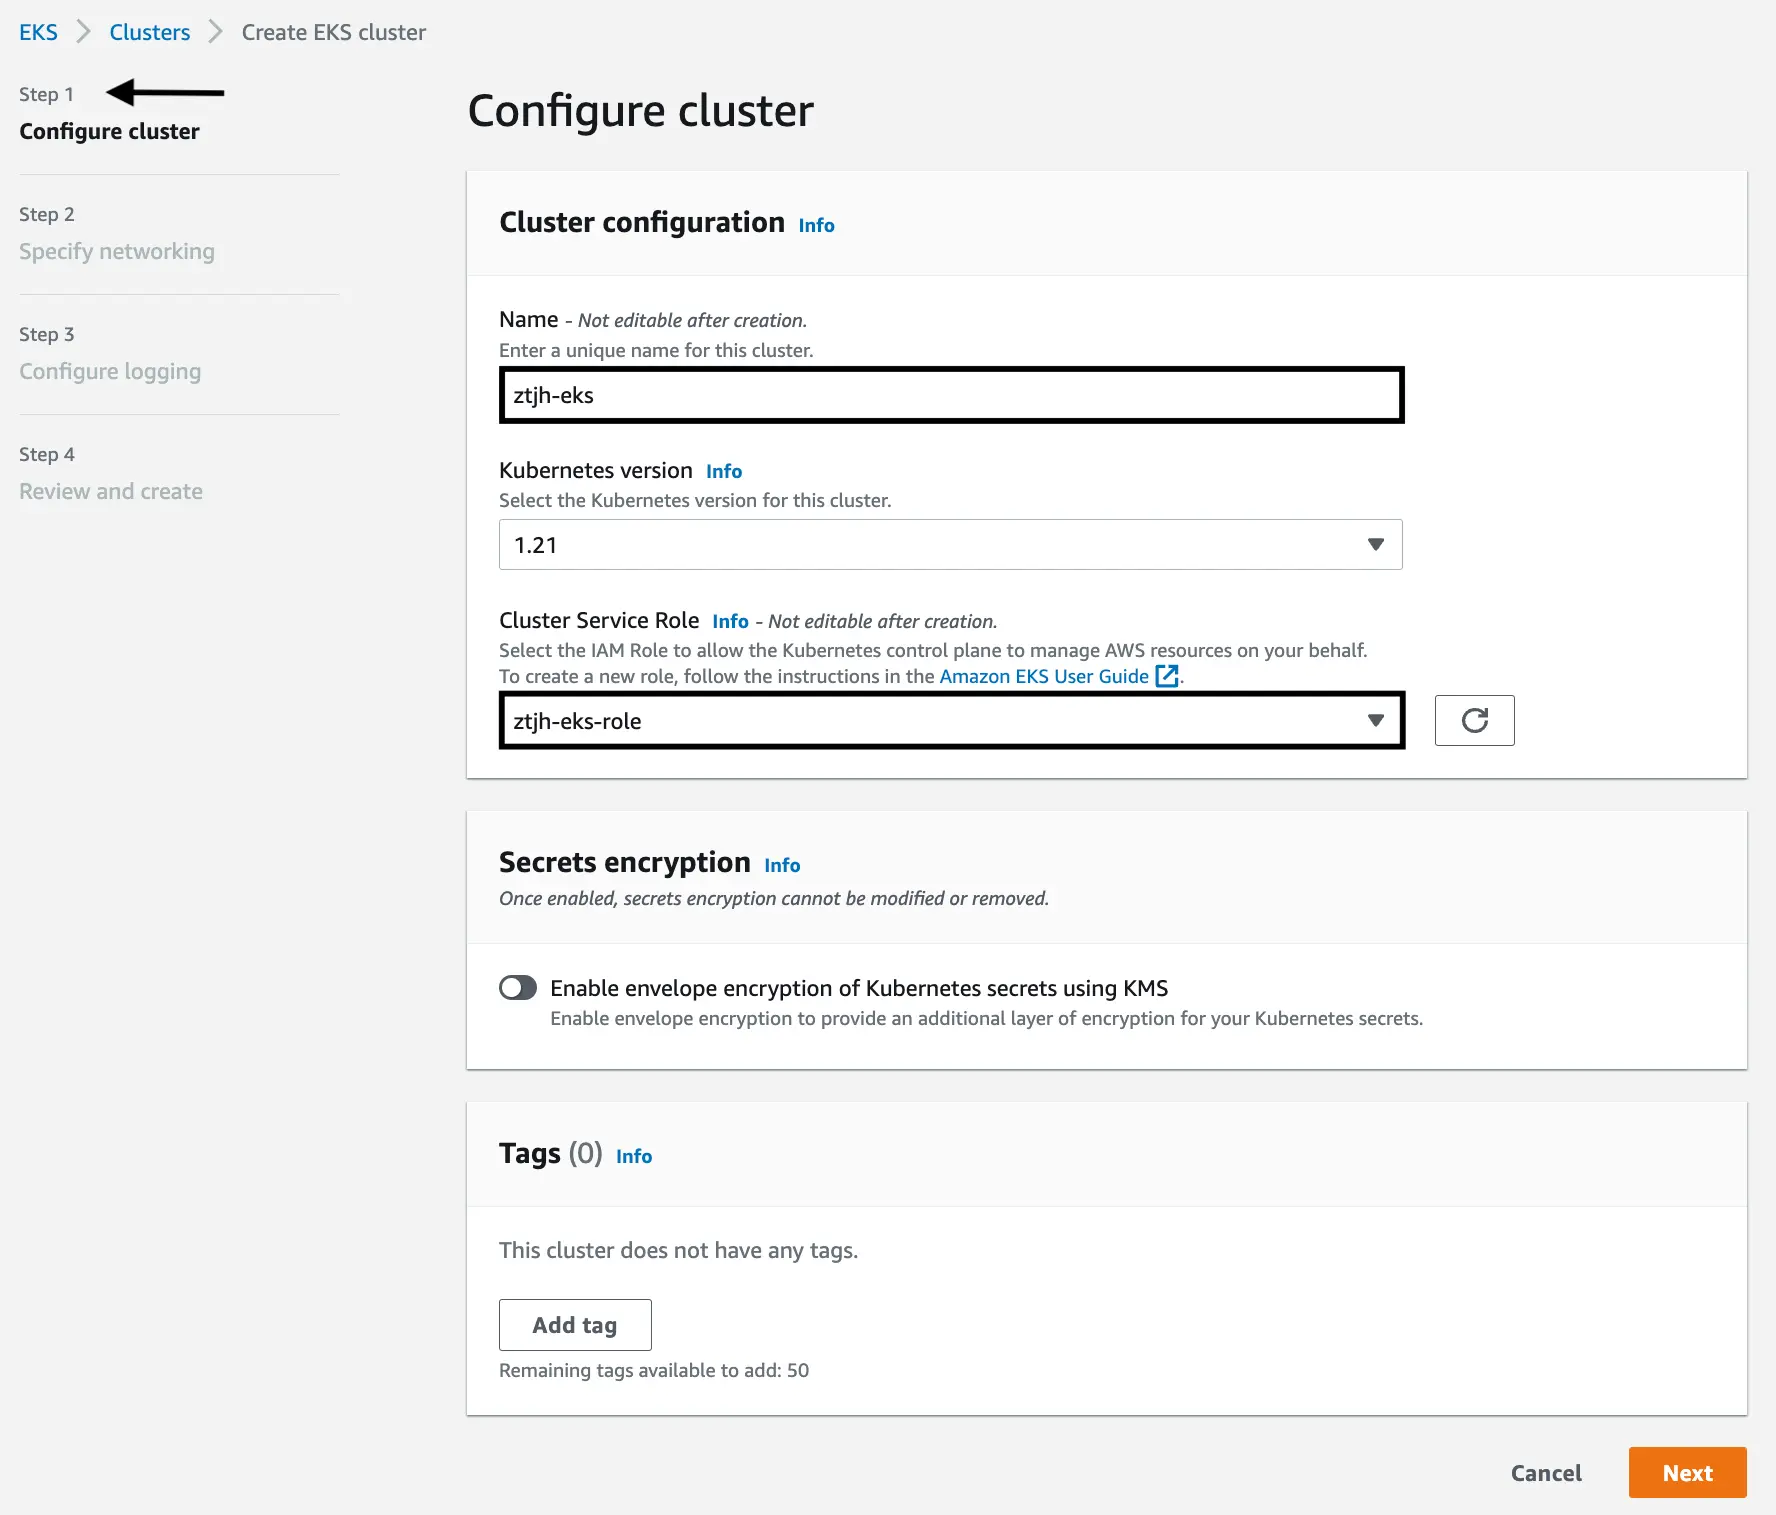
Configure cluster
Give your EKS cluster a unique and identifiable name. In our case, we gave it the name
ztjh-eks.Attach the newly created EKS role that we created in the previous action. In our case, we would use
ztjh-eks-role.Click “Next”.
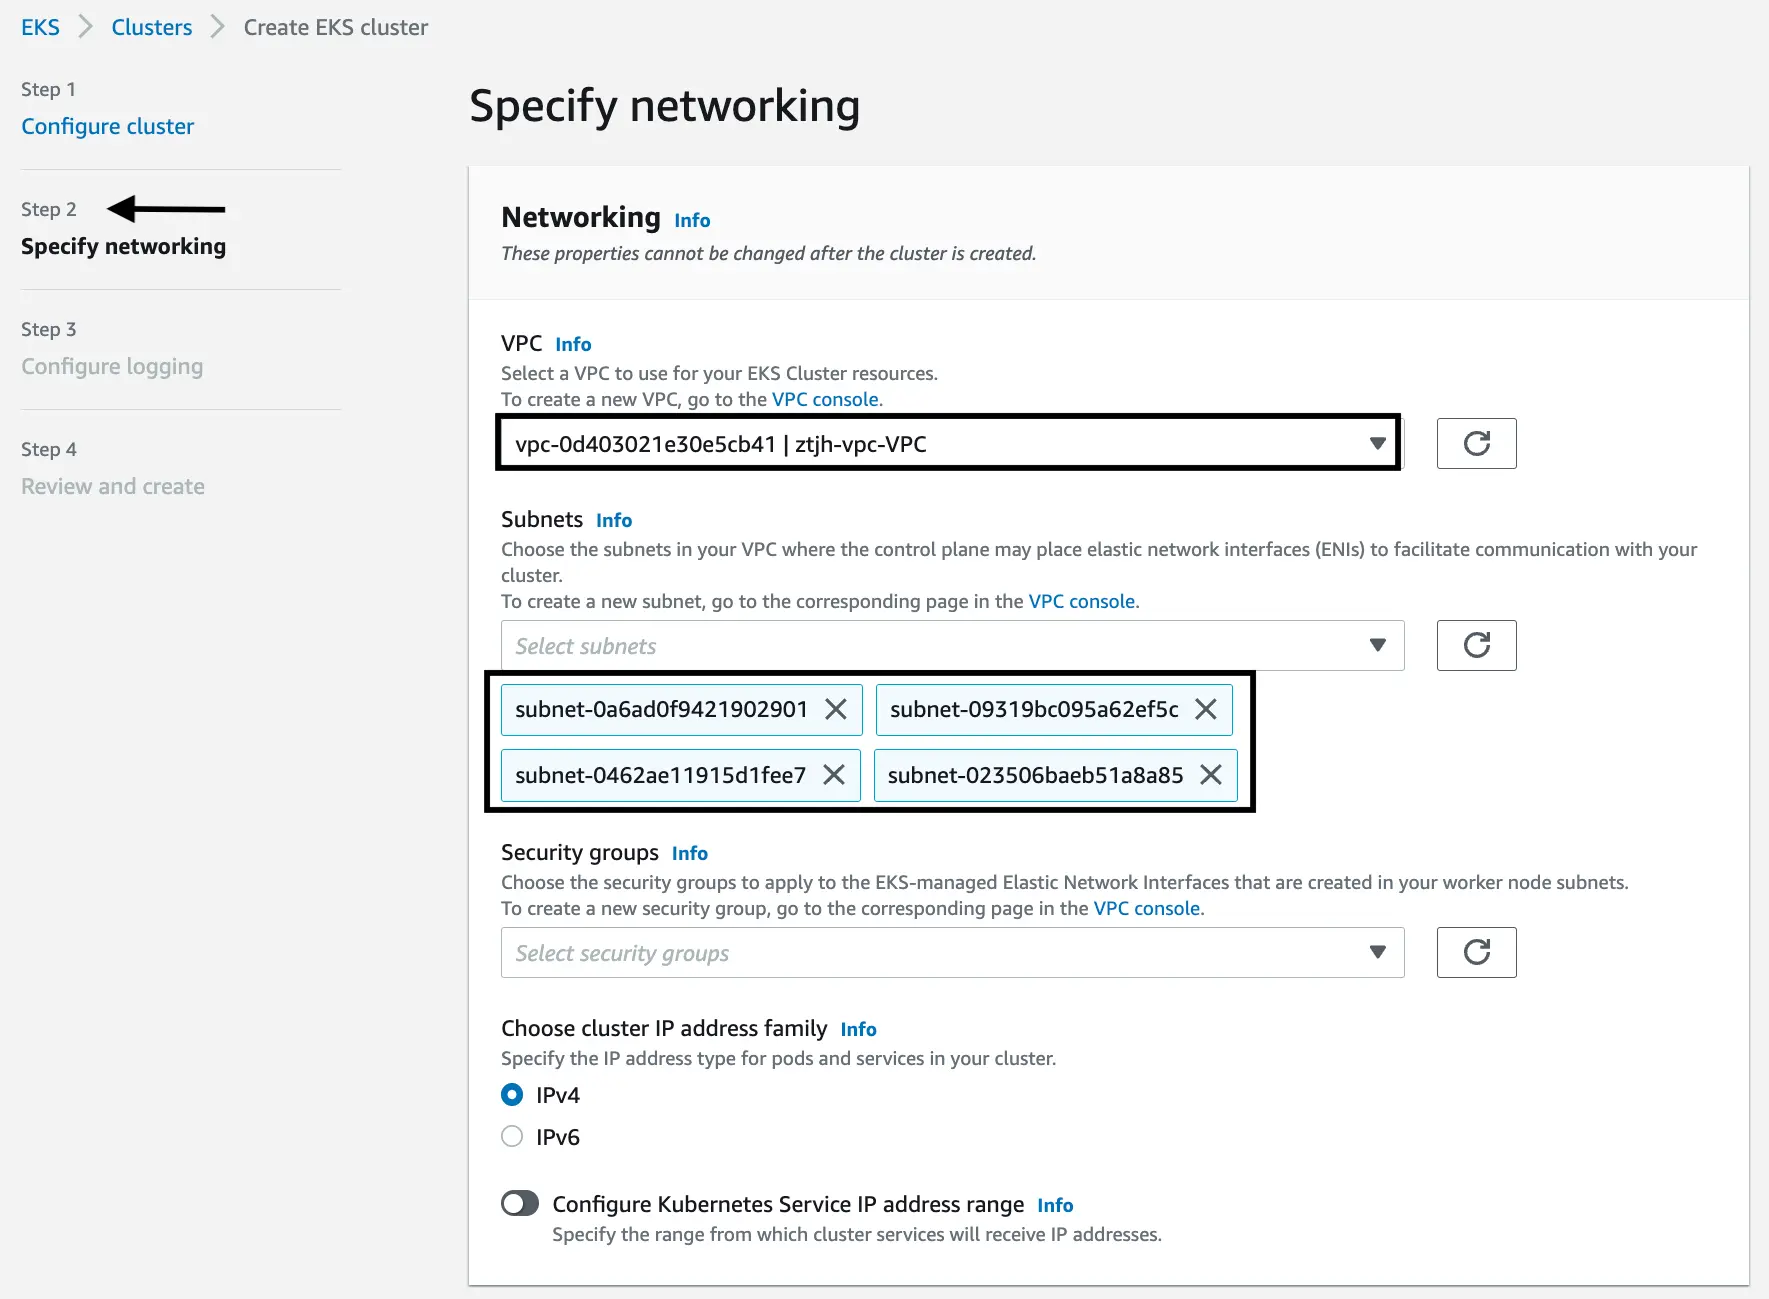
Specify networking
Now we configure our EKS cluster to use the VPC that we created above. In the “VPC” section, select your VPC. In our case, we would use
ztjh-vpc. The name on the screenshot might seem a little confusiong but this is because the first part is the unique VPC ID and the second part (ztjh-vpc-VPC) is the name we chose with-VPCappended.The subnets should be automatically added in the “Subnet” section once the VPC is selected.
Leave the remaining items as is, and click “Next”.
Configure logging
Keep the default logging configuration settings, and click “Next”.
Review and create
Finally, review your EKS configurations, then click “Create”. It might take 10-15 minutes for the EKS cluster to be created. Now is a good time to call your mom, text your friend back, or simply get up and stretch your legs.
Configure your computer to communicate with your cluster
Create or update your local
kubeconfigfile.This step assumes you have installed the AWS CLI, one of the prerequisites listed above. It also assumes you have your AWS credentials stored in the
~/.aws/credentialsfile.NOTE: AWS allows you to store multiple credentials (i.e. labeled “profiles”) in
~/.aws/credentialsfile so if you need to specify which account these credentials are tied to, runexport AWS_PROFILE=<your-profile>before the command below. If you only have one AWS profile, and it’s set to “default”, you can ignore this note.aws eks update-kubeconfig --region <region-code> --name <my-cluster>Verify you can communicate with the Kubernetes cluster.
This step assumes you have installed
kubectl, one of the prerequisites listed above.NOTE: Kubernetes allows you to connect with multiple contexts (or clusters). If you need to switch contexts, run
kubectl config set-context --name <my-cluster>, where<my-cluster>would beztjh-eksin our example.kubectl get scvThe output should look like this:
NAME             TYPE        CLUSTER-IP   EXTERNAL-IP   PORT(S)   AGE
svc/kubernetes   ClusterIP   10.100.0.1   <none>        443/TCP   1m
If you get an error message like
could not get token: AccessDenied: Access denied, inspect your~/.kube/configand have a look at this troubleshooting guide.
Create nodes
In the AWS “Getting Started” guide, you have a choice between “Fargate - Linux” and “Managed nodes - Linux”. Select the tab “Managed nodes - Linux” to view the steps that we are following here.
Create an EKS node-group IAM Role
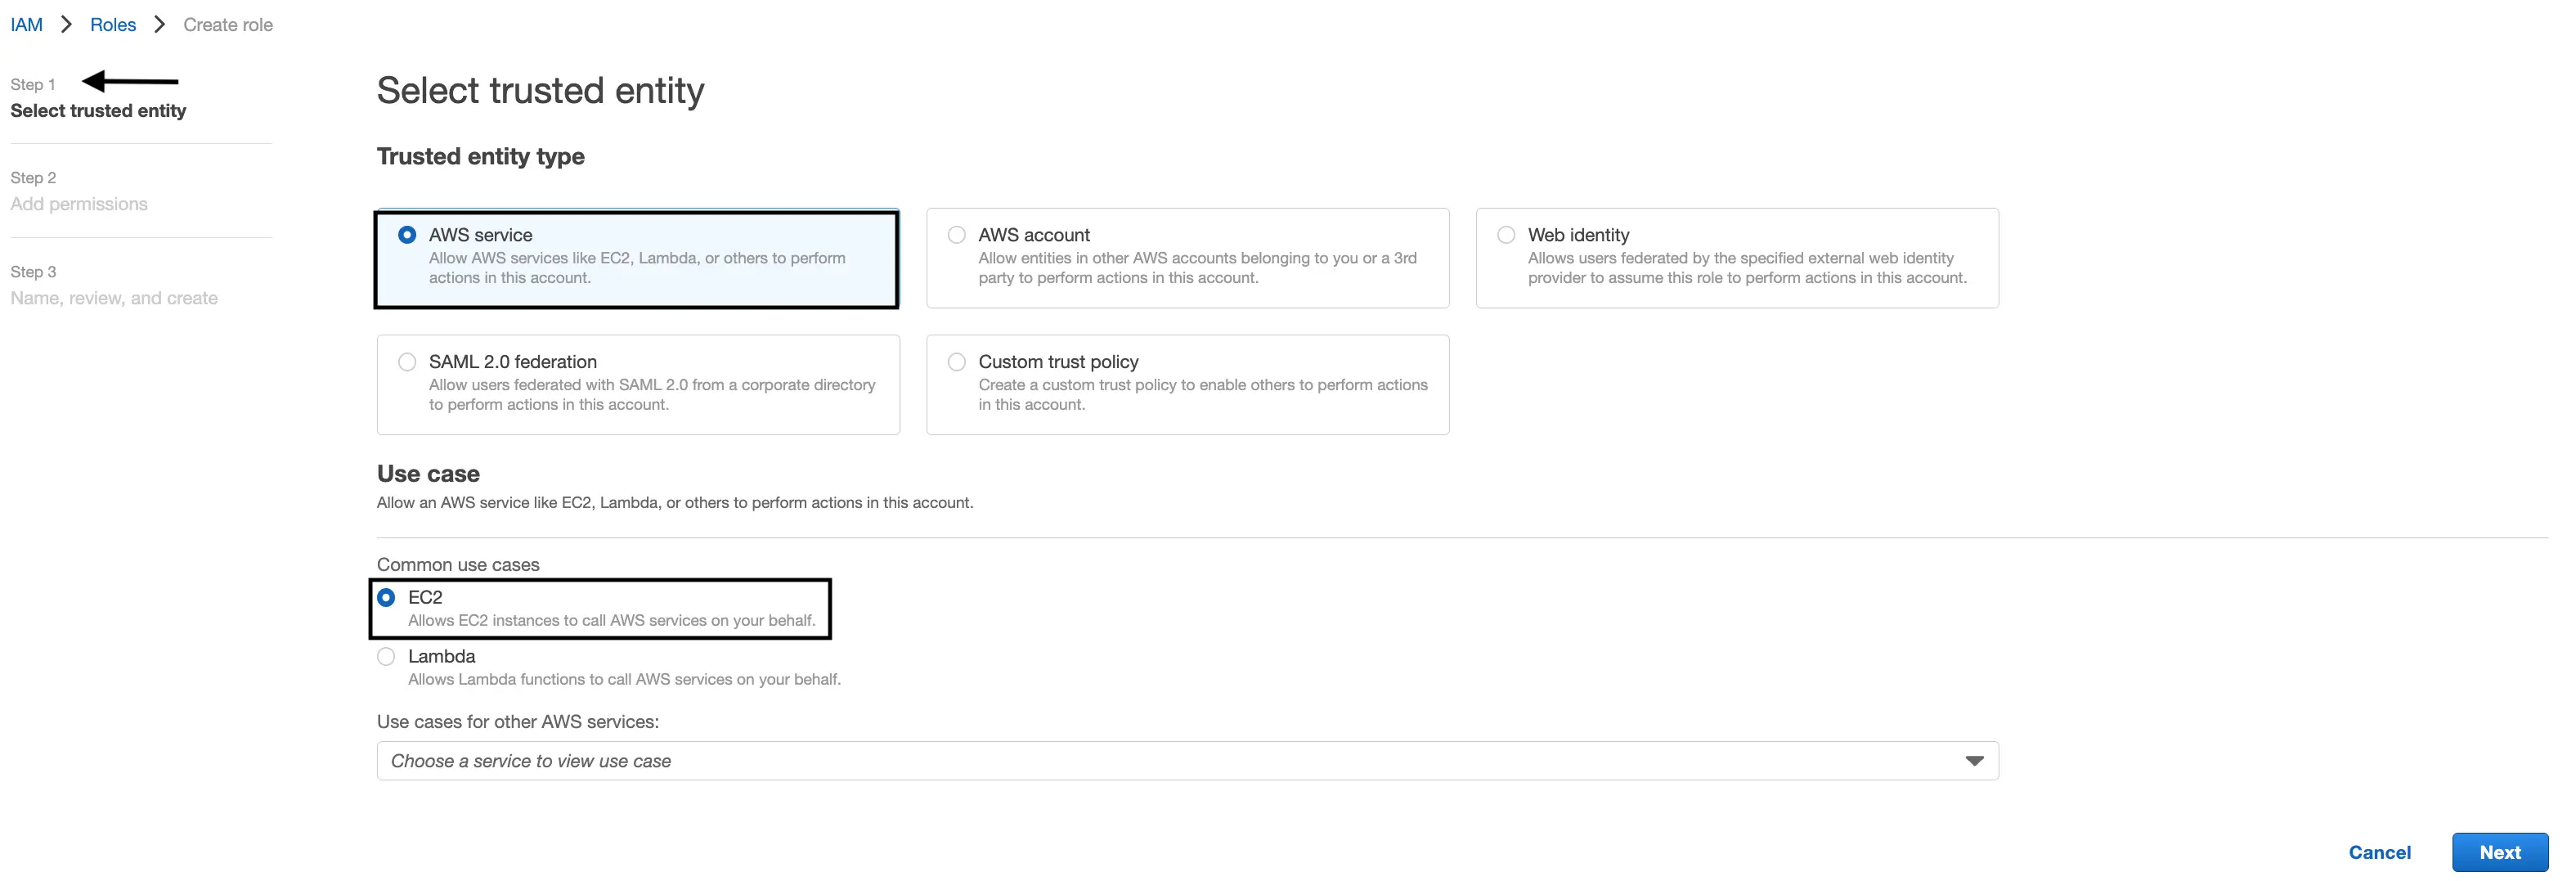
Select trusted entity
Select “AWS Service” as the “Trusted entity type”.
Select “EC2” under the “Use case”.
Then click “Next”.
Add permissions
Add the following permissions to this new role by searching for them and selecting them one at a time:
AmazonEKSWorkerNodePolicyAmazonEC2ContainerRegistryReadOnlyAmazonEKS_CNI_Policy.
Then click “Next”.

Name, review, and create
Give your EKS role a name, something that clearly indicates what kind of resource it is (i.e. an EKS node-group role) so that it is easily identifiable in later steps. Then click “Create”, and your role should be instantly available. In our case, we gave it the name
ztjh-node-role.Navigate to the EKS console, select the EKS cluster created above and create a node-group.
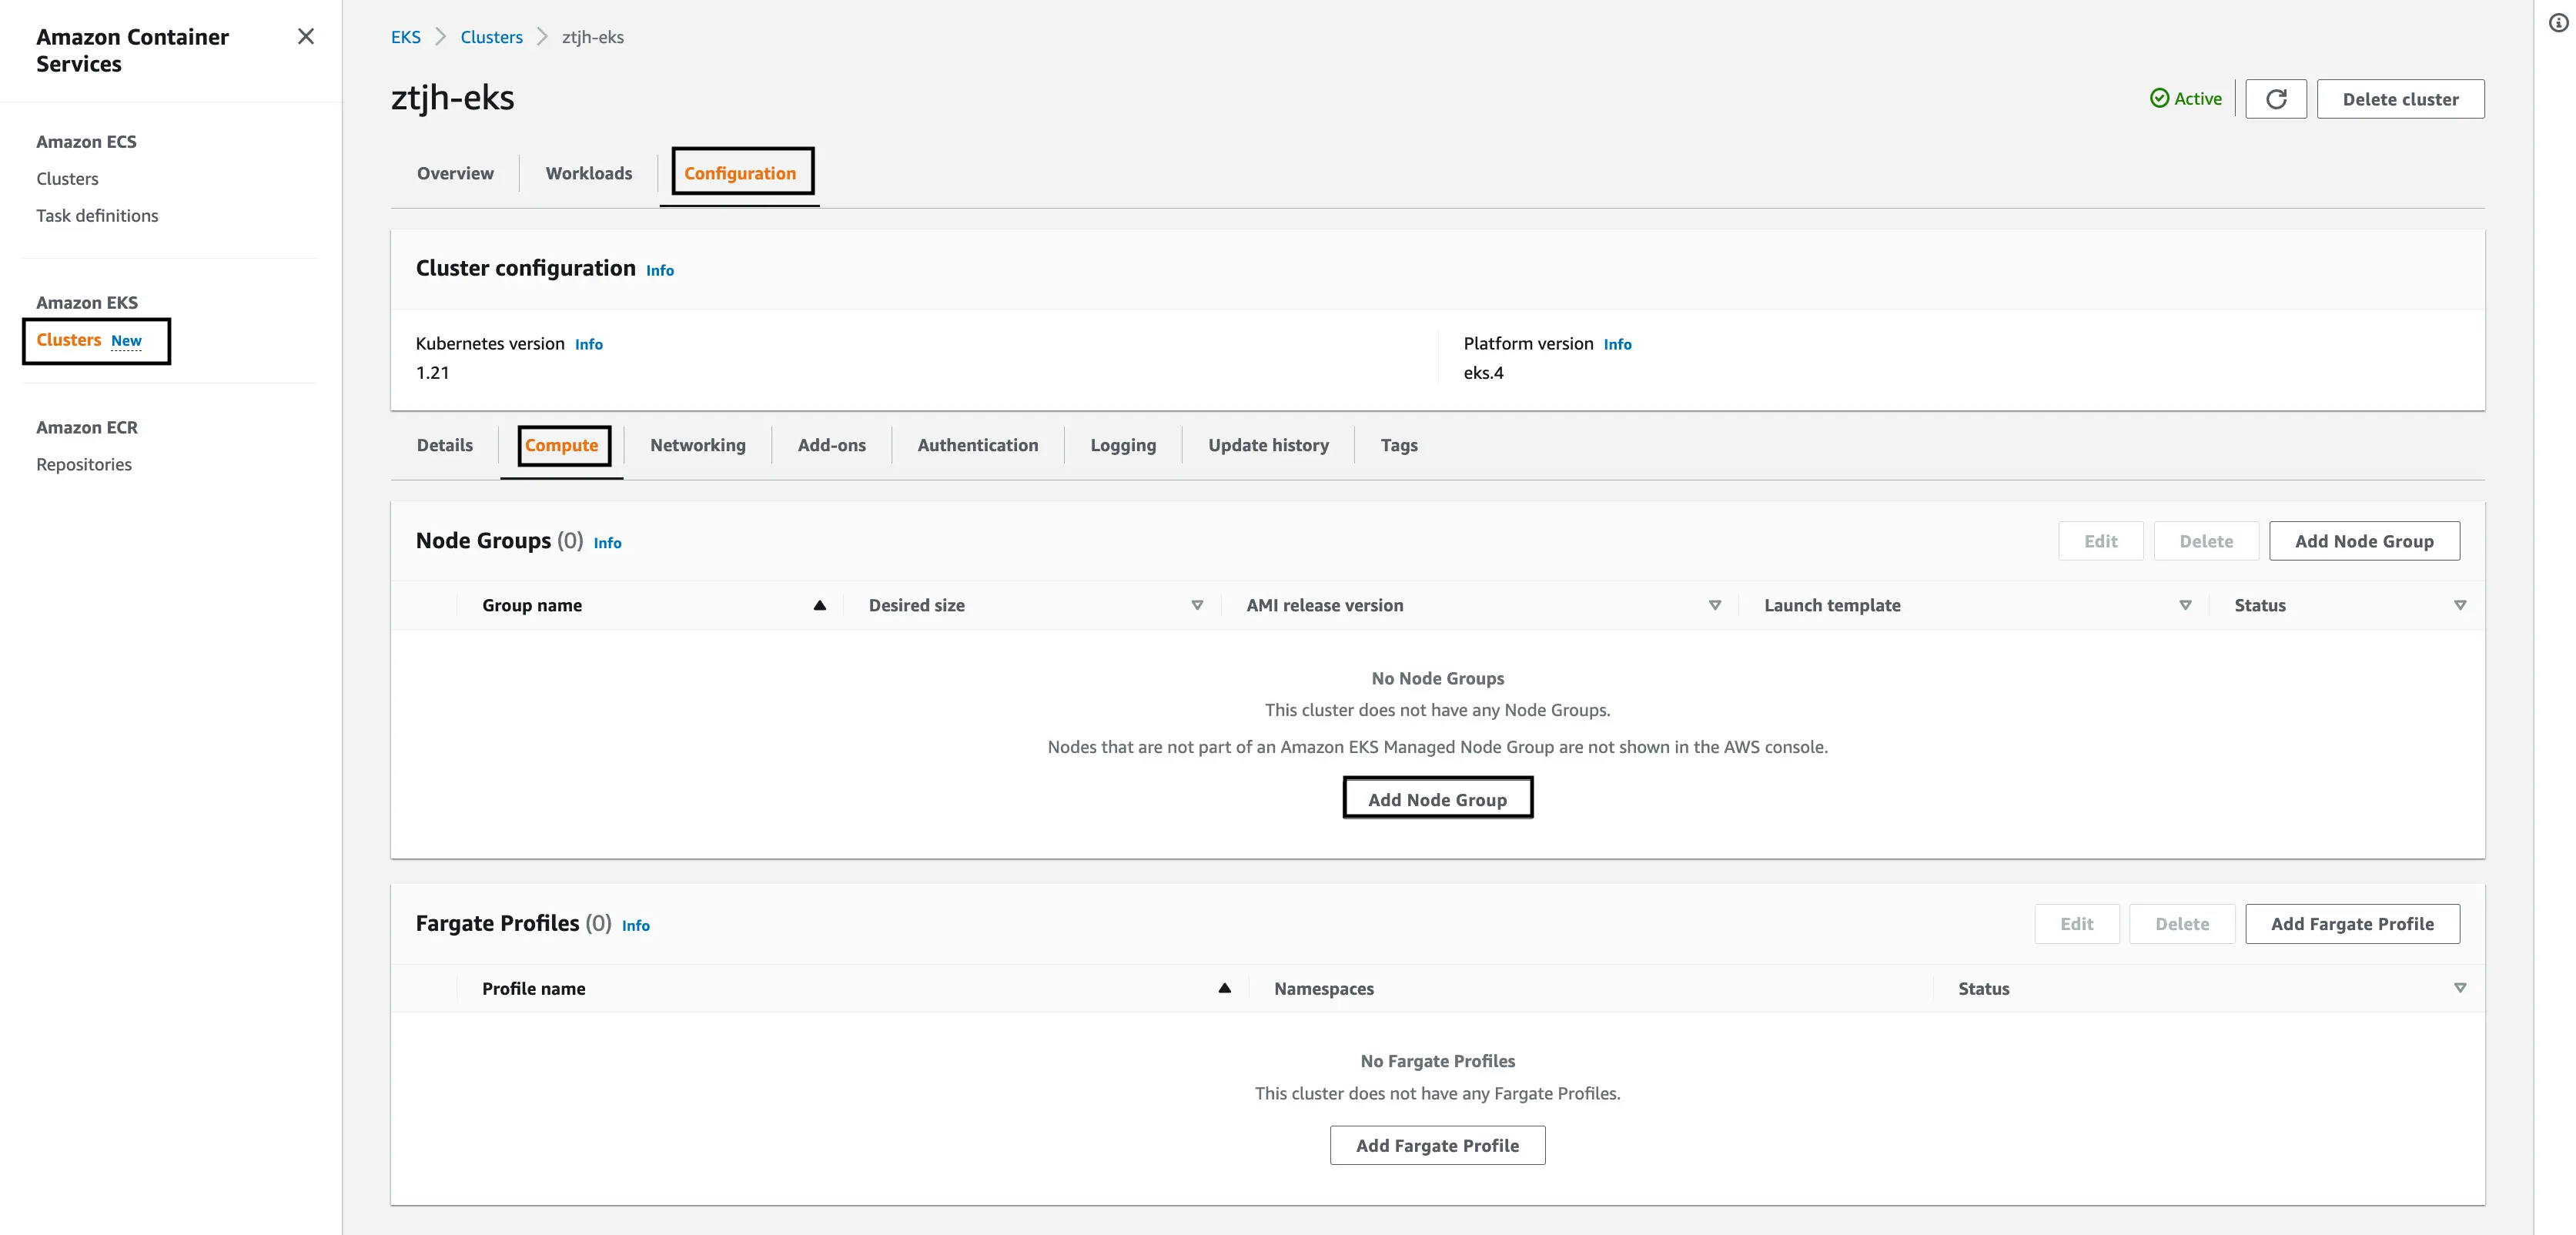
Once you’ve navigated to the EKS cluster, in our case
ztjh-eks, select “Configuration” on the cluster menu bar.Select the “Compute” tab.
Select, “Add Node Group”.
Configure Node Group
Give your EKS node group a name, again something easily identifiable. In our case, we gave it the name
ztjh-ng.For the “Node IAM Role”, select the role that we created in the previous action. In our case,
ztjh-node-role.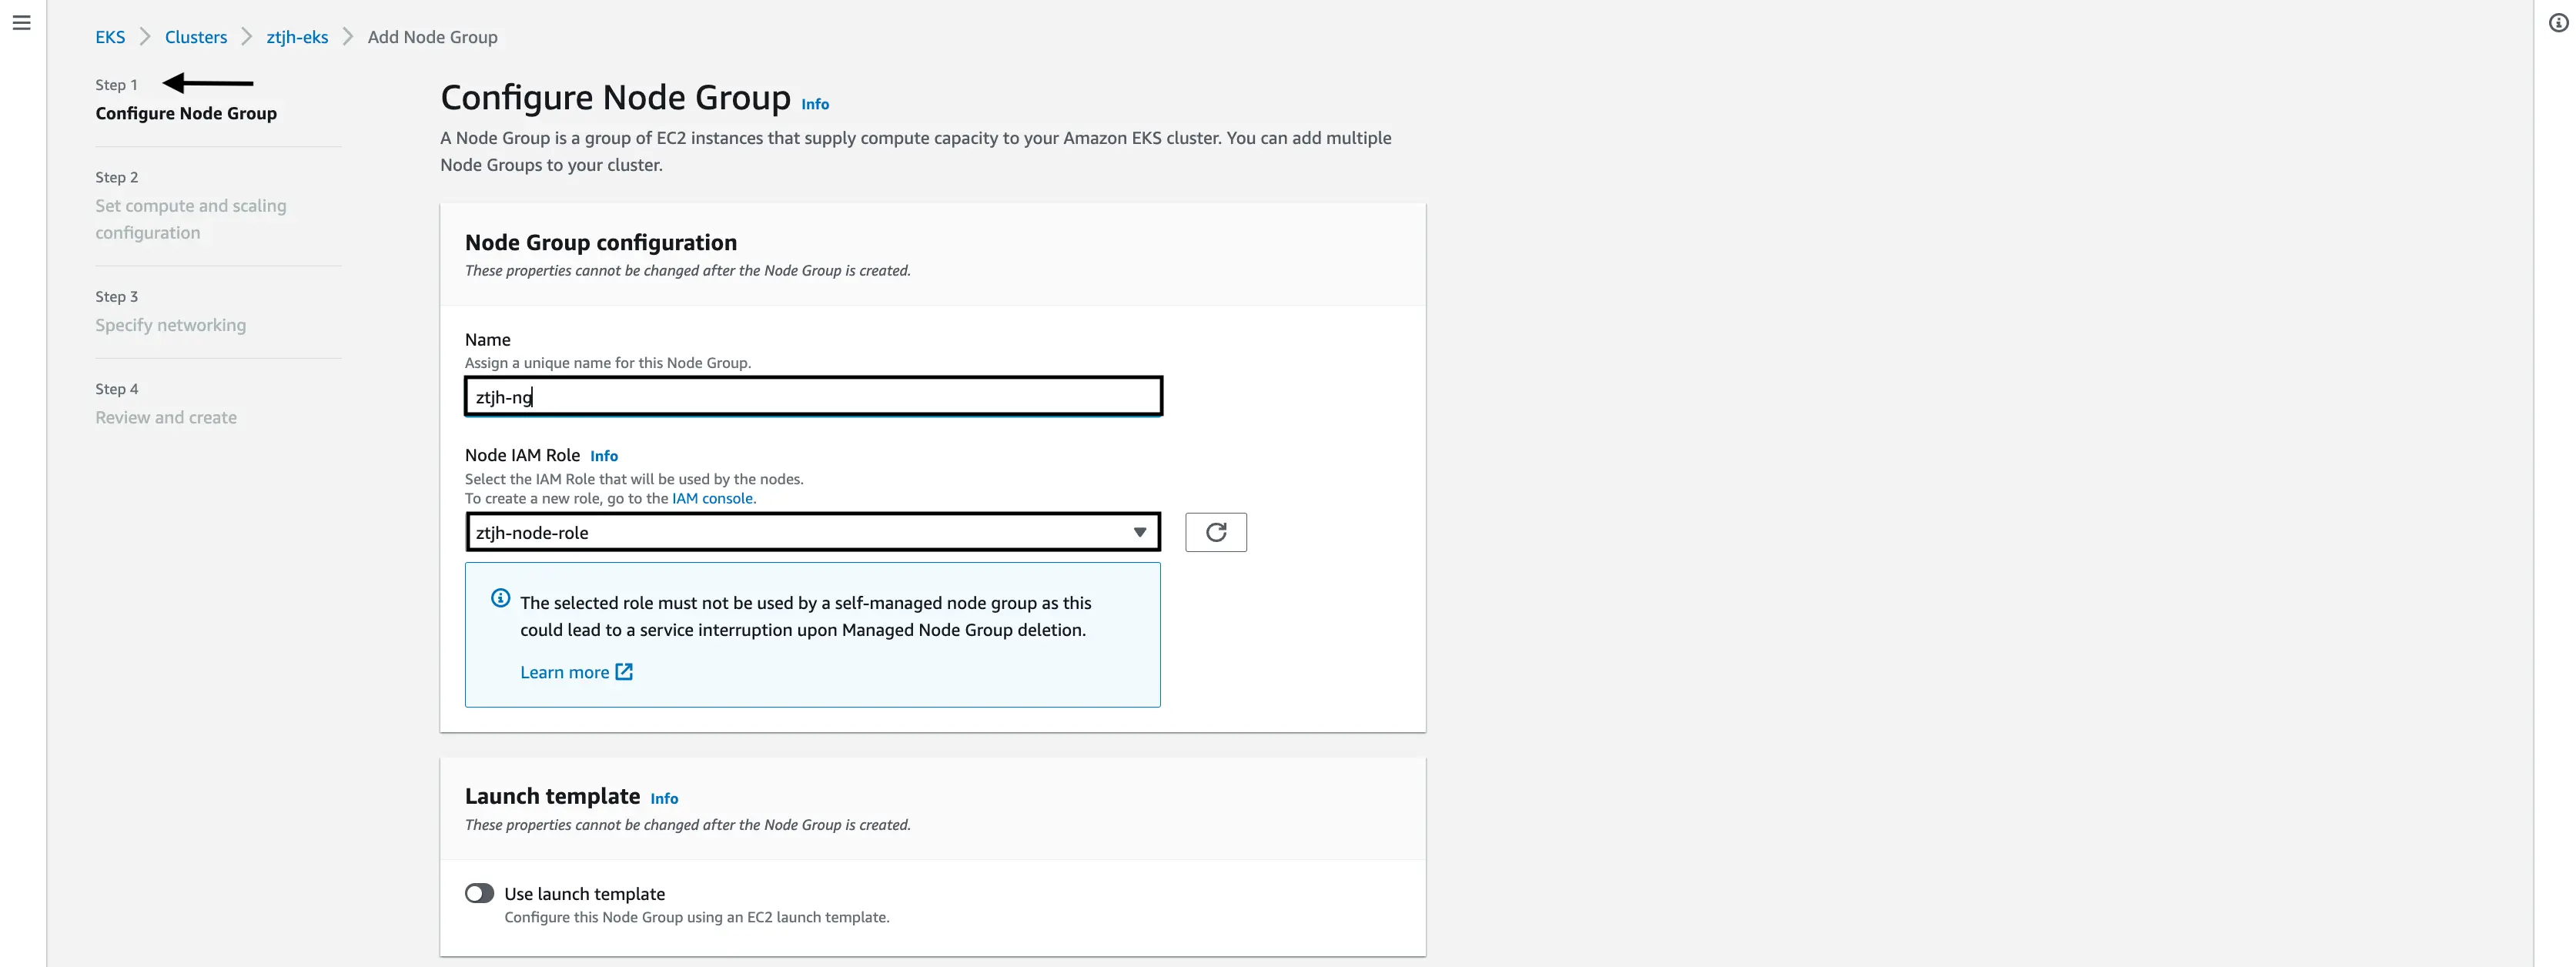
Set compute and scaling configurations
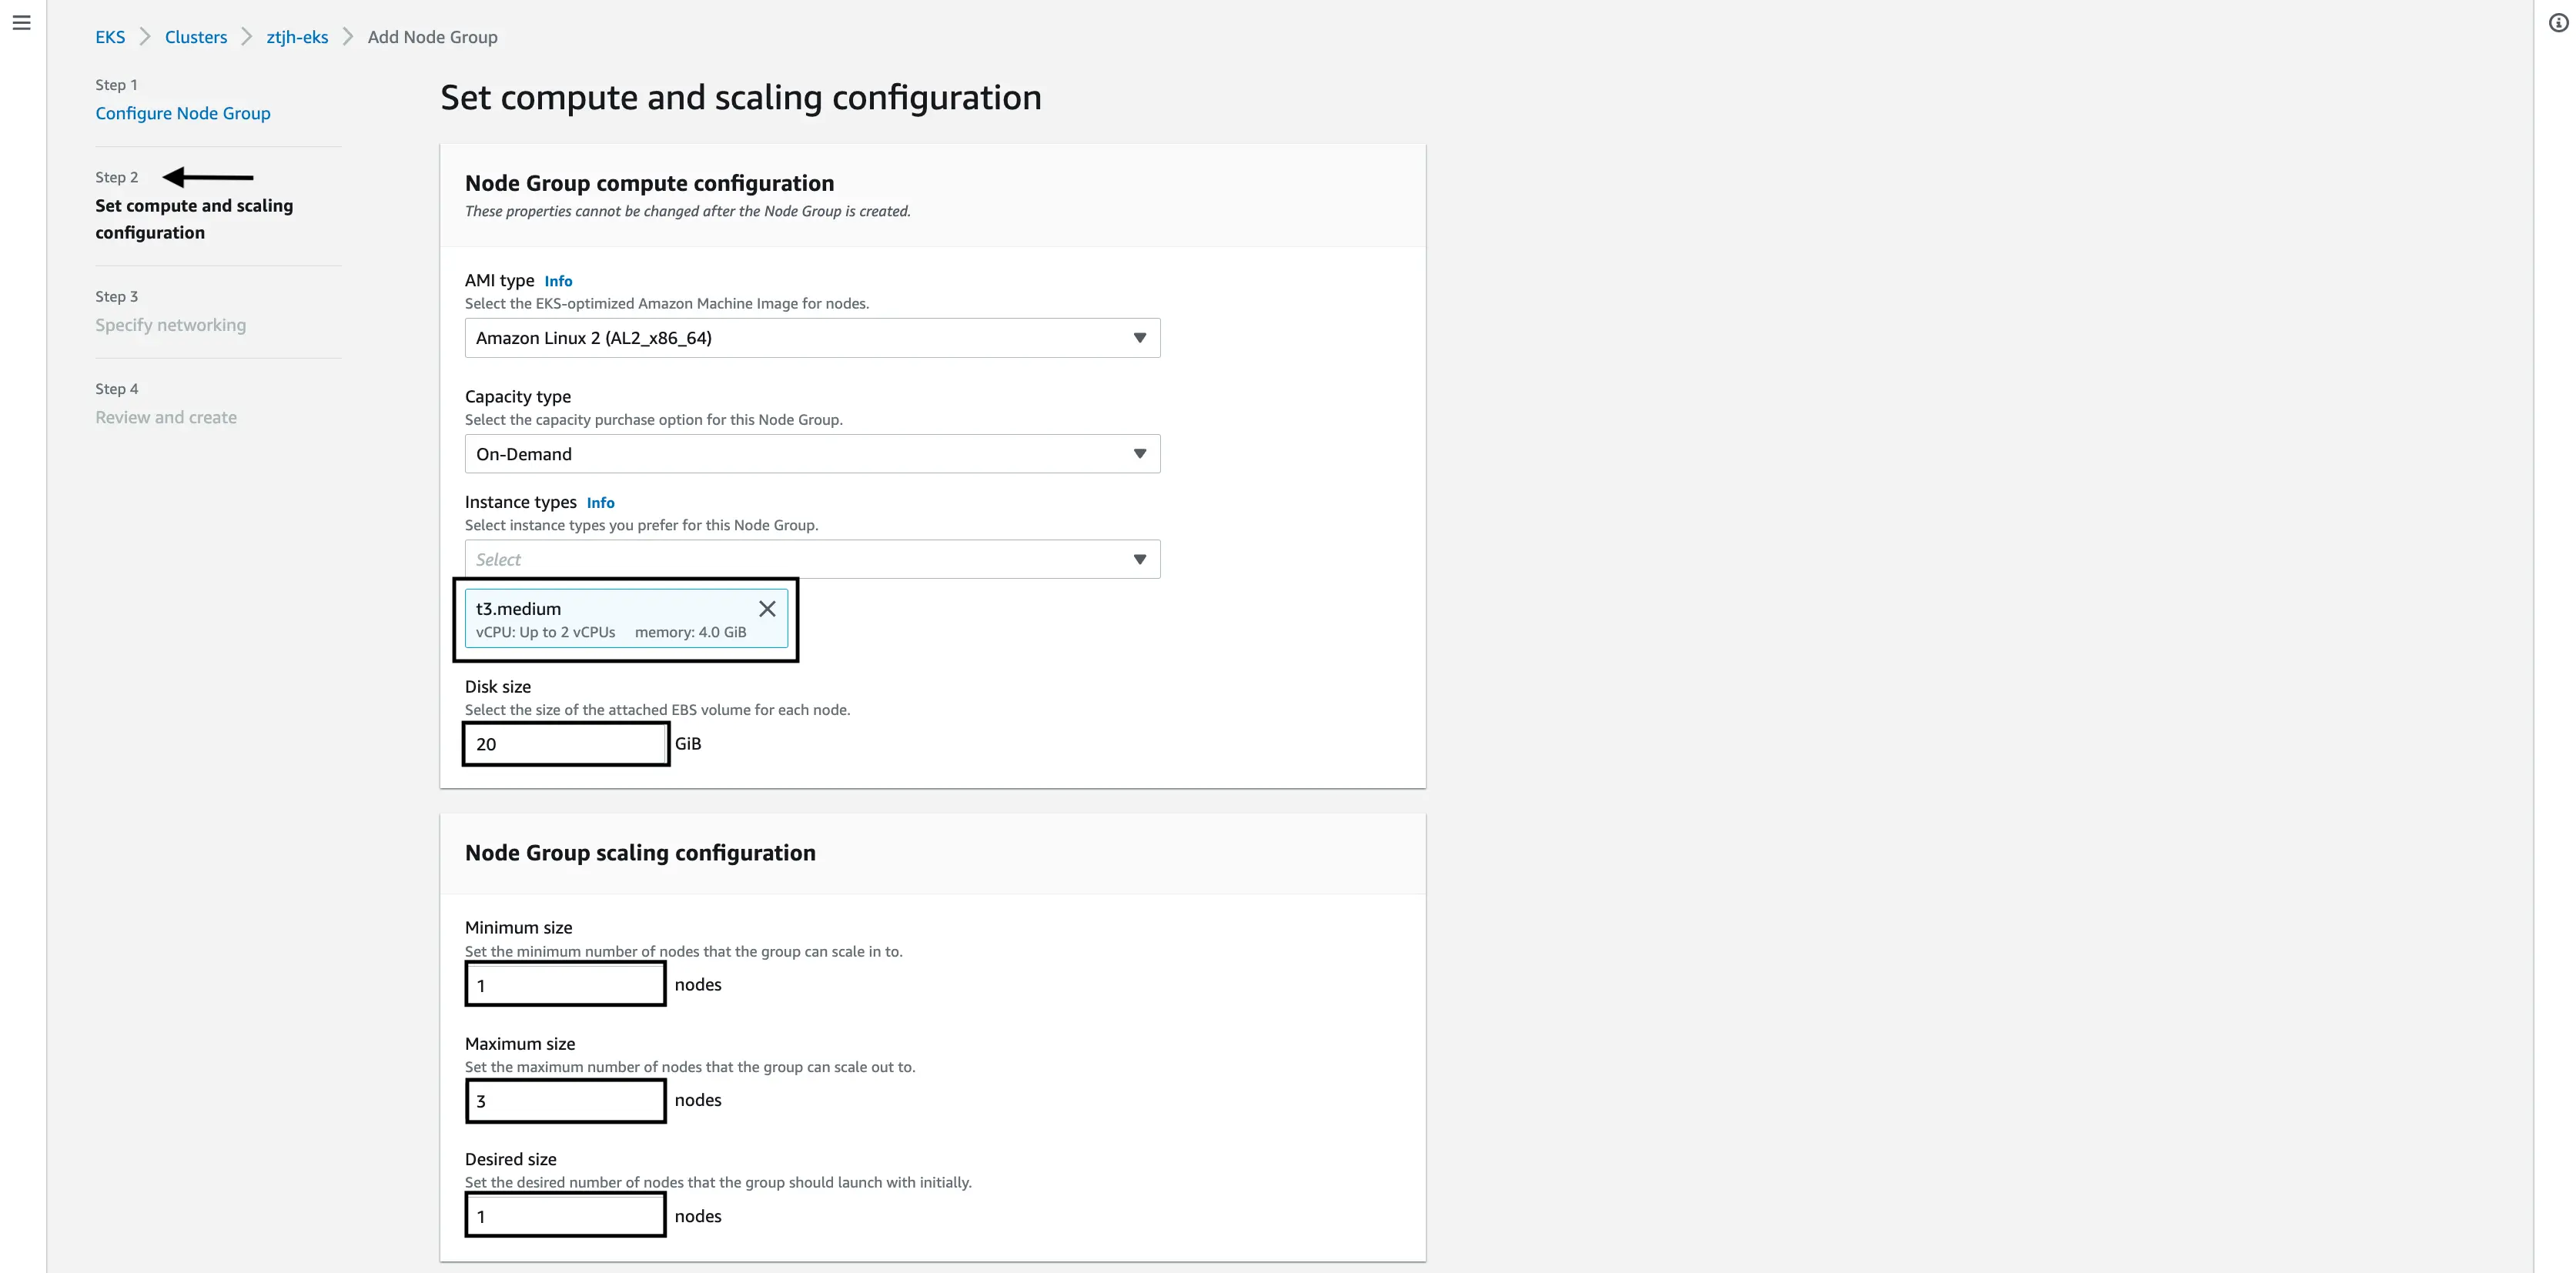
In this step, we will have to make a handful of decisions related to cluster resources, namely the underlying EC2 instance type, disk size, and scaling options.
Under “Instance type”, select the EC2 instance that your cluster will run on. AWS has many options at various price points. In our case, we went with a
t3.mediumwhich has 2vCPU and 4GiB of RAM (memory).NOTE: Keep in mind that not all EC2 instances will be availabe in your AWS Region and not all EC2 instances can be run EKS clusters.
For “Disk size”, select the size in gigabytes (GiB) for the attached block store (EBS). This will be the amount of disk space that is attached to each Kubernetes node (read server) and used by the Kubernetes cluster itself. The default of 20GiB should be sufficient for most uses cases.
NOTE: This is NOT the disk/volume size that each user is assigned. By default each user given 10GiB.
NOTE: Although JupyterHub can be configured to have a shared filsystem, this is also not what we are referring to here either.
Under “Node Group scaling configurations”, set the “Minimum size” and “Maximum size” that the nodes in this cluster will scale to. You can also set a “Desired size” which is the number of nodes the cluster will scale to upon initial launch.
NOTE: The “Minimum size” must be 1 or greater.
Specify network
For the network settings, under “Subnet”, select all of the subnets.
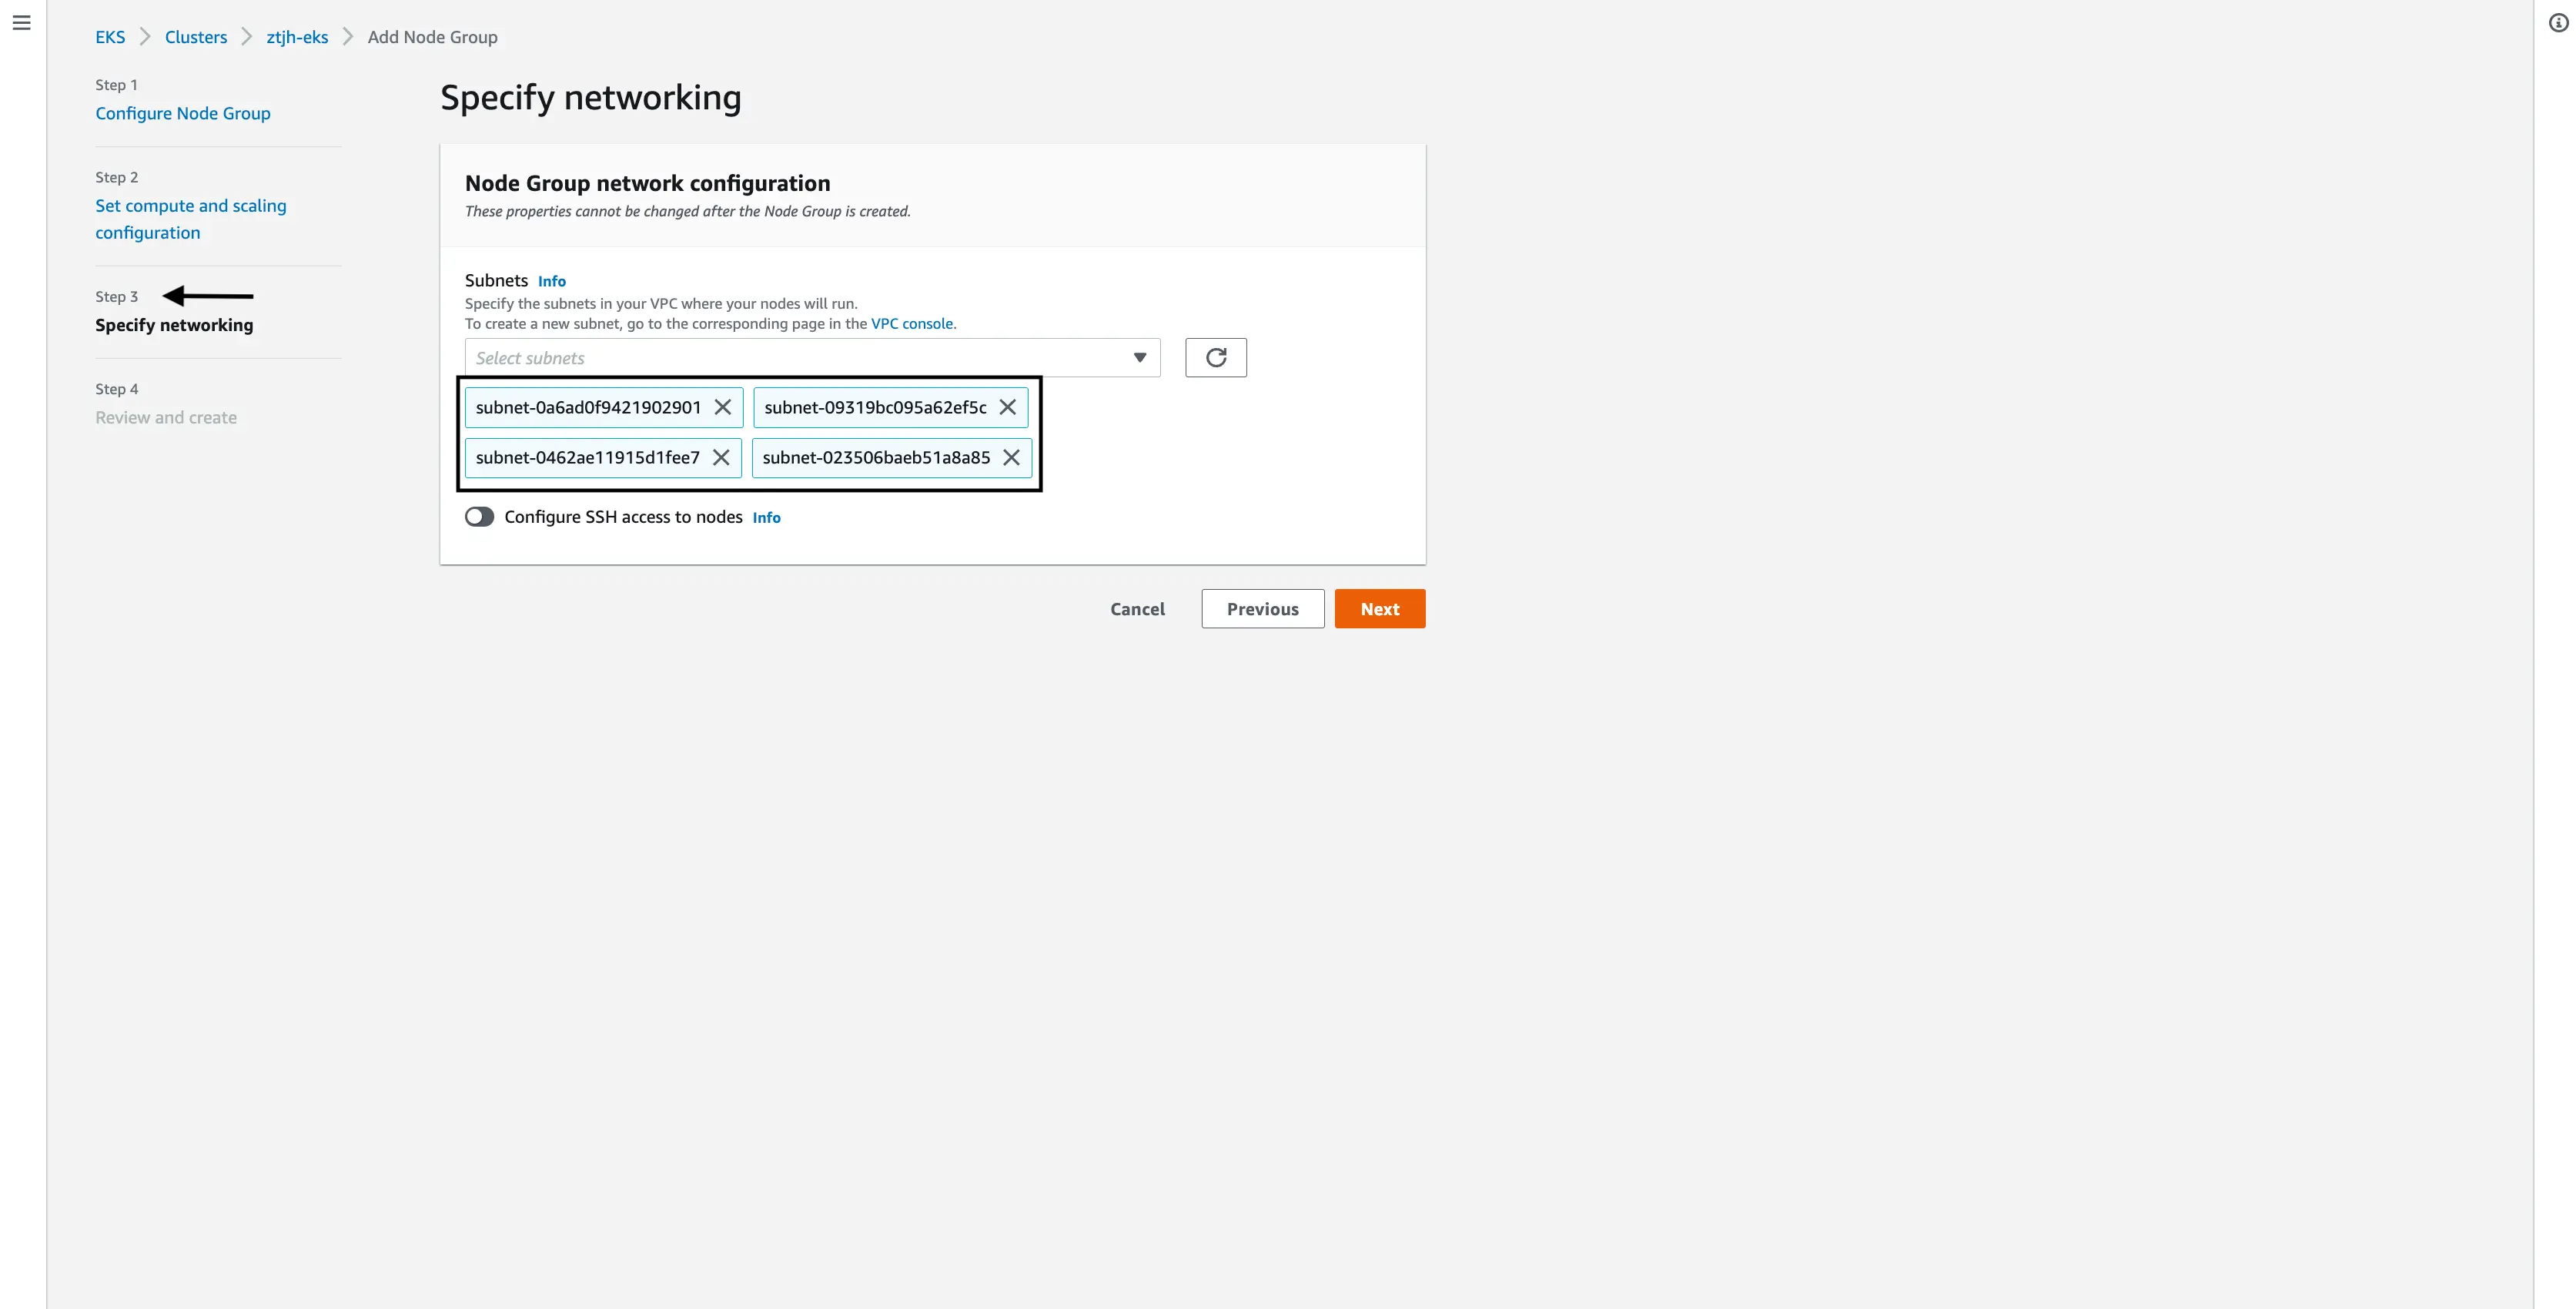
Review and create
Finally, review your node group configurations and then click “Create”. Again this will take a few minutes. When the “Status” on the EKS cluster page is “Active”, your node group (Kubernetes cluster) is ready.
Install Helm
Now that a basic Kubernetes cluster has been setup on AWS EKS, we can (almost) install JupyterHub. Before doing so, we need to install helm. Helm is a packager manager for Kubernetes, and the packages in helm are known as “charts”. Once Helm is installed on our local machine, we will simply “install” JupyterHub on our Kubernetes cluster.
Install Helm
curl https://raw.githubusercontent.com/helm/helm/HEAD/scripts/get-helm-3 | bashVerify installation
helm versionYou should see an output similar to this, although your version will likely differ slightly.
version.BuildInfo{Version:"v3.8.0", GitCommit:"d14138609b01886f544b2025f5000351c9eb092e", GitTreeState:"clean", GoVersion:"go1.17.5"}
Install JupyterHub
Great! You’ve made it this far, now we can actually install JupyterHub. As mentioned earlier, the JupyterHub installation is handled by a “helm chart”, which is basically a two step process.
Create a directory on your local machine for this project and add a
config.yaml.This
config.yamlwill eventually contain all of your bespoke JupyterHub configurations. There is a lot that can be configured, much of which will be covered in a later blog post, but for now just create an empty file.mkdir <your-ztjh-dir> touch config.yamlMake Helm aware of the JupyterHub Helm chart repo.
helm repo add jupyterhub https://jupyterhub.github.io/helm-chart/
helm repo update
Install the chart.
This is it! This is where we actually install JupyterHub on our Kubernetes cluster. All of the previous steps have been preparing us to get to this stage.
Although the below command might seem a bit cryptic, let’s break some parts down.
<your-release-name>- given that the same “chart” (package) can be installed multiple times on the same Kubernetes cluster, this release name is simply a way of distinguishing between those different installations.- In our case, we’ll use
ztjh-release.
- In our case, we’ll use
<your-namespace>- this is the Kubernetes namespace that the JupyterHub will be created in. If that namespace doesn’t exist, it will create it for you.- In our case, we went with
ztjh.
- In our case, we went with
<JH-helm-chart-version>- each version of JupyterHub is associated with a Helm chart version. Reference this document for more details.- In our case, because we are deploying JupyterHub version 1.5, we use Helm chart version
1.2.0.
- In our case, because we are deploying JupyterHub version 1.5, we use Helm chart version
NOTE: Write these values down somewhere (perhaps as a comment in your
config.yaml) as they will be needed whenever you make changes to your JupyterHub configuration.helm upgrade --cleanup-on-fail \ --install <your-release-name> jupyterhub/jupyterhub \ --namespace <your-namespace> \ --create-namespace \ --version=<JH-heml-chart-version> \ --values config.yamlThis command will take a few minutes to complete so sit tight while JupyterHub is installed.
At the moment, our JupyterHub does not have a signed SSL cert so is considered “unsafe”. In a later blog post we will go over how to harden the security of your JupyterHub.
Well done! You’ve gone from zero to JupyterHub!
Determine JupyterHub URL endpoint
At this stage, we would like to load JupyterHub from a web browser to make sure everything works as expected.
From your terminal, run the following to get the “External IP” of the
proxy-public(which for AWS might be a CNAME).kubectl get service -n <your-namespace>With an output resembling this:
NAME           TYPE           CLUSTER-IP       EXTERNAL-IP
hub            ClusterIP      10.100.176.64    <none>
proxy-api      ClusterIP      10.100.146.223   <none>
proxy-public   LoadBalancer   10.100.70.173    xxx-xxx.<AWS_REGION>.elb.amazonaws.com
Now you can navigate to
xxx-xxx.<AWS_REGION>.elb.amazonaws.com.NOTE: This site is currently considered “Not secure” because it does not have a signed SSL certificate. If you’re having trouble accessing the site, Google “how to access unsecure website
”.
Applying configuration changes
Make changes to your
config.yaml, such as adding an admin user.Of course before you start using your JupyterHub you need to add users. In this example, we add one admin user,
admin-user, who, upon first login will be prompted to create a password.hub: config: Authenticator: admin_users: - admin-userRun a Helm upgrade.
In order for the changes in the
config.yamlto take hold, they must be applied to our JupyterHub. The command below is how this is performed in general.As we pointed out when we initially installed JupyterHub, the values with
<..>will need to be reused.helm upgrade --cleanup-on-fail \ <your-release-name> jupyterhub/jupyterhub \ --namespace <your-namespace> \ --version=<JH-heml-chart-version> \ --values config.yamlThat’s it, you’ve added an admin user.
Conclusion
Single Node Jupyter Hub (The Littlest JupyterHub) and Multi-node Jupyter Hub (Zero-to-JupyterHub) are good ways to set up basic data science capabilities for your team. Hopefully this article can help you get set up quickly, and avoid some common pitfalls.
From here, you will need to focus on
- Helping your team get images built with their desired packages
- Setup any required data access credentials for consuming data
- Maintaining JupyterHub and keeping it healthy or even more secure.
Saturn Cloud provides customizable, ready-to-use cloud environments for collaborative data teams.
Try Saturn Cloud and join thousands of users moving to the cloud without
having to switch tools.
Check out other resources on setting up JupyterHub:
- Setting up JupyterHub Securely on AWS
- Setting up HTTPS and SSL for JupyterHub
- Using JupyterHub with a Private Container Registry
- Setting up JupyterHub with Single Sign-on (SSO) on AWS
- List: How to Setup Jupyter Notebooks on EC2
- List: How to Set Up JupyterHub on AWS
About Saturn Cloud
Saturn Cloud is your all-in-one solution for data science & ML development, deployment, and data pipelines in the cloud. Spin up a notebook with 4TB of RAM, add a GPU, connect to a distributed cluster of workers, and more. Request a demo today to learn more.
Saturn Cloud provides customizable, ready-to-use cloud environments for collaborative data teams.
Try Saturn Cloud and join thousands of users moving to the cloud without
having to switch tools.


