
This article was published when data science tooling like Dask and R was a primary focus for Saturn Cloud. Today, Saturn Cloud is the enterprise AI platform for any GPU infrastructure.
As a data scientist, you may be familiar with Jupyter Notebook, a popular tool for data analysis and visualization. But did you know that you can also use SQL in Jupyter Notebook to query and manipulate data? In this blog post, we’ll explore how to use SQL in Jupyter Notebook and some best practices for doing so. Don’t forget you can get free Jupyter notebooks online at Saturn Cloud.
Table of Contents
- Introduction 1.1 Why Use SQL in Jupyter Notebook?
- Getting Started with SQL in Jupyter Notebook 2.1 Installing Dependencies 2.2 Loading SQL Extension
- Executing SQL Queries in Jupyter Notebook
- Combining SQL and Python Code
- Best Practices for Using SQL in Jupyter Notebook
- Resources
Why Use SQL in Jupyter Notebook?
Before we dive into the technical details, let’s first discuss why you might want to use SQL in Jupyter Notebook. SQL is a powerful language for working with relational databases, and many data scientists work with SQL on a regular basis. By using SQL in Jupyter Notebook, you can:
- Query and manipulate data directly within your notebook environment
- Combine SQL queries with Python code to create more complex analyses and visualizations
- Easily share your SQL queries and results with others by exporting your notebook as a PDF or HTML file
Getting Started with SQL in Jupyter Notebook
To use SQL in Jupyter Notebook, you’ll need to install a few dependencies first. The easiest way to get started is to use the Anaconda distribution, which includes Jupyter Notebook and the necessary dependencies for working with SQL.
Once you have Jupyter Notebook installed, you’ll need to install a SQL kernel. There are several SQL kernels available for Jupyter Notebook, but one of the most popular is the IPython-SQL kernel. To install this kernel, simply open a terminal or command prompt and run the following command:
!pip install ipython-sql
Once the kernel is installed, you can start using SQL in your Jupyter Notebook. To do so, you’ll need to load the SQL extension by running the following command:
%load_ext sql
This command tells Jupyter Notebook to load the SQL extension, which allows you to execute SQL queries directly within your notebook.
Executing SQL Queries in Jupyter Notebook
Now that you have the SQL extension loaded, you can start executing SQL queries. To do so, you’ll need to connect to a database. The syntax for connecting to a database depends on the type of database you’re using. For example, if you’re using SQLite, you can connect to a database by running the following command:
%sql sqlite:///example.db
This command tells Jupyter Notebook to connect to the “example.db” database using the SQLite engine. Once you’re connected to a database, you can start executing SQL queries.
To execute a SQL query, simply write your query as a string and pass it to the %sql magic command. For example, to select all records from a table called “customers”, you could run the following command:
%sql SELECT * FROM customers
This command tells Jupyter Notebook to execute the SQL query and display the results in a table format within your notebook.
Combining SQL and Python Code
One of the powerful features of Jupyter Notebook is the ability to combine SQL queries with Python code. This allows you to create more complex analyses and visualizations that combine data from multiple sources.
To combine SQL and Python code, you can use the %sql magic command within a Python code block. For example, you could use the following code to execute a SQL query and then create a bar chart of the results using Python’s matplotlib library:
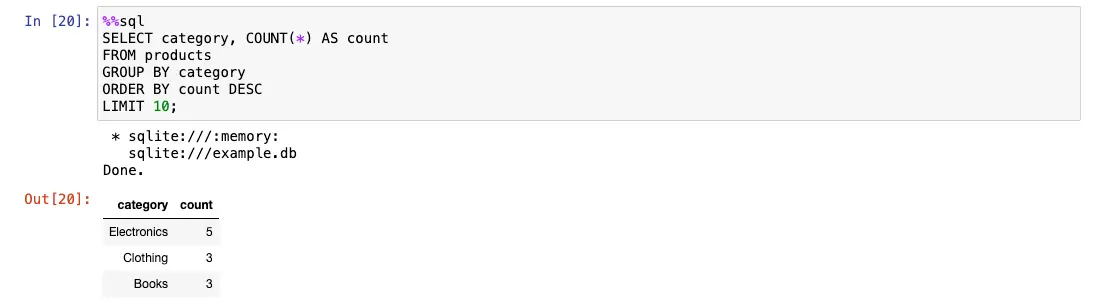
%%sql
SELECT category, COUNT(*) AS count
FROM products
GROUP BY category
ORDER BY count DESC
LIMIT 10;
import matplotlib.pyplot as plt

data = %sql SELECT category, COUNT(*) AS count FROM products GROUP BY category ORDER BY count DESC LIMIT 10;
df = data.DataFrame()
df.plot(kind='bar', x='category', y='count')
plt.show()
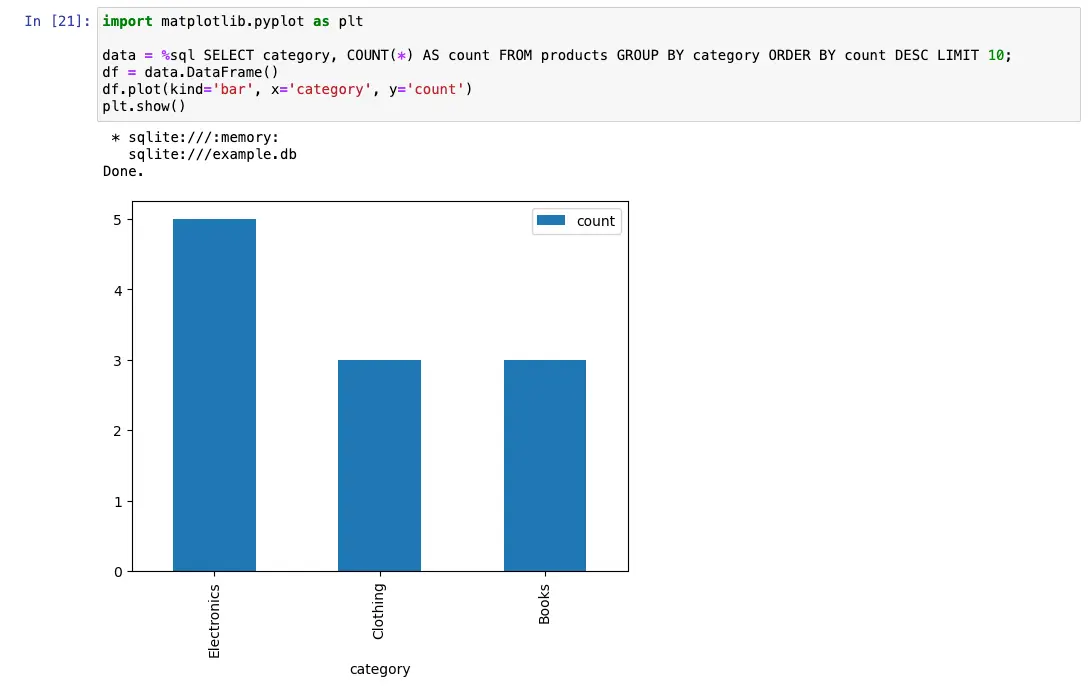
This code first executes a SQL query to select the top 10 product categories by count, and then creates a bar chart of the results using Python’s matplotlib library.
Best Practices for Using SQL in Jupyter Notebook
As with any tool, there are some best practices to keep in mind when using SQL in Jupyter Notebook. Here are a few tips to help you get the most out of this powerful combination:
- Use the
%sqlmagic command sparingly. While it’s tempting to use SQL for everything, it’s often more efficient to use Python code for tasks that don’t require SQL. - Keep your SQL queries organized and easy to read. Use comments and whitespace to break up your queries into logical chunks.
- Use parameterized queries to avoid SQL injection attacks. Parameterized queries allow you to pass user input as parameters rather than incorporating it directly into your query, which can help prevent malicious attacks.
- Use the
DataFramemethod to convert SQL query results into a Pandas DataFrame. This allows you to manipulate and analyze your data using Python’s powerful data analysis tools.
SQL is a powerful language for working with relational databases, and by using SQL in Jupyter Notebook, you can take advantage of the benefits of both tools. With the %sql magic command and the IPython-SQL kernel, you can query and manipulate data directly within your notebook environment, combine SQL queries with Python code, and easily share your results with others. By following best practices and keeping your queries organized and easy to read, you can take your data analysis to the next level with SQL in Jupyter Notebook.
Resources:
- Pypi Ipython-sql
- JupyterLab Tutorial by Corey Schafer (YouTube): A detailed video tutorial that covers the basics of JupyterLab
- JupyterLab Keyboard Shortcuts: A list of useful keyboard shortcuts to improve your productivity in JupyterLab
- Top 33 JupyterLab Extensions: A curated list of the top third-party extensions to improve your JupyterLab.
- JupyterLab Extensions: A collection of third-party extensions to enhance JupyterLab’s functionality.
- Setting up JupyterHub on AWS: Step-by-step walkthrough that covers how to install JupyterHub for your organization on your internal systems
- Setting up JupyterHub with Single Sign-on (SSO): A guide on how to securely set up JupyterHub with SSO for your data science team
- The Littlest JupyterHub: A guide to setting up JupyterHub on a single server for small teams or classrooms.
- Project Jupyter: The main website for Project Jupyter, which offers resources, documentation, and news related to the Jupyter ecosystem.

