This article was published when data science tooling like Dask and R was a primary focus for Saturn Cloud. Today, Saturn Cloud is the enterprise AI platform for any GPU infrastructure.
Saturn Cloud provides customizable, ready-to-use cloud environments
for collaborative data teams.
Try Saturn Cloud and join thousands of users moving to the cloud without having to switch tools.
Table of content
Key pair authentication
create a snowflake account and use key pair auth
Deploy JupyterHub on AWS EKS
Connect Snowflake with JupyterHub
Conclusion
Introduction
It is important for companies to secure their data from unauthorized access. First and foremost, data security is important for protecting sensitive information, such as financial data, customer data, intellectual property, etc. If this type of data were to be accessed by unauthorized individuals, it could lead to serious consequences.
One way that companies can secure their data is by using a platform like Snowflake, which provides a number of security features and controls, such as data encryption, role-based access controls, and more. By using Snowflake, companies can store and analyze their data in a secure and compliant manner.
In this article, you will learn how to set up a Snowflake service account on JupyterHub and set up authentication for the Snowflake access using key pairs.
Snowflake:
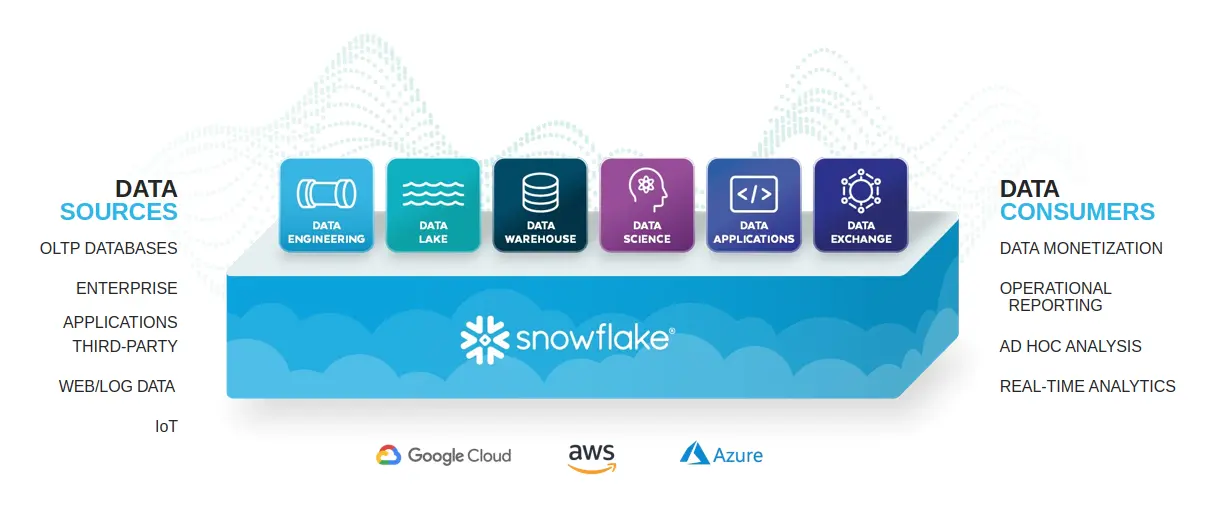
Snowflake is a cloud data storage and analytics platform. It provides services designed to make it easy to store, access, and distribute large volumes of data effectively and efficiently. Additionally, Snowflake is a fully managed service that supports setup via Amazon web services (AWS), Microsoft Azure, and Google Cloud Platform (GCP) and can also be accessed via a web interface or APIs.
In Snowflake, there are three main architectural layers: storage, compute, and services. Here is a brief overview of each of these layers:
Storage Layer: The storage layer is responsible for storing and managing data within Snowflake. This layer includes the data storage infrastructure, such as disks, servers, and networks, as well as the data management software that is used to store, organize, and retrieve data.
Compute Layer: The compute layer is responsible for processing data within Snowflake. This layer includes the compute infrastructure, such as servers, networks, and software, as well as the tools and algorithms used to analyze and manipulate data.
Services Layer: The services layer is responsible for providing access to data and processing resources within Snowflake. This layer includes the user interface, APIs, and other tools and services that users and applications can use to interact with the storage and compute layers.
Altogether, these layers work together to provide a platform for storing, querying and analyzing large amounts of data in the cloud and the architecture is designed to be highly scalable and flexible, allowing organizations to easily store and analyze as much data as they need.
Furthermore, Snowflake support storage and query for a wide range of data formats (SQL, CSV, JSON, Parquet, etc), allow scalability for your business demand, supports querying data using SQL and makes it easy for analysts and data scientists to access and analyze data. With Snowflake, you can integrate with a variety of other tools and platforms, including data visualization tools like Tableau, and data integration platforms like PowerBI, and it also offers a number of features to help protect your data, including data encryption, key pair authentication, etc.
Let’s discuss the security features of Snowflake and how we can use them to protect our data environment from unauthorized access.
First, let’s discuss Key pair authentication
Key Pair Authentication:
Password, brute-force, phishing attacks, and breaches are the most common types of attacks that depend on being able to guess or obtain a user’s password, which can be relatively easy to do if the password is weak or has been reused across multiple accounts.
Key pair authentication can help to solve this problem by providing a stronger and more secure authentication method that is not vulnerable to these types of attacks. In this type of authentication, a client authenticates the server by proving possession of the private key corresponding to the public key that the server presents.
Here’s an analogy that might help you understand better.
Imagine you have a special key to unlock your garage. This key is like the private key in key pair authentication. Now, let’s say you decide to make a duplicate of this key and give it to your spouse so that they can unlock the garage anytime. The duplicate key is like the public key in key pair authentication.
Now consider the scenario where your spouse has left a gift in the garage and wants you to open it. However, the gift has been locked with the public key. In key pair authentication, you can encrypt or restrict access to data or information, and only the person with the private key will be able to decrypt the data or access the restricted resources.
With key pair authentication, the user’s private key is used to sign messages, and the public key is used to verify the authenticity of the message. Because the private key is never shared, it is extremely difficult for an attacker to impersonate the user, even if they are able to obtain the user’s public key.
Specific to snowflake, Hard coding client credentials such as the username and password in order for users to access the snowflake database makes the system less secure.
Snowflake offers key pair authentication as a more secure alternative to basic authentication with a username and password.
The public key will be stored on snowflake while we will take the responsibility to securely store the private key. The stored public key on snowflake will be used to authenticate the private key and if the validation is successful then the connectivity will be set up.
Read more about Public and private key here
Let’s create a snowflake service account and generate key pair we will use for authentication.
Create a snowflake service account and use key pair authentication
Requirements:
Step 1:
Navigate to snowflake.com, sign up, and pick any Edition type and Cloud Provider of your choice but for this article, we will use the standard and AWS cloud provider
Note: The process described in this article is not limited to a specific cloud provider.
Step 2: Obtain your public and private key, create a snowflake service account, assign a role to it, and use key pair authentication for access
- First, let’s obtain our public and private key with the code below, we will be using OpenSSL to generate the respective keys.
#generate private key

$ openssl genrsa 2048 | openssl pkcs8 -topk8 -inform PEM -out rsa_key.p8
$ openssl rsa -in rsa_key.p8 -pubout -out mypublickey.pub
$ openssl rsa -in rsa_key.p8 -out myprivatekey.pem

#open your public key
$ cat mypublickey.pub


# output


--------------BEGIN RSA XXXXXXX KEY----
xxxxxxxxxxxxxxxxxx
- Next, create a snowflake worksheet, and select a data warehouse. we will use the default warehouse provided by snowflake for this article


- Paste the code on the worksheet to create a service account
CREATE OR REPLACE USER Saturncloud;

-- Grant sys admin role to user
GRANT ROLE SYSADMIN TO USER Saturncloud;

-- set use access to use key pair auth
alter user Saturncloud set rsa_public_key = "MIIBIjANBxxxxxxxxxxxxxxxxxxxxxxxxxxxxxxxx
xxxxxxxxx";

DESCRIBE USER Saturncloud
-- optional
-- grant user and monitor activities in the warehouse selected

GRANT USAGE, MONITOR
 ON WAREHOUSE compute_wh
 TO ROLE SYSADMIN;
Snowflake service account is a special type of user account that is used to run automated tasks or processes within Snowflake. Service accounts are typically used to perform tasks that do not require human intervention, such as data loading or data transformation jobs. A service account can be a user account with a sole purpose to run automated tasks or processes within Snowflake
The above script creates a service account Saturncloud and grants a sys admin role to the account, Next, the code sets the user’s RSA public key for use with key pair authentication, then the DESCRIBE USER command is used to display information about the Saturncloud user, including their role and any privileges they have been granted. Finally, the optional code grants the USAGE and MONITOR privileges on the compute_wh warehouse to the SYSADMIN role. The USAGE privilege allows users to execute queries and perform other actions using the resources of the warehouse, while the MONITOR privilege allows users to view information about the performance and resource usage of the warehouse.
STEP 4: Setup JupyterHub on Amazon Elastic Kubernetes Service (EKS)
- Follow the instructions on the link below to set up JupyterHub on EKS
Follow the link below and skip to the Kubernetes section
How to Set up JupyterHub on AWS
After setting up JupyterHub on EKS, we will move on to the next task.
Note: Be sure to run the next step commands in the same terminal where you set up Kubernetes.
Store the private key
We will store our private key as a Kubernetes secret and reference it as an environment variable in our pods.
It is generally not recommended to store private keys as Kubernetes secrets, as Kubernetes secrets are stored in etcd, which is a database that stores configuration data for a cluster. While etcd does have some built-in security features, such as access controls and encryption, it may not be as secure as using specialized tools for storing sensitive information, such as hardware security modules (HSMs) or key management systems (KMS).
A better approach might be to use a hardware security module (HSM) or Key Management Service (KMS) such as Aws key management service or an external vault such as Azure key vault to store your private keys and then inject them into your pod at runtime, this way it wouldn’t be stored in the cluster at all.
These services are designed to provide a secure environment for storing and managing sensitive information, such as private keys, and can be integrated with Kubernetes to provide additional security for your applications.
For the purpose of this article, we will just store it as a secret without using any external key management service.
Let’s create a Kubernetes secret with the value of our private key and reference this key as an environment variable in our JupyterHub configuration file so that we can have access to it when we spin up our notebook.
- Create a Kubernetes secret to store your private key
$ kubectl create secret generic <preferred kube secret name>--from-literal=<private key name>=55b8xxxxxxxxxxxxxx
- Open your JupyterHub configuration file
$ sudo nano <your yaml configuration file>

# e.g /tmp/jupyterhub.yaml
- Make the changes to your configuration file under singleuser
# before
extraEnv:{}

# substitute the code above with the code below
extraEnv:
   SNOWFLAKE_PRIVATE_KEY:
     valueFrom:
       secretKeyRef:
         name: <preferred kube secret name>
         key: <private key name>
Note: When a notebook is created for each user, the environment variable will be accessible to the users.
- You can use the command below forward the service port so that you can access the JupyterHub application on your browser with the address localhost:8080
$ kubectl --namespace=default port-forward service/proxy-public 8080:http
Step 5: Connect to snowflake on your JupyterHub
Next, we will be using the snowflake Connector for Python which provides an interface for developing Pythonapplications that can connect to Snowflake and perform all standard operations.
- Install the necessary packages
!pip  install  snowflake-connector-python
!pip  install  pandas
- Import the necessary modules
import  snowflake.connector
import  os
- Get the private key from the environment variable and store it in the variable SNOWFLAKE_PRIVATE_KEY
SNOWFLAKE_PRIVATE_KEY = os.environ("SNOWFLAKE_PRIVATE_KEY")
The code below decrypts the private key and passes it to the Snowflake driver to create a
connection.
from cryptography.hazmat.backends import default_backend
from cryptography.hazmat.primitives.asymmetric import rsa
from cryptography.hazmat.primitives.asymmetric import dsa
from cryptography.hazmat.primitives import serialization
from cryptography.hazmat.backends import default_backend
from cryptography.hazmat.primitives.asymmetric import rsa
from cryptography.hazmat.primitives.asymmetric import dsa
from cryptography.hazmat.primitives import serialization

p_key = serialization.load_pem_private_key(
        data = SNOWFLAKE_PRIVATE_KEY.encode(),
        password=None,
        backend=default_backend())

pkb = p_key.private_bytes(
   encoding=serialization.Encoding.DER,
   format=serialization.PrivateFormat.PKCS8,
   encryption_algorithm=serialization.NoEncryption())

ctx = snowflake.connector.connect(
   user='<user>',
   account='<account Identifier>',
   private_key=pkb,
   warehouse='<warehouse name>',
   database='<database name>
   schema='<schema name>
   )
cs = ctx.cursor()
Learn more about snowflake account identifier here https://docs.snowflake.com/en/user-guide/admin-account-identifier.html
Now you can connect to the database, in this case, we will be connecting to the snowflake default provided database and converting the table to a pandas dataframe.
# query to be executed
sql ="select * from snowflake_sample_data.tpch_sf1.lineitem limit 100;"
res = cs.execute(sql).fetchall()
pd.DataFrame(res)
Finally, setting up Snowflake on Jupyter Hub using key pair authentication has several benefits:
Improved security: Key pair authentication provides a strong and secure way to authenticate users, making it difficult for unauthorized users to gain access to your Snowflake data.
Enhanced convenience: With key pair authentication, your JupyterHub users do not need to remember passwords, which can be convenient and reduce the risk of password-related issues such as forgotten passwords or password reuse.
Non-repudiation: Key pair authentication provides a level of non-repudiation, which means that users cannot later deny having performed an action that was signed with their private key. This can be useful in situations where it is important to have a record of who performed a particular action.
Overall, setting up Snowflake on JupyterHub using key pair authentication can provide improved security, enhanced convenience, non-repudiation, and flexibility, making it a valuable and effective solution for accessing Snowflake data from JupyterHub.
Saturn Cloud provides customizable, ready-to-use cloud environments
for collaborative data teams.
Try Saturn Cloud and join thousands of users moving to the cloud without having to switch tools.
You may also be interested in:


