
This article was published when data science tooling like Dask and R was a primary focus for Saturn Cloud. Today, Saturn Cloud is the enterprise AI platform for any GPU infrastructure.
If you are a data scientist or software engineer working with computer vision, you are probably familiar with OpenCV. OpenCV is a powerful open-source computer vision library that provides a wide range of image processing functions. It is widely used in various computer vision projects, from simple image processing tasks to complex video analysis. In this blog post, we will discuss how to import OpenCV on Jupyter Notebook.
What is OpenCV?
OpenCV is a popular computer vision library that provides a wide range of image processing functions. It was initially developed by Intel in 1999 and is now maintained by the OpenCV community. OpenCV is written in C++ and provides interfaces for Python, Java, and MATLAB. It is free for commercial and non-commercial use and is compatible with Windows, Linux, Mac OS, iOS, and Android.
OpenCV provides various functionalities for image and video processing, such as image filtering, feature detection, object recognition, and face detection. It also includes support for various machine learning algorithms, such as neural networks and support vector machines.
Why use Jupyter Notebook?
Jupyter Notebook is an open-source web application that allows you to create and share documents that contain live code, equations, visualizations, and narrative text. It is widely used in data science and machine learning projects for exploratory data analysis, prototyping, and sharing code and results. Jupyter Notebook supports many programming languages, including Python, R, and Julia.
Jupyter Notebook provides an interactive environment for data analysis and visualization. It allows you to write and execute code in small pieces and see the results immediately. This makes it easy to explore data and experiment with different algorithms and parameters. Jupyter Notebook also provides support for various data visualization libraries, such as Matplotlib and Seaborn.
How to import OpenCV on Jupyter Notebook?
Before we can use OpenCV on Jupyter Notebook, we first need to install it. OpenCV can be installed using pip, a package manager for Python. To install OpenCV, open a terminal or command prompt and type the following command:
pip install opencv-python
Once OpenCV is installed, we can import it on Jupyter Notebook. To do this, open a new Jupyter Notebook and create a new code cell. In the code cell, type the following code:
import cv2
This will import the OpenCV library into our Jupyter Notebook environment. We can now use all the OpenCV functions and classes in our code.
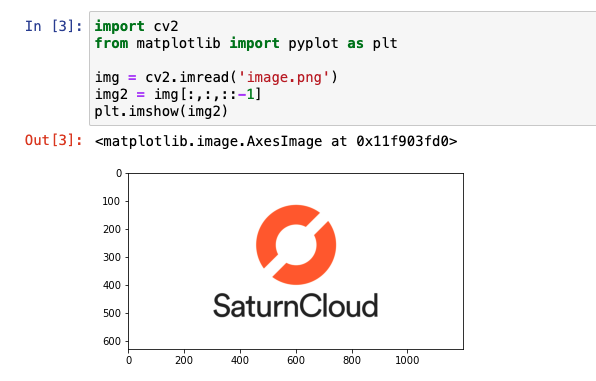
To test if OpenCV is imported correctly, we can load an image using the imread() function and display it using the imshow() function. In the code cell, type the following code:
import cv2
from matplotlib import pyplot as plt
# Load image
img = cv2.imread('image.png')
# Convert image from BGR to RGB
img2 = img[:,:,::-1]
# Show image using Matplotlib as cv2.imshow will cause jupyter kernel crashed.
plt.imshow(img2)
Replace image.png with the path and filename of the image you want to load. This code will load the image and display it.
Conclusion
In this blog post, we discussed how to import OpenCV on Jupyter Notebook. Firstly, you need to install it using pip. Once installed, you can import it using the import statement. You can then use all the OpenCV functions and classes in your code. To test if OpenCV is imported correctly, you can load an image using the imread() and display it using the matplotlib.pyplot functions. By combining OpenCV and Jupyter Notebook, you can easily explore and experiment with different computer vision algorithms and techniques.

