This article was published when data science tooling like Dask and R was a primary focus for Saturn Cloud. Today, Saturn Cloud is the enterprise AI platform for any GPU infrastructure.
Introduction
Meet Emily, a data scientist at a healthcare startup. Emily realized she spends significant time on non-coding tasks such as setting up infrastructure, managing dependencies, and keeping track of experiments. Emily needed a tool that would help her streamline her workflow and allow her to focus on actual data science and analysis.
That’s when she discovered Metaflow, an open-source framework for building and managing data science workflows. With Metaflow, Emily created reusable and reproducible workflows that automated much of the drudgery associated with data science. She could define her workflow as a Python class, and Metaflow would run the code in the correct order, manage dependencies, and version the results.
Emily found that Metaflow helped her be more productive in several ways. It had built-in support for parallelism, allowing her to run multiple experiments simultaneously and speed up her iteration time. She could also use cluster and parallel computing resources to scale her experiments, and automatic versioning made it easy for her to reproduce previous results if needed. Emily found Metaflow to be an excellent tool for collaboration, as she could easily share her workflows with other data scientists and engineers on her team.
Overall, Emily found Metaflow invaluable for managing her data science workflows. It allowed her to focus on the actual data science, reduced time spent on setup and maintenance tasks, and enabled collaboration, scaling, and automatic versioning.
Have you also spent significant hours of your day setting up your environment? If so, Metaflow could help!
The Building Blocks of Metaflow
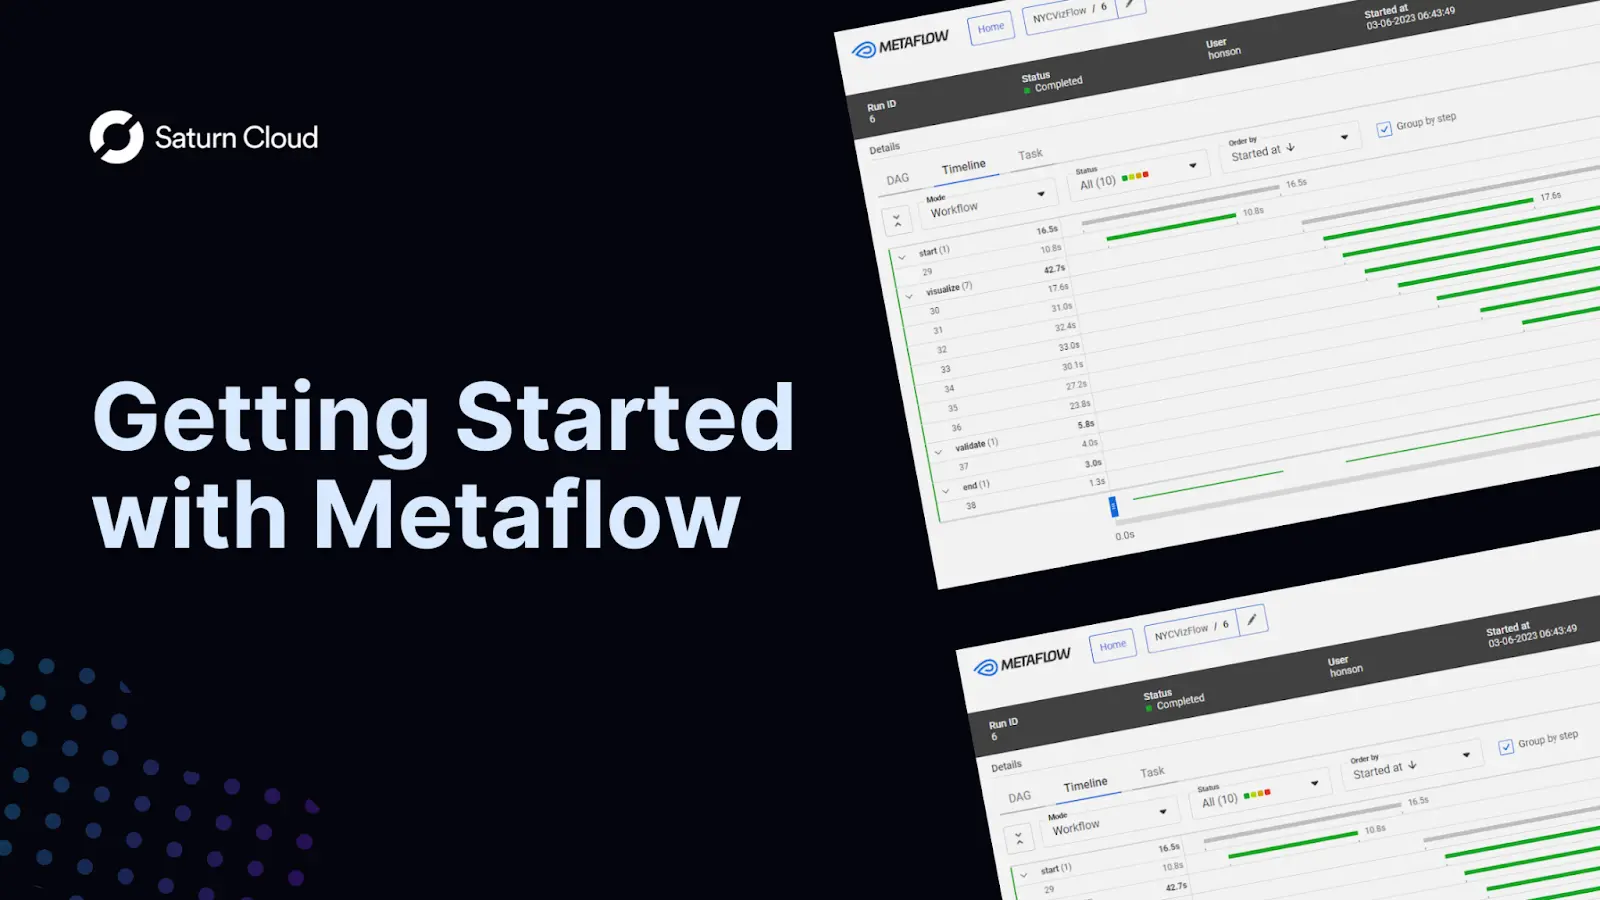
If you’re unsure whether or not Metaflow could be the right tool, Metaflow has a free sandbox to try out some samples. To access this sandbox, click here or refer to the “additional resources” links below. Simply create an account, and you’ll have access to a VS Code instance and the Metaflow UI dashboard for each example. In the next several sections, you’ll also be given a glimpse of some useful features you can take advantage of in Metaflow.
For now, let’s go over some samples!
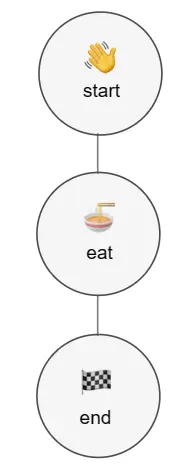
Example 1: Running a Basic Flow
In this example, we’re running through three steps linearly: start, eat, and end. To create a workflow, define your workflow name as the Python class, followed by the mandatory FlowSpec argument. Inside your workflow, decorate each of your steps with the @step decorator. Inside each step, declare the proceeding steps in self.next(). From here, running the workflow is easily done by typing in the command python name_of_file.py run..
            from [metaflow](https://saturncloud.io/glossary/metaflow) import step, FlowSpec, conda_base

            class HelloFlow(FlowSpec):
                @step
                def start(self):
                    print("Starting 👋")
                    self.next(self.eat)


                @step
                def eat(self):
                    print("Eating 🍜")
                    self.next(self.end)


                @step
                def end(self):
                    print("Done! 🏁")

            if __name__ == "__main__":
                HelloFlow()
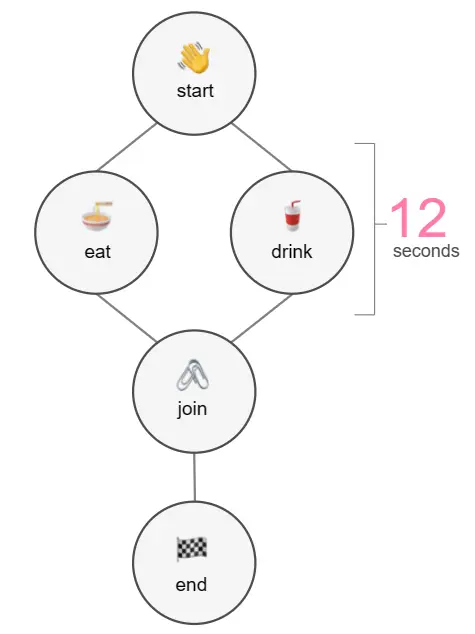
Example 2: Running Steps in Parallel
Workflows in Metaflow also can run multiple steps in parallel. The workflow can then interpret the outputs of these steps together in later steps. For any pipelines that have multiple independent steps in specific areas of the workflow, this is an excellent way of reducing execution time while also tracking each of the outputs that return from all steps.
            import time
            from metaflow import step, FlowSpec

            class BranchFlow(FlowSpec):
                @step
                def start(self):
                    print("Starting 👋")
                    self.next(self.eat, self.drink)


                @step
                def eat(self):
                    print("Pausing to eat... 🍜")
                    time.sleep(10)
                    self.next(self.join)


                @step
                def drink(self):
                    print("Pausing to drink... 🥤")
                    time.sleep(10)
                    self.next(self.join)

                @step
                def join(self, inputs):
                    print("Joining 🖇️")
                    self.next(self.end)

                @step
                def end(self):
                    print("Done! 🏁")

                if __name__ == "__main__":
                    BranchFlow()
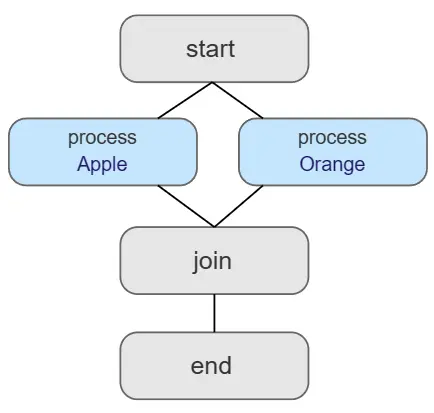
Example 3: Running Steps in Parallel
What if you needed to run the entire workflow for each data entry independently? Another way of running pipelines in parallel is by utilizing the foreach feature in Metaflow. This example workflow will run each data entry in its own individual process until a join() step. In a real use case, you can imagine a workflow where data entries are processed individually. The join step could involve interpreting the two results to make an ultimate decision.
import time
from metaflow import step, FlowSpec

class ForeachFlow(FlowSpec):
    @step
    def start(self):
        self.data = ["Apple", "Orange"]
        self.next(self.process, foreach="data")

    @step
    def process(self):
        print("Processing:", self.input)
        self.fruit = self.input
        self.score = len(self.input)
        self.next(self.join)

    @step
    def join(self, inputs):
        print("Choosing the best fruit")
        self.best = max(inputs, key=lambda x: x.score).fruit
        print("Best fruit:", self.best)
        self.next(self.end)


    @step
    def end(self):
        pass

if __name__ == "__main__":
    ForeachFlow()
For more information on additional decorators to use at the workflow and step levels (e.g., defining conda environments and catching errors), refer to the resources at the end of this post.
Metaflow Cards

Another useful feature of Metaflow is Cards. Cards enable users to create interactive visualizations, shareable reports, and dynamic dashboards with their team members or other stakeholders. Aside from the ease of sharing Cards with others, data scientists can use Cards to view their project runs on the Metaflow UI dashboard visually. For example, a data scientist could create a card that displays a performance graph of a model over time using data from previous runs. Cards can enable scientists to quickly access visualizations of any model improvements or declines over time and make adjustments as needed. Data scientists can also use Cards to generate visualizations for any step of the data science lifecycle, including preliminary data analysis.
Metaflow cards are built using a combination of Python and HTML, CSS, and JavaScript, which makes it easy to create powerful, customized visualizations and reports that collaborators can view in a web browser. Users can create and modify Cards using a simple, intuitive interface and share them via email, Slack, or other communication channels. Making Cards and utilizing them in Jupyter notebooks is also just a few lines of code, so say goodbye to all the complex visualization code clogging up your notebook!
To learn more about Cards, click here. You can also read more about creating your own Cards in the additional resources at the bottom of this post.
Metaflow Dashboard:
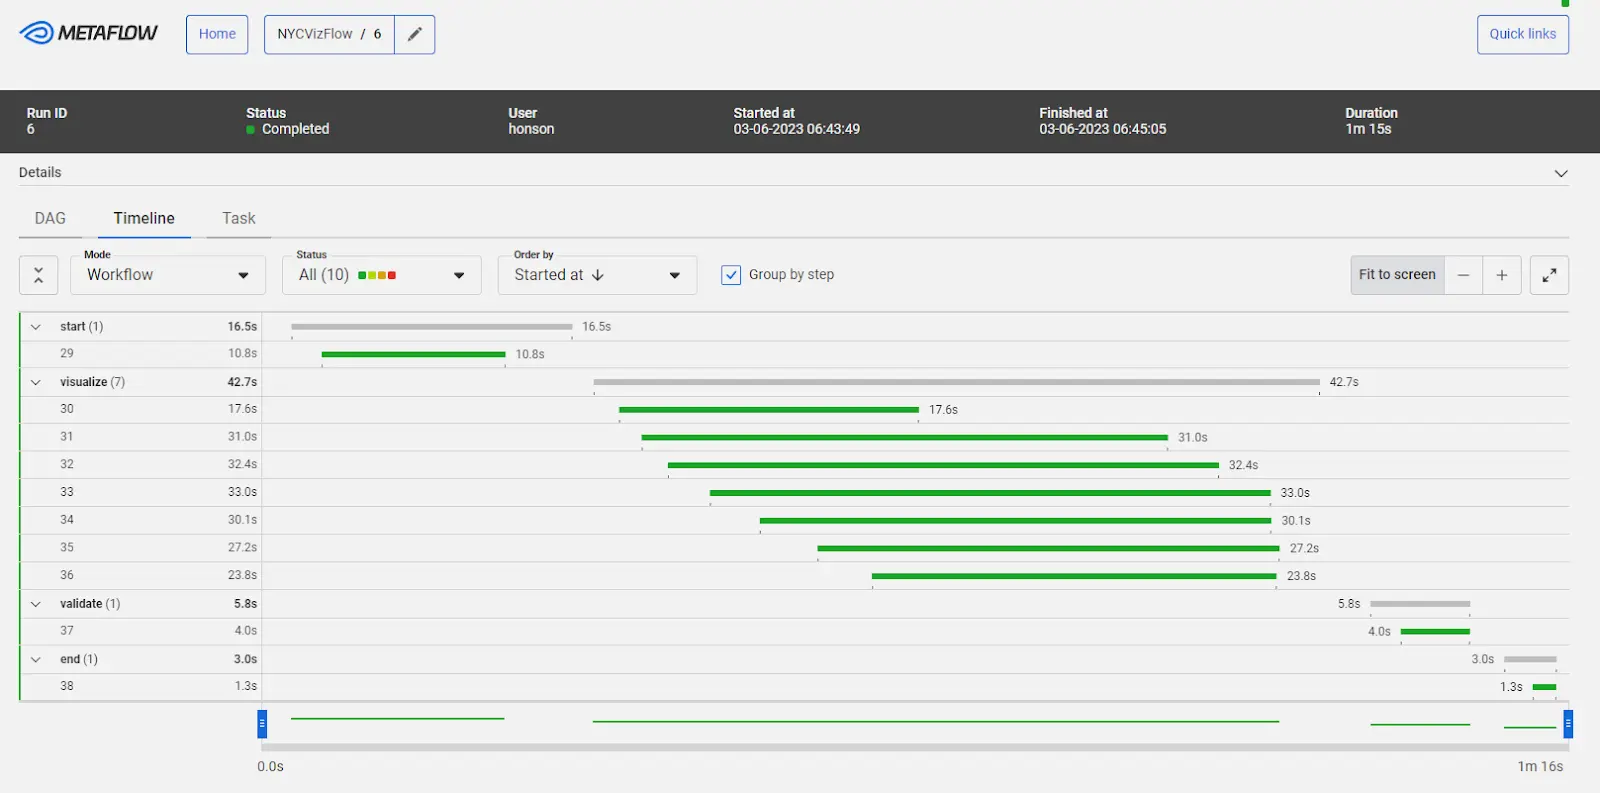
The Metaflow dashboard makes running workflows easier in parallel and gives convenient access to Cards. The Metaflow dashboard is a web-based tool with a user-friendly interface for managing and monitoring machine learning workflows. One of the key benefits of the Metaflow Dashboard is its ability to provide real-time insights into the performance of ML workflows. Users can identify and address any issues or errors that may arise, improving the overall efficiency and effectiveness of the workflow. The dashboard provides a central location for managing and visualizing ML data pipelines, making it easy for users to track progress and collaborate with team members.
Another advantage of the dashboard is its flexibility and customization. Members can easily customize the dashboard to meet the specific needs of individual users or teams, with the ability to integrate new tools and technologies as needed. Additionally, the Metaflow Dashboard provides powerful tools for managing ML data pipelines, including features such as automatic versioning and dependency management.
Installing Metaflow on AWS
In this demo, we’ll demonstrate how to quickly provision Metaflow and the Metaflow dashboard to AWS using CloudFormation. CloudFormation is Metaflow’s quickest way to deploy Metaflow to the cloud, with many options for a starting user to modify. Ultimately, CloudFormation provides a low-maintenance stack that is mostly automated for the user. If you wish to deploy via other means, refer to this documentation for other options.
Prerequisites
Before we get started, ensure you have the following:
We’ll be using Python3 for this demo.
The AWS CLI is installed and configured with your login credentials.
- [Here’s a guide on how to configure your AWS CLI](https://aws.amazon.com/getting-started/guides/setup-environment/module-one/).If you use virtual environments in your workflow, ensure you also have conda installed on your local machine.
- [Here’s a guide to installing conda](https://conda.io/projects/conda/en/latest/user-guide/install/index.html#regular-installation).Make sure you have the correct IAM permissions on your user to run the CloudFormation YAML successfully. Please refer to the following links below to see the demo permissions.
-   [List of services used in this deployment](https://github.com/Netflix/metaflow-tools/blob/master/aws/cloudformation/metaflow-cfn-template.yml)

-   [Direct link to the CloudFormation YAML](https://github.com/outerbounds/metaflow-tools/blob/master/aws/cloudformation/metaflow-cfn-template.yml)
(Optional) If you wish to enable the Metaflow UI dashboard through CloudFormation, ensure you have a web domain purchased to enable this capability. We will generate an SSL certificate through AWS for free afterward.
- Note: While enabling the dashboard for localhost and SSH tunneling on other deployment options is possible, Metaflow’s CloudFormation deployment utilizes AWS Cognito, which requires a domain and SSL certificate. Modifying the CloudFormation stack to use the UI via SSH tunneling might require more work than it’s worth.
(Optional) Setting up the SSL Certificate
As aforementioned, you must generate an SSL certificate to enable the Metaflow UI when deploying the CloudFormation YAML. If you wish to have a dashboard for users to log in to see their runs, follow these steps (or access the official documentation here):
Setting up the Domain
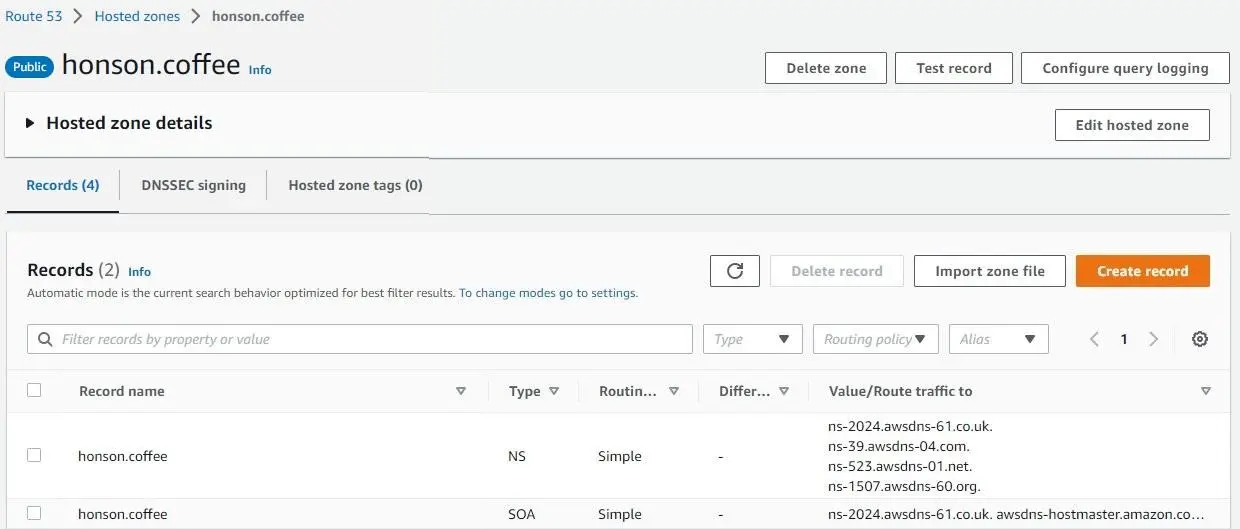
Go to the Hosted Zones Tab of AWS Route 53. Click on “Create hosted zone.”
Type in your domain name in “Hosted Zone Configuration.” For this example, I’m using
honson.coffee. Click “Create hosted zone.”You should now be greeted with your domain zone page with two entries in the table: NS and SOA. Take the four NS (nameservers) entries and make them the new nameservers for your domain via your domain provider. From experience, this has taken about 15-30 minutes for changes to take effect. However, DNS changes could potentially take several days, although unlikely.
a. As an example, changing nameservers is shown here by GoDaddy and Namecheap.
b. Note: Although the nameservers on Route 53 have a period at the end, I ran into an issue with GoDaddy where the extra period at the end of the nameserver caused an issue registering the nameserver. If this is the case, enter the nameservers without the trailing period.
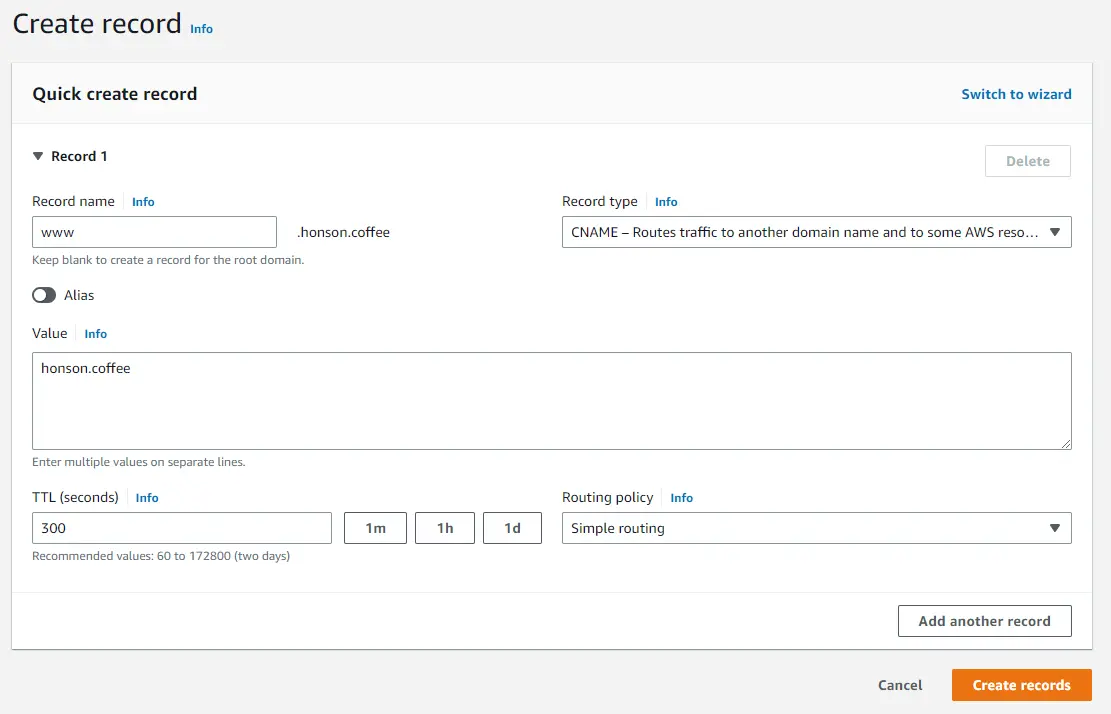
- Once changes reflect on Route 53, make a CNAME by clicking “Create Record” and add “www.` in the record name, followed by the domain name in the “Value” field. Click “Create Records”
Setting up the SSL Certificate
Go to the AWS Certificate Manager Console. Click on the orange “Request” button on the top right of the page.
You’ll be greeted with a certificate type to generate. Select “Request a public certificate and click “Next.”
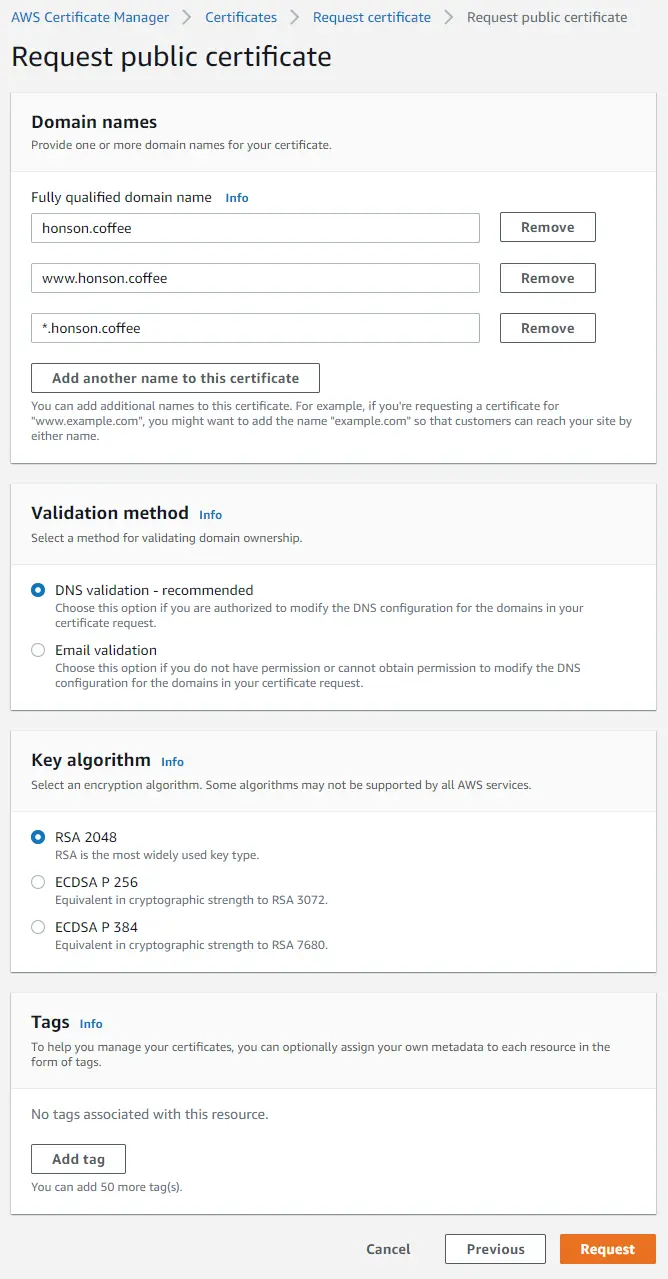
From here, add the domain you’re using to be issued an SSL certificate. It’s recommended to request a certificate be generated for your domain and your domain with the “www.” prefix. Select your DNS validation method to confirm you are the owner of the domain. You either have the choice to modify your DNS settings from the domain provider of your choice or do an email verification based on the email on your WHOIS information. Click “Request” once you’re done adding your domains.
To protect all subdomains, you can use a wildcard or manually define the ones you wish to use.
For example, I will use
“ui.honson.coffee”as my Metaflow dashboard URL, but I will be wildcarding all domains.
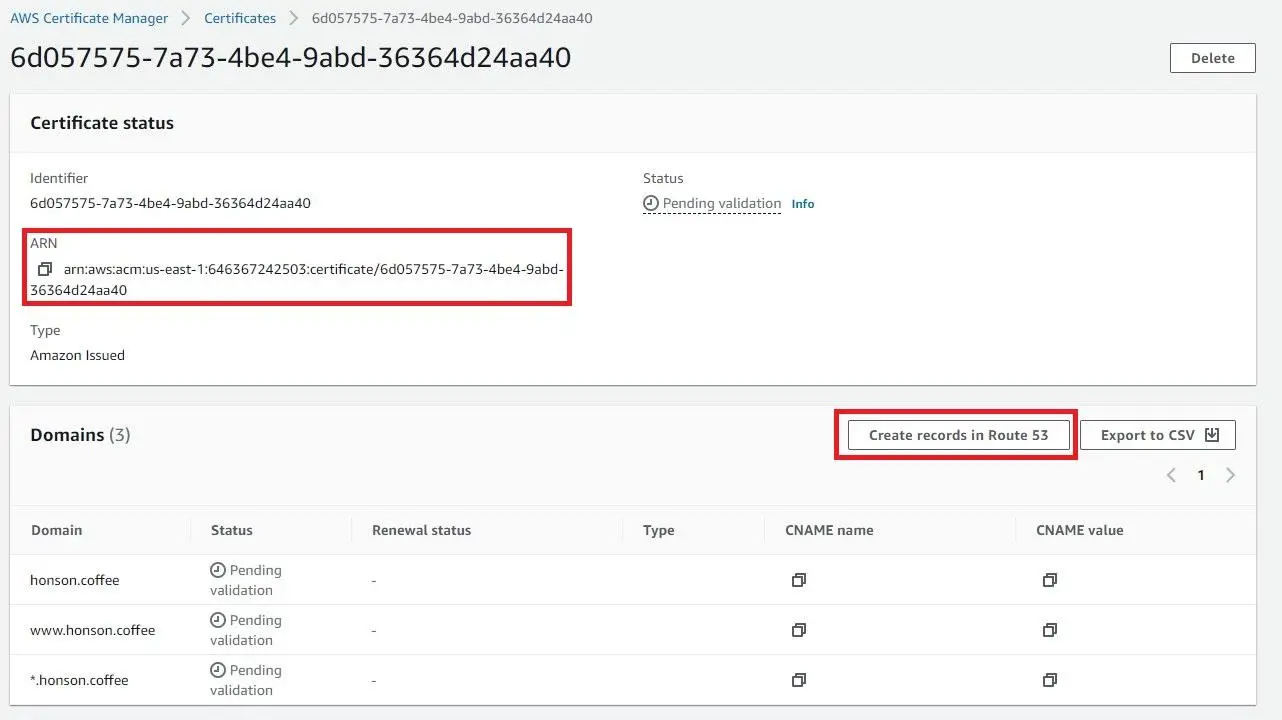
Once you click “Request,” you’ll be redirected back to the main dashboard of the certificate management console. If you don’t see your domain, refresh the page. Afterward, click on your domain certificate ID in the “Certificate ID” column to access more domain details. Take note of your certificate ARN as you’ll need it once we set up the CloudFormation stack. If you missed a chance to note it, you could always revisit the page to get the certificate ARN again.
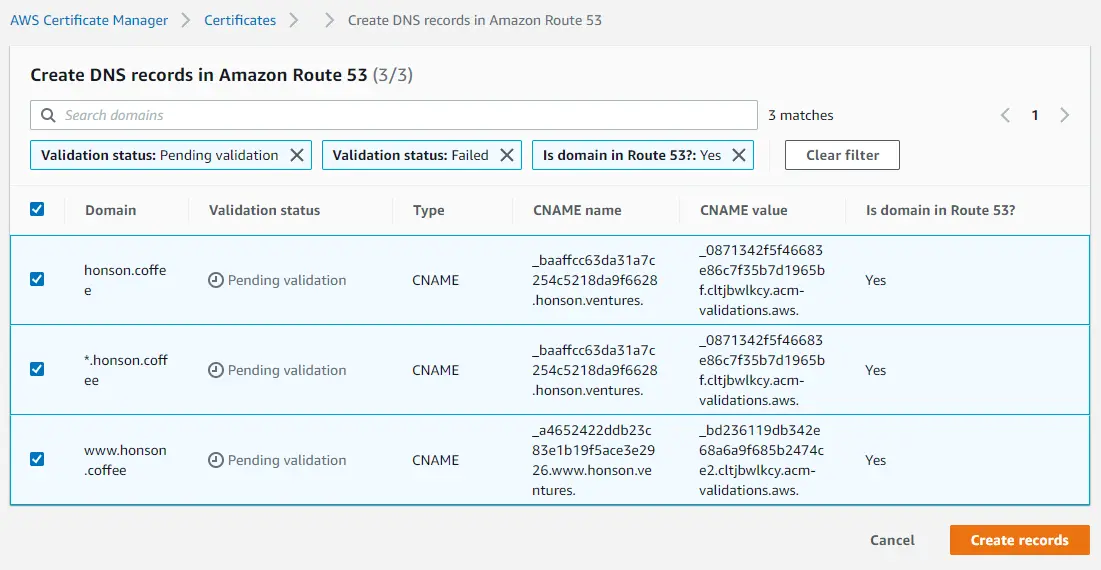
Click on “Create records in Route 53”.
- Click “Create Records.”
- Take a coffee break and come back to refresh the page. Once the ownership of your domain is verified, you’ll see a green “Success” in the “Validation status” column.
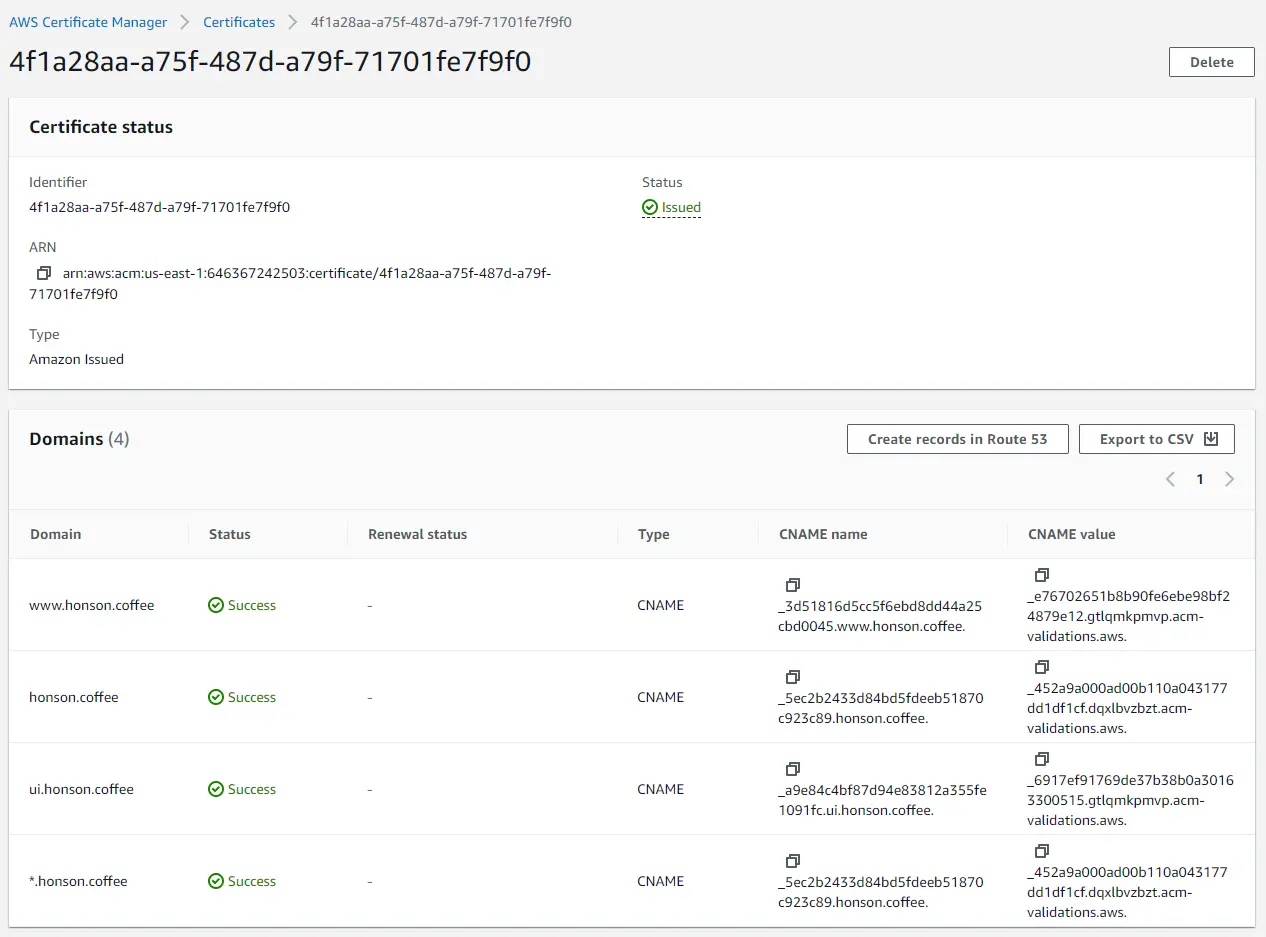
Now that we have our domain set up and verified, take note of the ARN certificate for our Metaflow CloudFormation deployment.
Deploy the Metaflow Stack
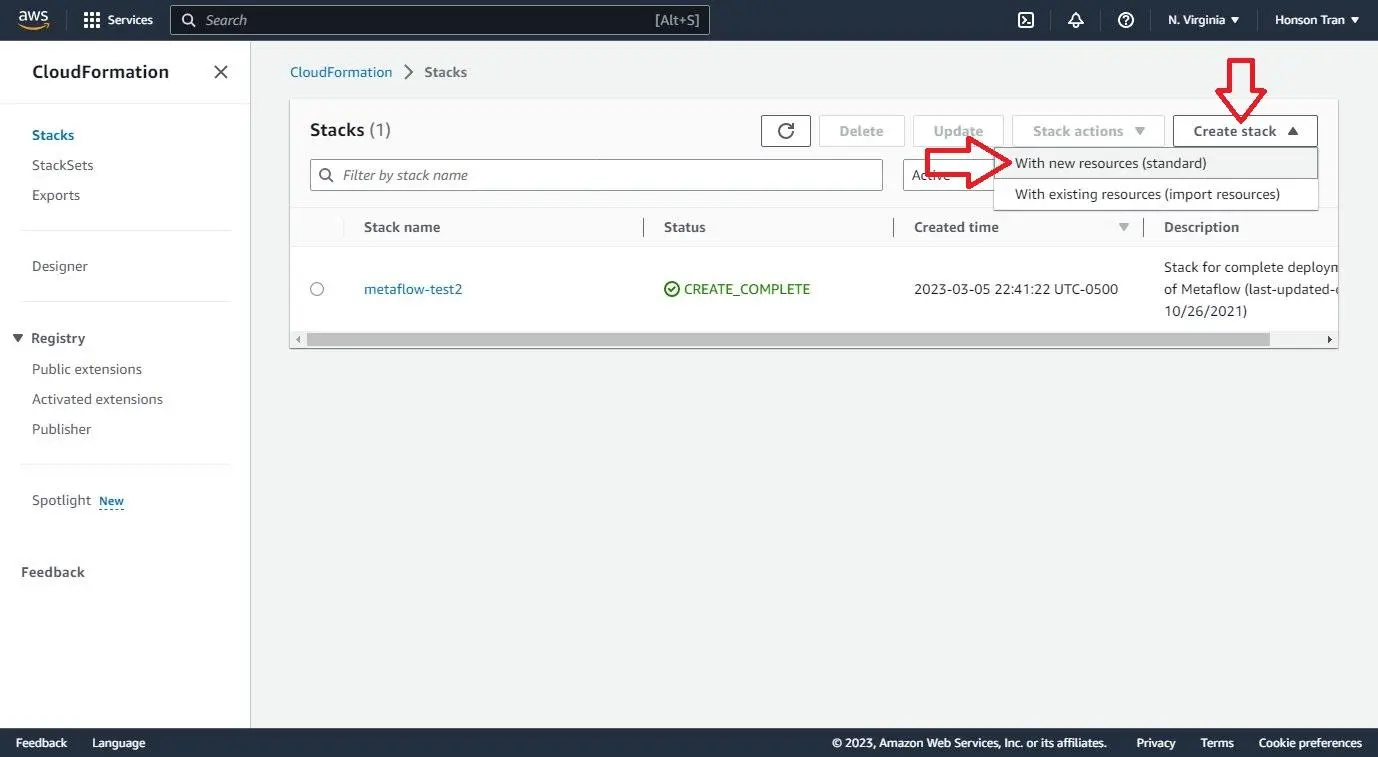
Go to the CloudFormation Console on AWS.
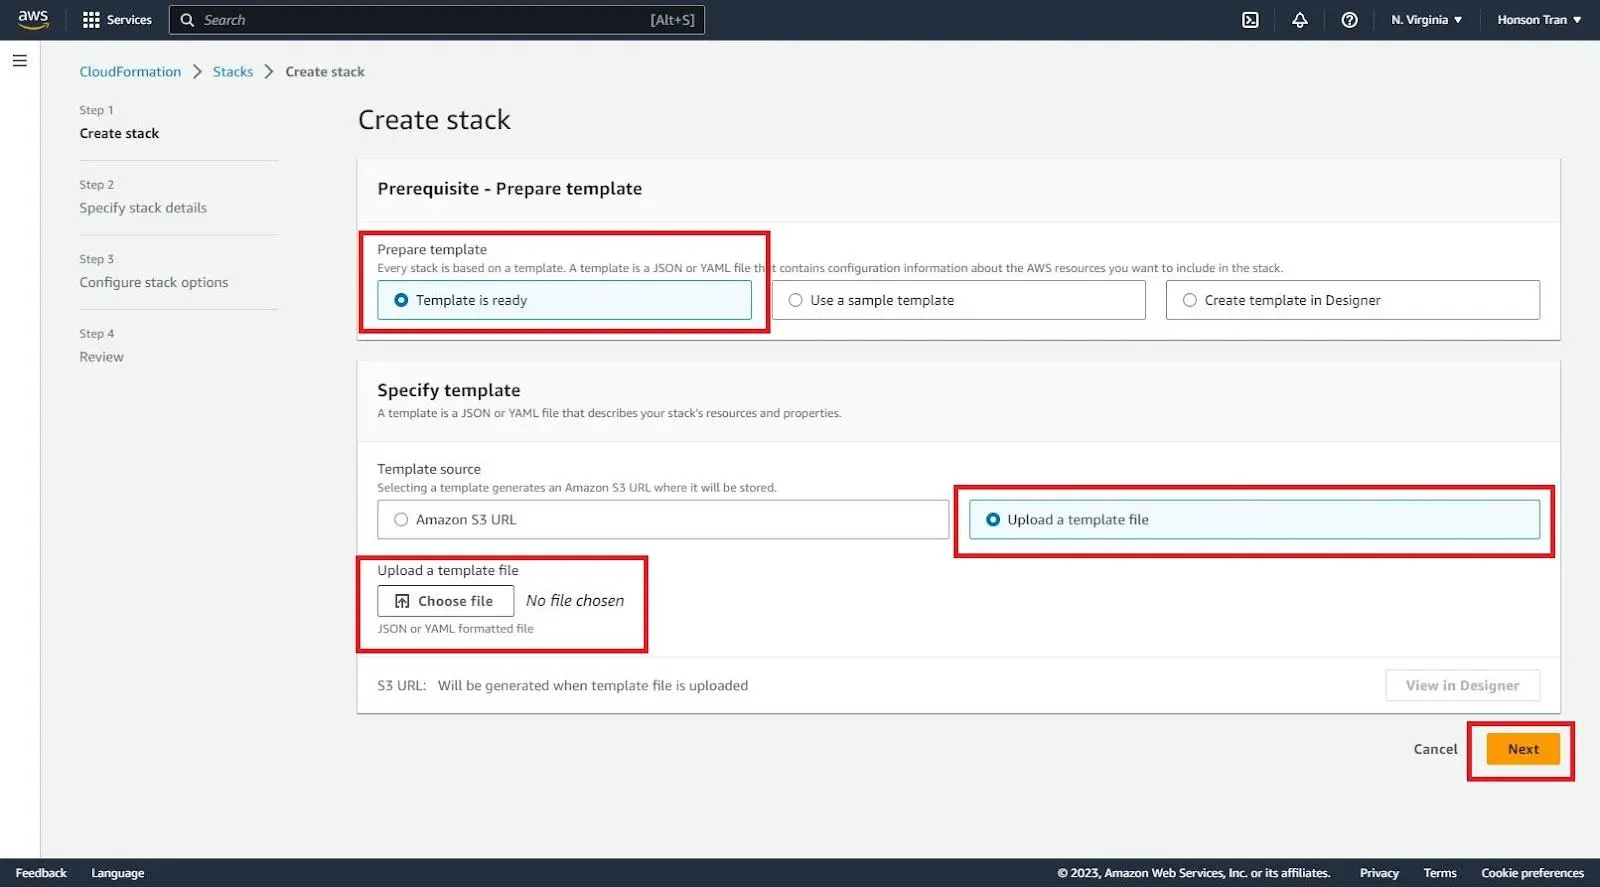
Click on “Create Stack” and “With new resources (standard).”
- Download this YAML, click “Upload a template file” and “Choose file” to select your YAML. Click next.
a. AWS will generate an S3 link upon uploading the YAML. Feel free to use that for future deployments by selecting “Amazon S3 URL” instead.
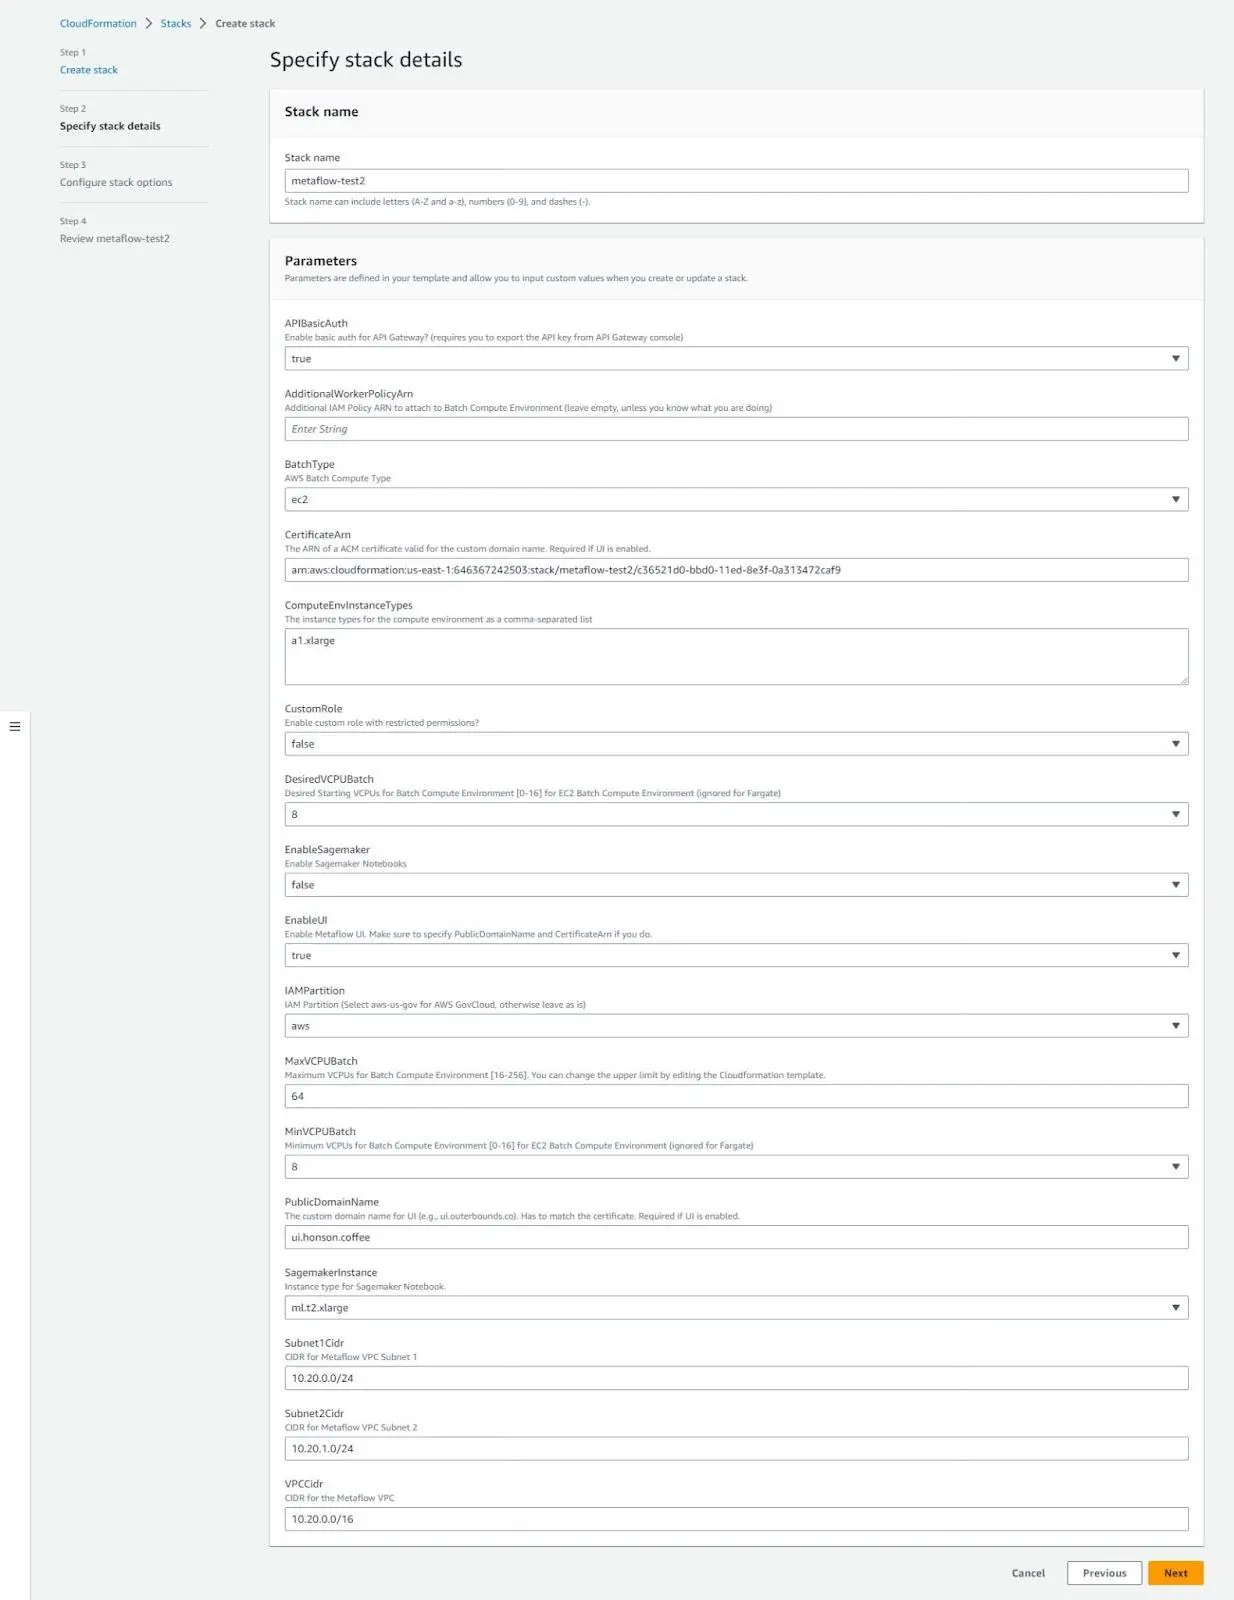
You’ll be greeted with a page to modify your stack details. Here are some fields we have changed for the demo. Anything not mentioned here is left as the default value.
a. Stack Name: Enter the name of what you would like the deployment to be called.
b. CertificateArn: (Optional UI) Paste the link of your certificate ARN here.
c. ComputeEnvInstanceTypes: This was changed to
a1.xlargefor demo purposes. However, this setting limits the types of instances CloudFormation can create during parallel or high compute situations.d. EnableSagemaker: Set to false as it is not needed in this demo.
e. EnableUI: (Optional) Set to true.
f. PublicDomainName: Set to
ui.honson.coffeefor our Metaflow dashboard. Add your own here.
Click “Next” d uring “Configure stack options.” We have left all the options on this page as the default option, but feel free to change them to your preference (e.g., IAM permissions, stack failure behaviors, etc.).
Finally, accept the acknowledgment at the bottom of the page and click “Submit.”
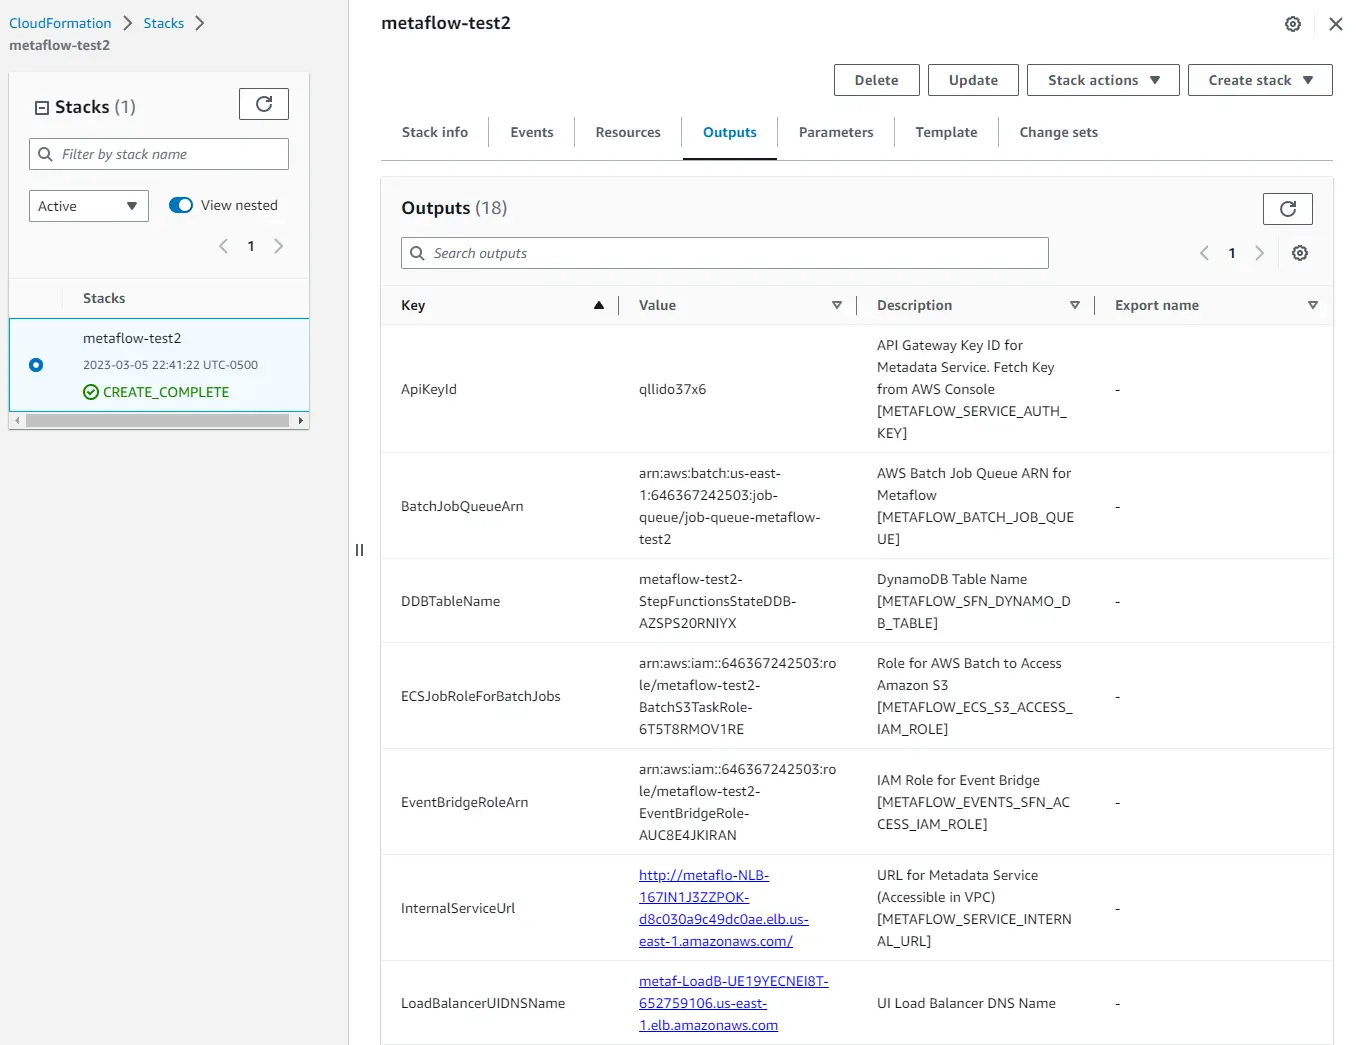
- After clicking submit, you’ll return to the home page of the CloudFormation console, where you will see your stack is currently being created. The creation time for this should take about 10-15 minutes. Refresh the page to see if you have a “Create Completed” status on the stack. If so, click on the stack name to obtain more information on what was deployed.
- Click the output tab to view all the resources created once on the stack details page. Leave this page open for reference, as we’ll need this in the next step to configure your local machine to send jobs to AWS.
(Optional) Create Your UI Login
Those who opted to deploy Metaflow with a UI must create a user account to login to the dashboard.
On the same Metaflow CloudFormation stack page as the “Outputs” tab, click on “Resources.” Search for “Cognito.”
Click on the URL link in the “UserPoolUI” row and “Physical ID” column.
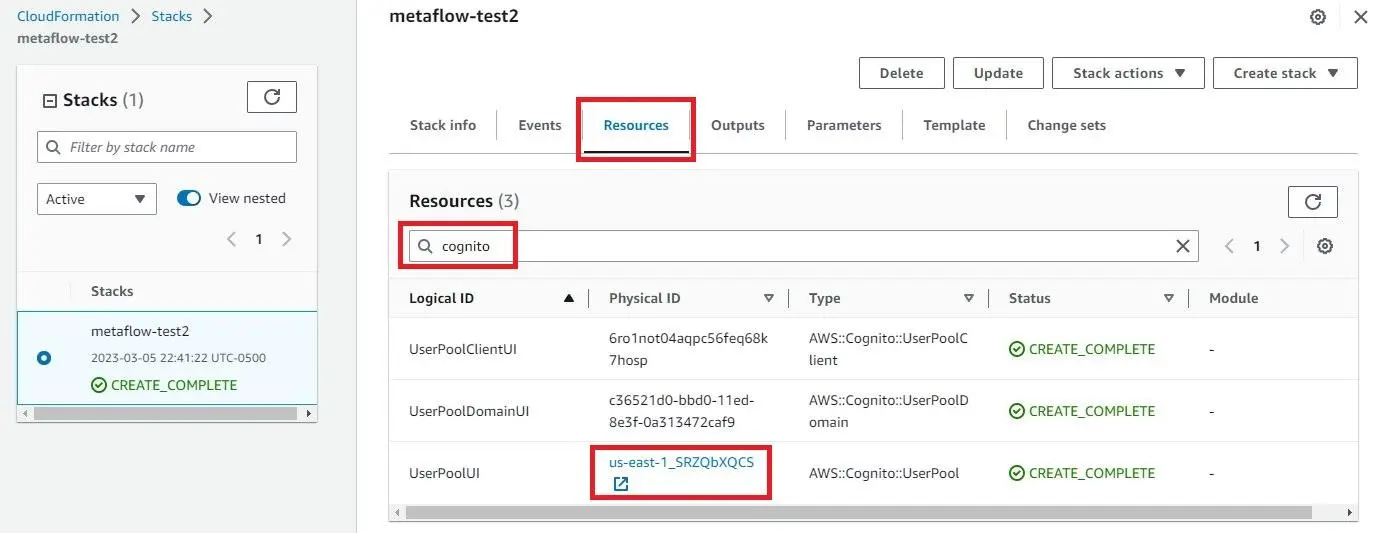
- You will be redirected to the AWS Cognito console page. Click on the “Users” tab and “Create User.”
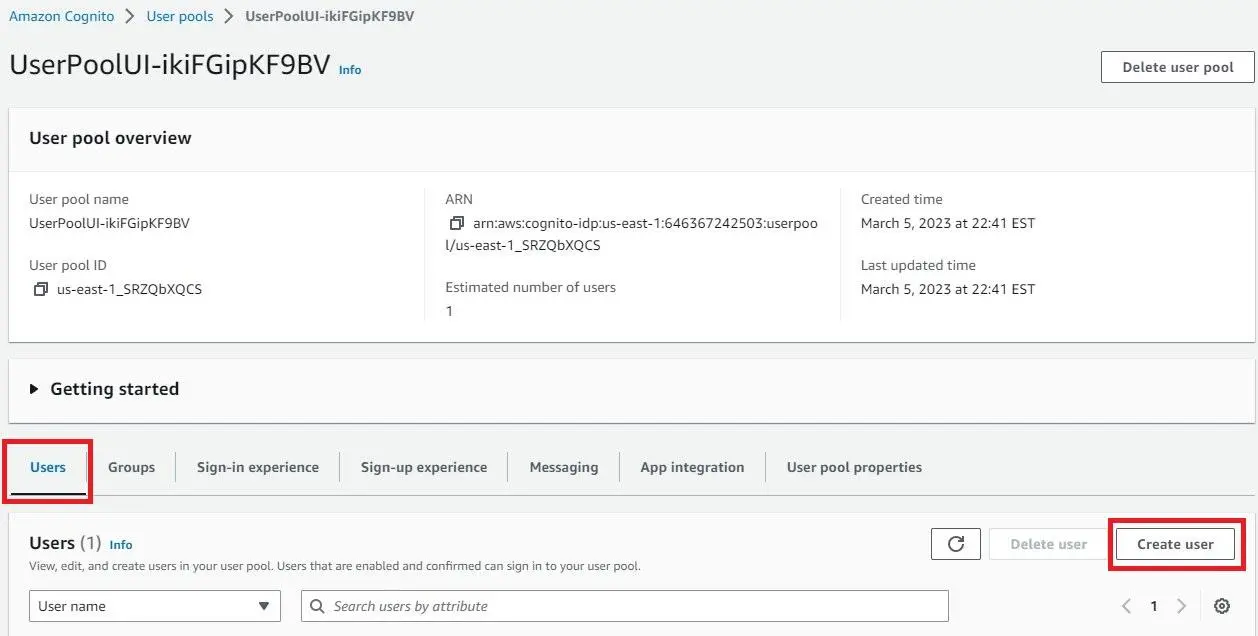
- Create your user and click “Next.”
Configure Your Local Machine
Welcome to the last step of the Metaflow deployment! Configuring the remainder of the Metaflow demo will be much less painful from here on out.
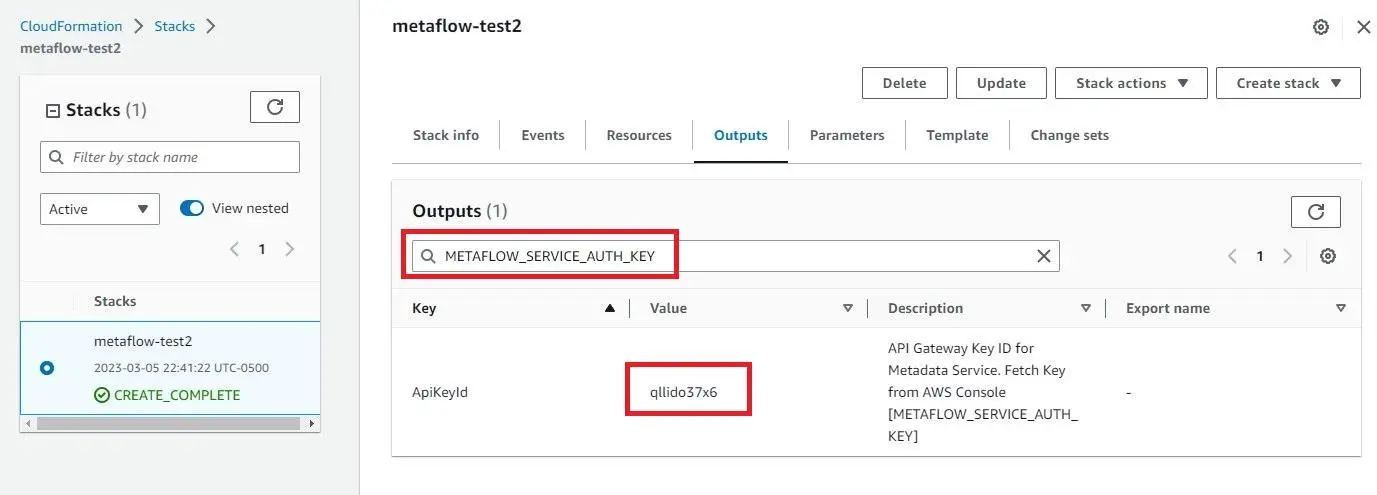
Before configuring Metaflow, we’ll need to obtain our API key. There are two options to obtain the API key:
Option 1: Through the AWS CLI
- Go to the “Outputs” tab you left open from the last step of the last section. Copy the value you get from searching for
METAFLOW_SERVICE_AUTH_KEY.
Modify this command with your API key where the command says
YOUR_KEY_HERE, and enter this into a terminal:aws apigateway get-api-key --api-key YOUR_KEY_HERE --include-value | grep valueSave the 40-character string value returned from the terminal for later steps.
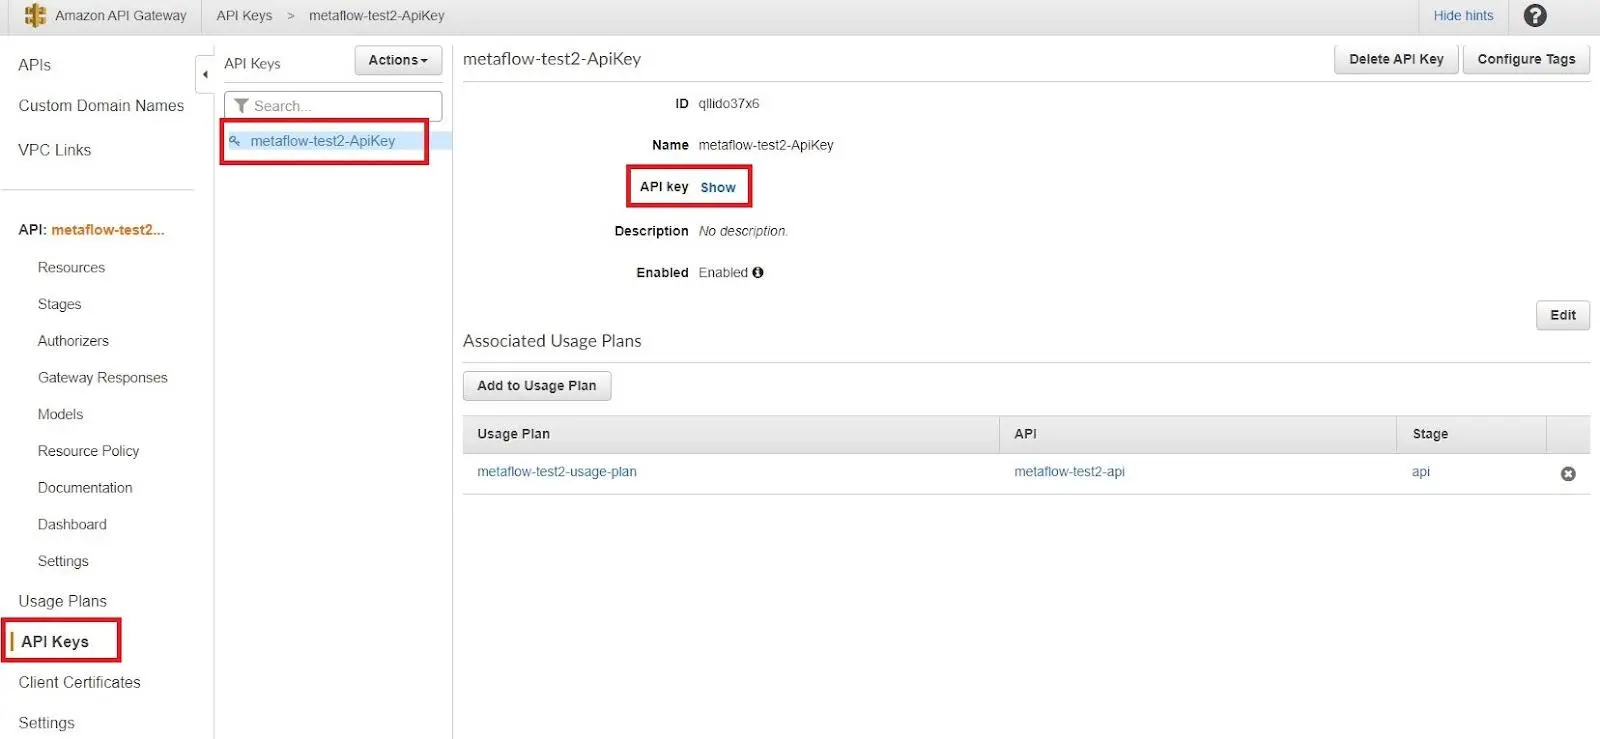
Option 2: Through the AWS console.
- Go to the AWS API Gateway, then select the region where you created your CloudFormation stack. After choosing your region, you should be greeted with a page like the one below.

Click on the name of your demo-name-API (i.e.,
metaflow-test2-api) to obtain more information.Click on “API Keys” on the left sidebar, followed by the name of your API key (i.e.,
metaflow-test2-api), then “Show” at the “API Key” entry.Save this information for use in the next set of steps in the terminal.
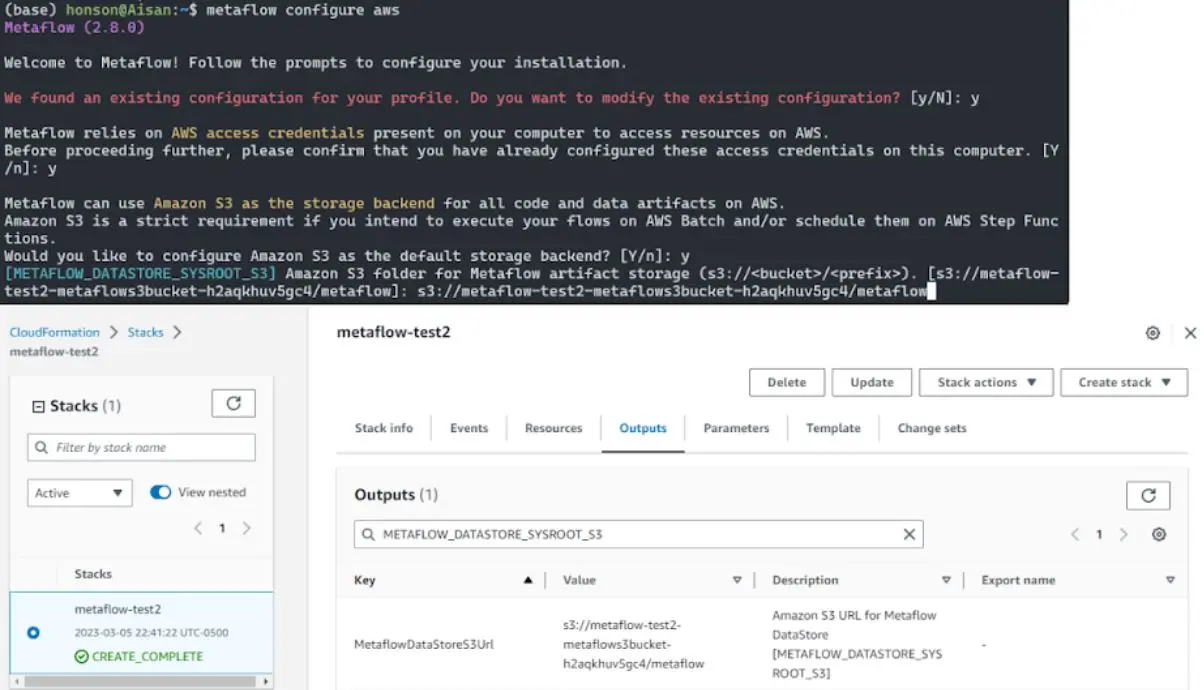
Once you obtain your API key, proceed with the following steps. In a terminal window, do the following:
pip3 install metaflowmetaflow configure awsContinue following the interactive setup on the terminal. You’ll notice variable names (e.g.,
METAFLOW_DATASTORE_SYSROOT_S3]) in each step. For most of the configuration, take the variable name inside the brackets and search for this variable name in the “Outputs” search bar from step 8 of “Deploy the Metaflow Stack.” Copy the “Value” from the “Outputs” table into your terminal. For other variables in this setup, do the following:[METAFLOW_DATATOOLS_SYSROOT_S3]
a) This can be left as the default value or changed to your preference.[METAFLOW_SERVICE_AUTH_KEY]
a). This is the API key obtained from either option 1 or 2 above.[METAFLOW_BATCH_CONTAINER_REGISTRY]
a). This variable can be left as the default unless you’re using a different Docker registry.METAFLOW_BATCH_CONTAINER_IMAGE
a). This variable can be left as the default value. If nothing is specified, an appropriate python image is used as default.
Running and Observing our Sample
Now that everything is set up, we can finally run our sample! Feel free to run any of the above samples in this post or the Metaflow sandbox. For our demo, we’ll run one of the sandbox examples with modifications to the defined conda environment (as the sandbox example might be a bit outdated for other environments).
from metaflow import FlowSpec, step, card, conda_base, conda, current, Parameter, [kubernetes](https://saturncloud.io/glossary/kubernetes)
from metaflow.cards import Markdown, Table, Image
from io import BytesIO


URL = (
    "https://metaflow-demo-public.s3.us-west-2.amazonaws.com"
    "/taxi/sandbox/train_sample.parquet"
)
DAYS = ["Sunday", "Monday", "Tuesday", "Wednesday", "Thursday", "Friday", "Saturday"]


@conda_base(python='3.9.10', libraries={"datashader": "0.14.0", "pandas": "1.4.2", "pyarrow": "5.0.0"})
class NYCVizFlow(FlowSpec):


    data_url = Parameter("data_url", default=URL)


    @card
    @step
    def start(self):
        import pandas as pd


        df = pd.read_parquet(self.data_url)
        self.size = df.shape[0]
        print(f"Processing {self.size} datapoints...")
        df["key"] = pd.to_datetime(df["key"])
        self.dfs_by_dow = [(d, df[df.key.dt.day_name() == d]) for d in DAYS]
        self.next(self.visualize, foreach="dfs_by_dow")


    # UNCOMMENT THIS LINE FOR CLOUD EXECUTION:
    # @kubernetes
    @card
    @step
    def visualize(self):
        self.day_index = self.index
        self.dow, df = self.input
        self.dow_size = df.shape[0]


        print(f"Plotting {self.dow}")
        self.img = render_heatmap(df)
        self.next(self.validate)


    @card(type="blank")
    @step
    def validate(self, inputs):


        # validate that all data points got processed
        self.num_rows = sum(inp.dow_size for inp in inputs)
        assert inputs[0].size == self.num_rows


        # produce a report card
        current.card.append(Markdown("# NYC Taxi drop off locations by weekday"))
        rows = []
        for task in sorted(inputs, key=lambda x: x.day_index):
            rows.append([task.dow, Image(task.img)])
        current.card.append(Table(rows, headers=["Day of week", "Heatmap"]))
        self.next(self.end)


    @step
    def end(self):
        print("Success!")


def render_heatmap(df, x_range=(-74.02, -73.90), y_range=(40.69, 40.83), w=375, h=450):
    from datashader import Canvas, count, colors
    from datashader import transfer_functions as tr_fns


    cvs = Canvas(plot_width=w, plot_height=h, x_range=x_range, y_range=y_range)
    agg = cvs.points(
        df, "dropoff_longitude", "dropoff_latitude", count("passenger_count")
    )
    img = tr_fns.shade(agg, cmap=colors.Hot, how="log")
    img = tr_fns.set_background(img, "black")
    buf = BytesIO()
    img.to_pil().save(buf, format="png")
    return buf.getvalue()

if __name__ == "__main__":
    NYCVizFlow()
Run any example using the following command:
python3 file.py --environment=conda run.If you don’t have the conda-forge channel added (Metaflow will let you know), you can temporarily add
CONDA_CHANNELS=conda-forgein front of the command.(Optional). If you have set up the Metaflow UI, access your run by going to your UI domain and logging in with the user created in AWS Cognito.
Article Resources and More
Now that you have Metaflow deployed, you can create more users to access these resources. Metaflow will run all these jobs and manage the infrastructure in the background. To learn more about Metaflow, add functionality to your pipeline or workflow, or ask for support, refer to the links below.


