
This article was published when data science tooling like Dask and R was a primary focus for Saturn Cloud. Today, Saturn Cloud is the enterprise AI platform for any GPU infrastructure.
As a data scientist, you may have heard about the powerful machine learning framework called TensorFlow. TensorFlow is an open-source software library developed by Google that allows you to build and train machine learning models. In this blog post, we will show you how to install TensorFlow in Jupyter Notebook, a popular web-based interactive development environment for data science.
Tired of the complexities of installing TensorFlow in Jupyter Notebook? Try Saturn Cloud for free and to set up your data science environment effortlessly!
Step 1: Install Jupyter Notebook
Now that we have TensorFlow installed, we need to install Jupyter Notebook so we can start using it. In the same terminal window, type the following command:
conda install jupyter
This will download and install Jupyter Notebook in your environment.
Step 2: Launch Jupyter Notebook
With TensorFlow and Jupyter Notebook installed, we can now launch Jupyter Notebook. In the same terminal window, type the following command:
jupyter notebook
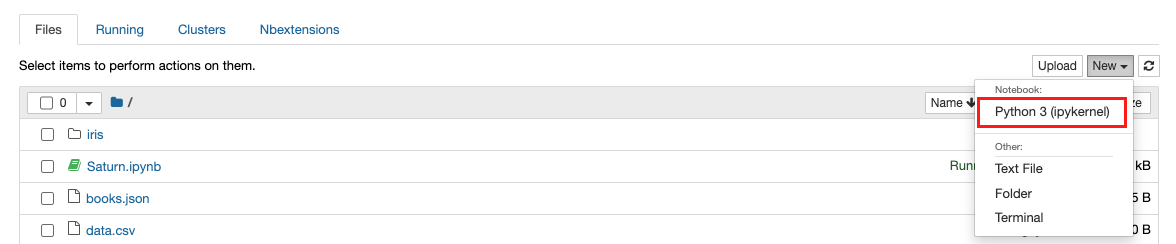
This will open Jupyter Notebook in your default web browser. You should see a list of files and folders in your home directory. To create a new notebook, click on the New button in the top right corner and select Python 3 under Notebooks.
Step 3: Install TensorFlow
With our new environment created, we can now install TensorFlow. There are two ways to install TensorFlow: using pip or using conda. We recommend using conda as it will automatically install all the necessary dependencies. Create a new cell in your Jupyter notebook and run the command below:
!pip install tensorflow
This will download and install the latest version of TensorFlow in your environment. If your machine support GPU, make sure to Install the NVIDIA GPU driver if you have not and verify it by nvidia-smi. At the end, you can run the following command:
!pip install tensorflow[and-cuda]
Step 4: Test TensorFlow
To test if TensorFlow is working correctly, we can create a simple program that adds two numbers using TensorFlow. In your new notebook, type the following code:
import tensorflow as tf

a = tf.constant(2)
b = tf.constant(3)

c = tf.add(a, b)

with tf.Session() as sess:
    result = sess.run(c)
    print(result)
This program creates two constants, a and b, and adds them together using TensorFlow’s add function. The result is then printed to the console.
To run the program, click on the Run button in the toolbar or press Shift+Enter. You should see the result, 5, printed to the console.
Congratulations, you have successfully installed TensorFlow in Jupyter Notebook!
Tired of the complexities of installing TensorFlow in Jupyter Notebook? Try Saturn Cloud for free and to set up your data science environment effortlessly!
Conclusion
In this blog post, we have shown you how to install TensorFlow in Jupyter Notebook using Anaconda. By following these simple steps, you can start building and training machine learning models using TensorFlow in Jupyter Notebook. Remember to create a new environment specifically for TensorFlow to avoid conflicts with other Python packages.

