
How to Install PyTorch in Windows
PyTorch is an open-source machine learning library for Python, developed by Facebook’s AI research team. It has gained popularity due to its ease of use and flexibility, making it a preferred choice for data scientists and software engineers. Installing PyTorch on a Windows machine can be challenging, but this guide will help you install PyTorch on your Windows computer.
Prerequisites
Before installing PyTorch, you need to ensure that your computer meets the following requirements:
- Windows 7 or higher
- Python 3.6 or higher
- CUDA for GPU support (optional)
Step 1: Install Python
To install PyTorch, you will need to install Python first. You can download the latest version of Python from the official website (https://www.python.org/downloads/). Once you have downloaded the installer, run it and follow the instructions to install Python.
Step 2: Install PyTorch
There are several ways to install PyTorch on a Windows machine. You can either use pip, conda or choco. Navigate to the Pytorch official website and choose the way you prefer. Let’s say you want to install pytorch on Windows, using pip without GPU acceleration, then the command would be
pip3 install torch torchvision torchaudio
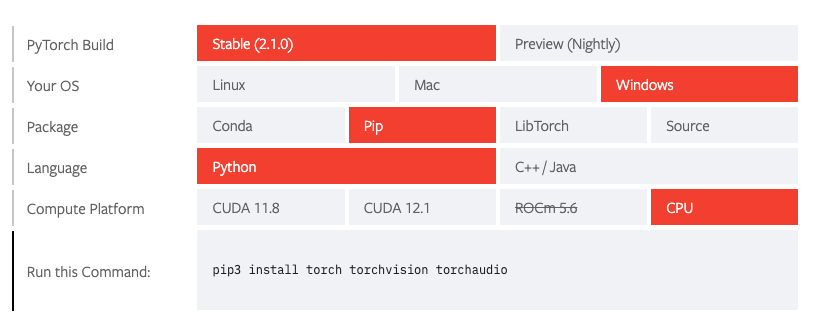
This command will install the latest version of PyTorch along with torchvision, which is a package that provides access to popular datasets, model architectures, and image transformations for computer vision tasks and torchaudio which is a PyTorch-based library designed for audio data processing and analysis, offering tools for loading, transforming, and working with audio data in deep learning applications..
Step 3: Verify the Installation
To verify that PyTorch has been installed correctly, open a Python shell by typing python in the command prompt or terminal window. Once the Python shell is open, type the following commands:
import torch
print(torch.__version__)
If PyTorch has been installed correctly, you should see the version number of PyTorch printed on the screen.
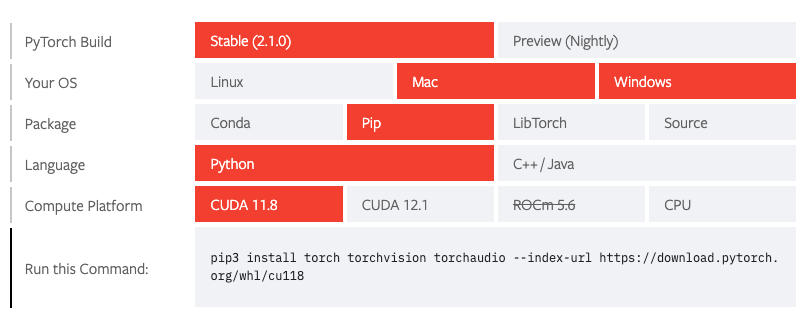
Step 4: Optional: Install CUDA
If you have an NVIDIA GPU and want to use PyTorch with GPU acceleration, you will need to install CUDA. CUDA is a parallel computing platform and programming model developed by NVIDIA for general computing on GPUs.
To install CUDA, you can download the installer from the NVIDIA website (https://developer.nvidia.com/cuda-downloads). Once you have downloaded the installer, run it and follow the instructions to install CUDA.
After installing CUDA, comeback to Step 2 and choose as follow and run the recommended command.
To check if your GPU driver and CUDA is enabled and accessible by PyTorch, run the following commands to return whether or not the CUDA driver is enabled:
python
import torch
torch.cuda.is_available()
Conclusion
Installing PyTorch on a Windows machine can be challenging, but by following the steps outlined in this guide, you should be able to install PyTorch with ease. Remember to ensure that your computer meets the prerequisites before attempting to install PyTorch. Once PyTorch is installed, you can start using it to build and train machine learning models.
PyTorch is a powerful tool for machine learning, and by installing it on your Windows machine, you can take advantage of its capabilities. Whether you are a data scientist or a software engineer, PyTorch can help you develop and deploy machine learning models quickly and easily.

