
If you’re a data scientist or software engineer working with machine learning models, you know that having access to GPUs can greatly speed up the training process. Google Colab is a popular cloud-based platform for running machine learning experiments, and it provides free access to GPUs. However, the allocated GPU specs can vary, and it may not always be clear what resources are available to you. In this article, we’ll walk through how to get allocated GPU specs in Google Colab.
Table of Contents
- Introduction
- What Is Google Colab?
- How to Check the Allocated GPU Specs in Google Colab
- How to Get More GPU Memory in Google Colab
- Google Colab’s Pros and Cons
- Error Handling
- Conclusion
What Is Google Colab?
Google Colab is a cloud-based platform that allows users to run Jupyter notebooks on Google’s cloud servers. It provides free access to GPUs, which can greatly speed up the training of machine learning models. Colab is a popular choice among data scientists and software engineers because it’s free, easy to use, and provides access to powerful computing resources.
How to Check the Allocated GPU Specs in Google Colab
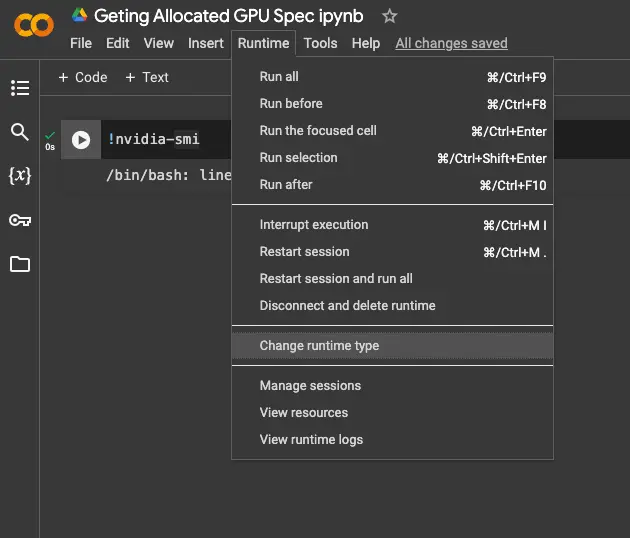
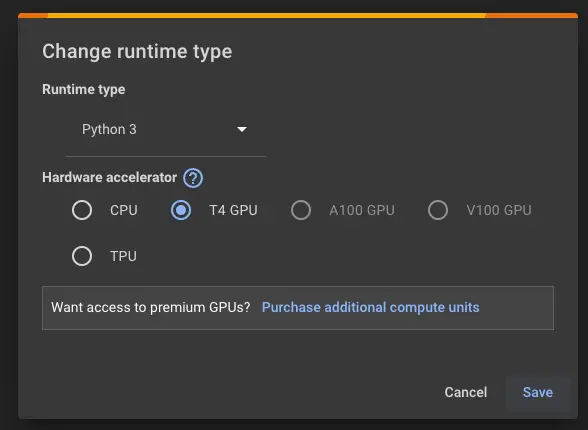
Ensure a GPU Runtime: First, make sure your Colab notebook is set to use a GPU runtime. Go to Runtime -> Change runtime type, and select “GPU” as the Hardware Accelerator.
To check the allocated GPU specs in Google Colab, you can use the !nvidia-smi command. This command will display information about the GPU, including the memory usage, temperature, and clock speed.
To run the !nvidia-smi command in Colab, simply open a new code cell and type the command. Here’s an example:
!nvidia-smi
When you run this command, you’ll see an output that looks something like this:
+-----------------------------------------------------------------------------+
| NVIDIA-SMI 465.19.01    Driver Version: 465.19.01    CUDA Version: 11.3     |
|-------------------------------+----------------------+----------------------+
| GPU  Name        Persistence-M| Bus-Id        Disp.A | Volatile Uncorr. ECC |
| Fan  Temp  Perf  Pwr:Usage/Cap|         Memory-Usage | GPU-Util  Compute M. |
|                               |                      |               MIG M. |
|===============================+======================+======================|
|   0  Tesla K80           On   | 00000000:00:04.0 Off |                    0 |
| N/A   39C    P0    60W / 149W |   1166MiB / 11441MiB |     57%      Default |
|                               |                      |                  N/A |
+-------------------------------+----------------------+----------------------+
This output provides information about the NVIDIA GPU that’s currently allocated to your Colab session. In this example, we can see that the allocated GPU is a Tesla K80 with 11441MB of memory, and that it’s currently using 1166MB of that memory.
How to Get More GPU Memory in Google Colab
If you find that you need more GPU memory than what’s currently allocated to your Colab session, you can request a larger GPU by going to Runtime > Change runtime type in the Colab menu. From there, you can select a different GPU type and size.
Keep in mind that larger GPUs may not always be available, and that requesting a larger GPU may result in a longer wait time before your Colab session is ready.
Google Colab’s Pros and Cons
Pros
Free Access to GPUs: Google Colab provides free access to GPUs, making it an attractive platform for data scientists and software engineers who want to leverage powerful computing resources without incurring additional costs.
Cloud-Based Platform: Being a cloud-based platform, Google Colab eliminates the need for users to set up and maintain their own computing infrastructure. This allows for easier collaboration and seamless sharing of Jupyter notebooks.
Ease of Use: Colab is known for its user-friendly interface and seamless integration with Jupyter notebooks. Users can quickly set up and run machine learning experiments without the hassle of configuring hardware or software.
Wide Adoption: Due to its free GPU access and ease of use, Google Colab has gained widespread adoption among the machine learning community. This popularity fosters a supportive user community and ensures that users can find resources and help easily.
Cons
Variable GPU Specs: The allocated GPU specifications in Google Colab can vary, and users may not always have clarity on the available resources. This variability can impact the performance and efficiency of machine learning experiments.
Limited GPU Memory: The allocated GPU memory may not always be sufficient for complex machine learning models or large datasets. Users may face limitations that hinder their ability to train certain types of models or handle extensive datasets.
Resource Availability: Larger GPUs may not always be available, and requesting a change in GPU type or size might result in a longer wait time before the Colab session is ready. This can be a drawback, especially when time is crucial for the experimentation process.
Error Handling
Unavailable GPUs: Users should be prepared to handle situations where GPUs are not available due to high demand or maintenance. It’s advisable to have contingency plans, such as trying the experiment at a later time or exploring alternative platforms.
Error in GPU Allocation: If there is an error in GPU allocation, users should check their Colab runtime settings and ensure that they have selected the correct GPU type. Clear instructions on troubleshooting such errors can help users quickly resolve issues.
Memory Exhaustion: In cases where GPU memory is insufficient, users should consider optimizing their machine learning models, utilizing data batching techniques, or exploring alternatives like distributed computing. Clear guidance on managing memory issues can enhance the user experience.
Long Wait Times: Users requesting larger GPUs should be aware of potential longer wait times. Adequate communication about expected wait times can help manage user expectations and allow them to plan their work accordingly.
Conclusion
In this article, we’ve walked through how to get allocated GPU specs in Google Colab. By using the !nvidia-smi command, you can quickly see what GPU is currently allocated to your Colab session, and how much memory it has available. If you need more GPU memory, you can request a larger GPU through the Colab menu. With this knowledge, you’ll be better equipped to optimize your machine learning experiments in Colab.

