
This article was published when data science tooling like Dask and R was a primary focus for Saturn Cloud. Today, Saturn Cloud is the enterprise AI platform for any GPU infrastructure.
As a data scientist or software engineer, you might have encountered Module Not Found errors during import in Jupyter Notebook. This error can be frustrating, but it is essential to know how to fix it to ensure the smooth running of your code.
In this blog post, we will explain what causes the Module Not Found error and how to fix it in Jupyter Notebook.
Table of Contents
- What is the Module Not Found Error?
- What Causes the Module Not Found Error?
- How to Fix the Module Not Found Error
- Best Practices
- Conclusion
What is the Module Not Found Error?
The Module Not Found error is a common error that occurs when you try to import a module that is not installed or not accessible. This error is often encountered when working with Jupyter Notebook, which is a popular tool for data scientists and software engineers.
The error message usually looks like this:
ModuleNotFoundError: No module named 'module_name'
This error message indicates that the module you are trying to import is not found in your Python environment.
What Causes the Module Not Found Error?
The Module Not Found error is caused by several reasons, some of which include:
The module is not installed: If the module is not installed, Python will not be able to find it when you try to import it.
The module is installed in a different environment: If the module is installed in a different environment, Python will not be able to find it in the current environment.
The module is not accessible: If the module is located in a directory that is not accessible by Python, it will not be found.
How to Fix the Module Not Found Error
Here are some ways to fix the Module Not Found error during import in Jupyter Notebook:
1. Install the Module
The first and most obvious solution is to install the module using pip or conda. To install a module using pip, open your terminal and type:
pip install module_name
To install a module using conda, open your terminal and type:
conda install module_name
2. Check the Installed Modules
Sometimes, you might have installed the module, but it is not recognized by Python. In this case, you can check the list of installed modules using the following command:
pip list
This command will list all the modules installed in your Python environment. If the module you are trying to import is not listed, then it means it is not installed.
3. Check the Environment Variables
If the module is installed in a different environment, you need to check the environment variables to ensure that the current environment can access it.
In Jupyter Notebook, you can check the environment variables using the following command:
!echo $PATH
This command will display the path to the environment variables. If the path to the environment variable where the module is installed is not included, you need to add it.
4. Check the Module Location
Sometimes, the module might be installed in a directory that is not accessible by Python. In this case, you need to check the module location and move it to a directory that is accessible.
To check the module location, you can use the following command:
!pip show module_name
This command will display the location of the module. If the location is not accessible, you need to move it to a different directory.
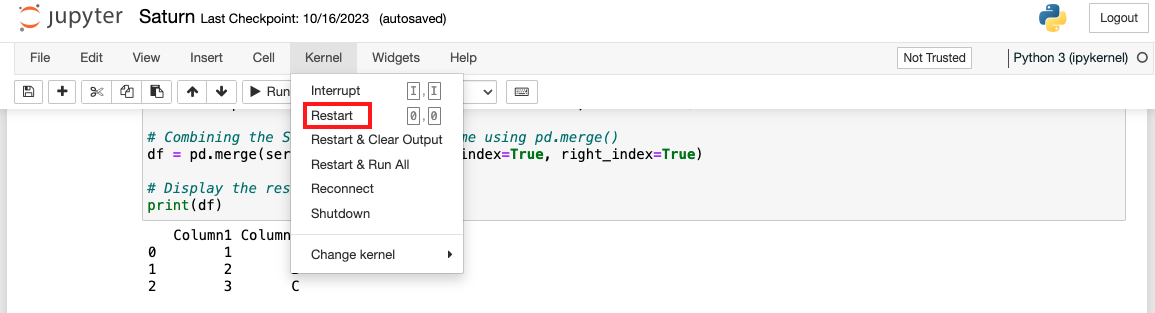
5. Restart the Kernel
If you have installed the module, checked the environment variables, and the module location, and the error still persists, you might need to restart the kernel.
To restart the kernel, go to the Kernel menu and click on Restart.
Best Practices
To minimize the likelihood of encountering “Module Not Found” errors, consider the following best practices:
- Use virtual environments to manage dependencies.
# Using virtualenv virtualenv venv source venv/bin/activate # Using conda conda create --name myenv conda activate myenv - Document your project’s dependencies in a requirements.txt or environment.yml file.
- Avoid naming your scripts with the same name as existing modules.
- Regularly update your modules to the latest versions.
Conclusion
The Module Not Found error during import in Jupyter Notebook can be frustrating, but it is essential to know how to fix it. In this blog post, we have explained what causes the error and how to fix it.
By following the steps outlined in this blog post, you can easily fix the Module Not Found error and ensure the smooth running of your code in Jupyter Notebook.
