
This article was published when data science tooling like Dask and R was a primary focus for Saturn Cloud. Today, Saturn Cloud is the enterprise AI platform for any GPU infrastructure.
In this tutorial, we will walk through the process of adding a Python 3 kernel to Jupyter (IPython) step by step. Jupyter Notebook is a widely-used tool among data scientists and programmers, as it allows for interactive computing with a variety of programming languages like Python, R, Julia, and many others. However, you might find yourself in a situation where you need to work with a different version of Python, or even a specific Python environment. In such cases, adding a new kernel to Jupyter Notebook can be extremely helpful.
Table of Contents:
- Prerequisites
- Step 1: Create a Python 3 Virtual Environment
- Step 2: Activate the Virtual Environment
- Step 3: Install the IPython Kernel Package
- Step 4: Register the Kernel with Jupyter
- Step 5: Verify and Use the New Kernel
- Conclusion
Prerequisites
Before getting started, you should have the following tools installed on your system:
- Python 3.x (preferably the latest version)
- Jupyter Notebook
- virtualenv (for creating virtual environments)
If you don’t have these installed, follow the instructions on their respective websites to get them set up.
Step 1: Create a Python 3 Virtual Environment
First, we need to create a new virtual environment for our Python 3 kernel. This will help us manage the dependencies and packages used by the kernel independently from the system-wide Python installation.
Open a terminal (or command prompt on Windows) and navigate to the directory where you want to create the virtual environment. Then, run the following command:
virtualenv -p python3 my-python3-env
This will create a new virtual environment named my-python3-env using the python3 interpreter. You can replace my-python3-env with any name you prefer.
Step 2: Activate the Virtual Environment
Once the virtual environment is created, we must activate it. This will allow us to install packages and configure the kernel within the context of the virtual environment. To activate the virtual environment, run the following command:
On Linux or macOS:
source my-python3-env/bin/activate
On Windows:
my-python3-env\Scripts\activate
After activating the virtual environment, your terminal prompt should change to reflect the active environment, like so:
(my-python3-env) $
Step 3: Install the IPython Kernel Package
Now that our virtual environment is active, we can install the IPython kernel package. This package is required for our new Python 3 kernel to function properly within Jupyter Notebook. Run the following command to install the IPython kernel package:
pip install ipykernel
Step 4: Register the Kernel with Jupyter
With the IPython kernel package installed, we can now register our new Python 3 kernel with Jupyter Notebook. To do this, we’ll use the ipykernel command, which was installed as part of the IPython kernel package. Run the following command to register the kernel:
python -m ipykernel install --user --name=my-python3-kernel
This command registers a new kernel with the name my-python3-kernel and associates it with our active virtual environment. You can replace my-python3-kernel with any name you prefer. This name will be displayed in the Jupyter Notebook interface when selecting kernels.
Step 5: Verify and Use the New Kernel
To verify that our new kernel was registered successfully and is available for use within Jupyter Notebook, launch Jupyter Notebook by running the following command:
jupyter notebook
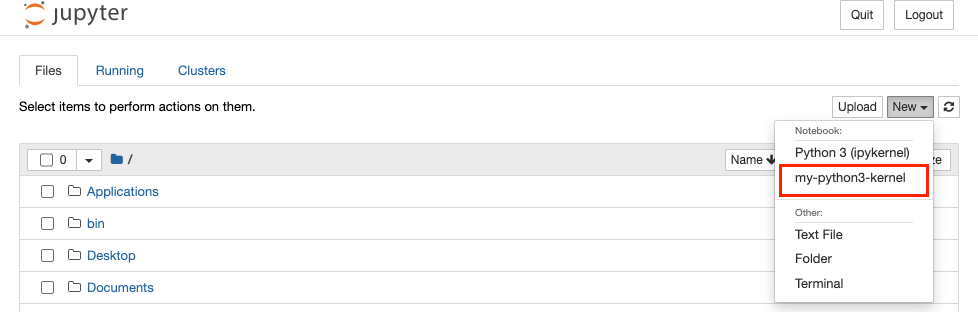
This will open the Jupyter Notebook interface in your default web browser. Create a new notebook by clicking the New button in the top right corner, and then select your new kernel (my-python3-kernel) from the dropdown menu.
You should now be able to use your new Python 3 kernel within Jupyter Notebook! Try running some Python code in a notebook cell to confirm that everything is working as expected.
Conclusion
In this tutorial, we learned how to add a Python 3 kernel to Jupyter (IPython) by following these steps:
- Create a Python 3 virtual environment
- Activate the virtual environment
- Install the IPython kernel package
- Register the kernel with Jupyter
- Verify and use the new kernel
With this new kernel, you can now work with different versions of Python or specific Python environments within Jupyter Notebook, making your data science and programming tasks even more flexible and efficient.
