
Google Colab is a free cloud-based service that provides a Jupyter Notebook environment for data scientists and developers to run their code. One of the most significant advantages of using Google Colab is that it provides access to powerful GPUs that can significantly accelerate computations. However, by default, Google Colab runs on CPUs, and to use GPUs, you need to activate them manually. In this article, we will discuss how to activate GPU computing in Google Colab.
What is GPU Computing?
Before we dive into how to activate GPU computing in Google Colab, let’s briefly discuss what GPU computing is and why it is essential for data scientists and developers.
A central processing unit (CPU) is a general-purpose processor that can perform a wide range of tasks. In contrast, a graphics processing unit (GPU) is a specialized processor designed to handle complex calculations related to graphics and video processing. However, GPUs are not limited to graphics and video processing, and they can also be used for other computationally intensive tasks such as machine learning, deep learning, and scientific computing.
GPUs are highly parallel, meaning they can perform multiple calculations simultaneously, making them ideal for tasks that require massive amounts of data processing. For example, training a deep learning model on a large dataset can be extremely time-consuming on a CPU, but with a GPU, the same task can be completed in a fraction of the time.
How to Activate GPU Computing in Google Colab?
Now that we understand the importance of GPU computing let’s see how to activate it in Google Colab.
Step 1: Open Google Colab
First, you need to open Google Colab by going to https://colab.research.google.com/ and sign in with your Google account.
Step 2: Create a New Notebook
Once you are signed in, click on the “New Notebook” button to create a new notebook.
Step 3: Select GPU as the Hardware Accelerator
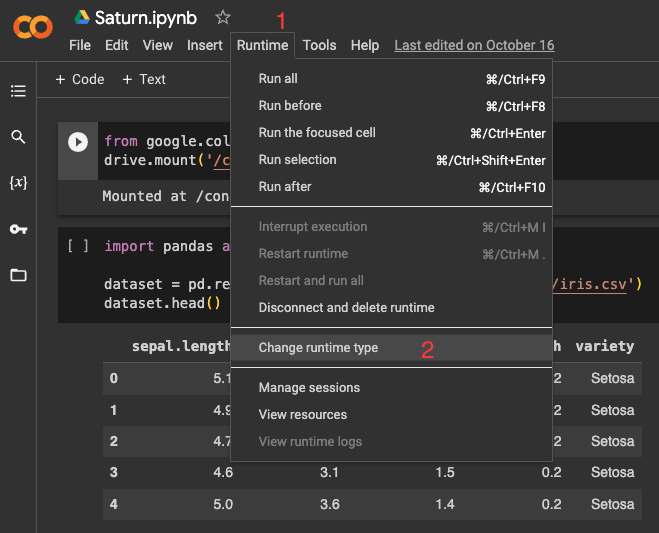
Next, select Runtime from the top menu and then click on Change runtime type.
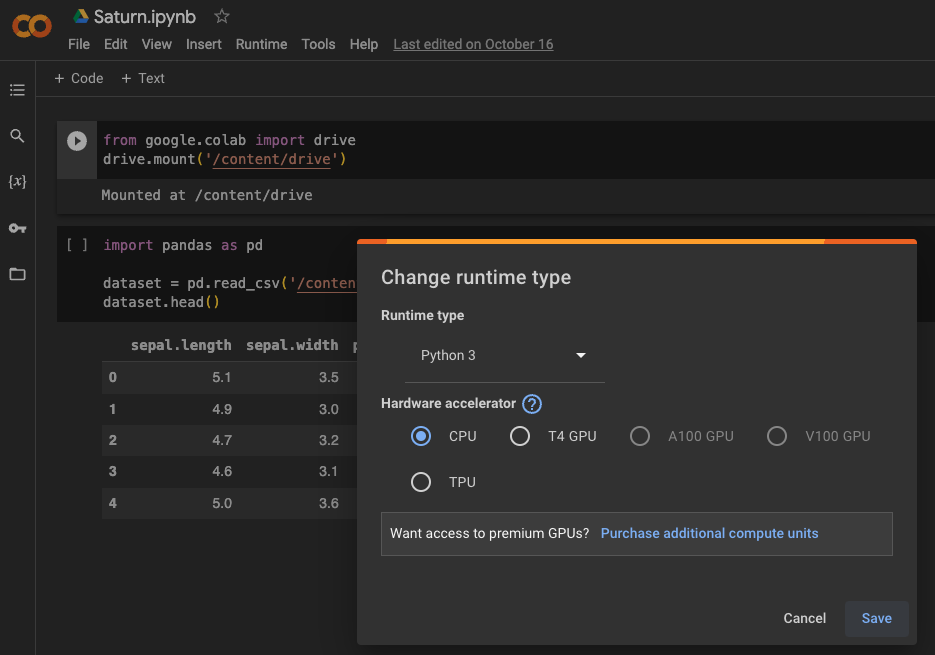
In the Hardware accelerator list, select which accelerator you want and then click Save
Step 4: Verify GPU Availability
After you have selected GPU as the hardware accelerator, you can verify that the GPU is available by running the following code in a code cell:
!nvidia-smi
This code will display information about the GPU, including its name, memory usage, and current processes running on it.

Conclusion
In this article, we discussed how to activate GPU computing in Google Colab. By following the steps outlined above, you can take advantage of the powerful GPUs available in Google Colab to accelerate your computations significantly. GPU computing is essential for data scientists and developers who work with large datasets and computationally intensive tasks, such as machine learning, deep learning, and scientific computing. By using Google Colab and activating GPU computing, you can speed up your computations and improve your productivity.
