
This article was published when data science tooling like Dask and R was a primary focus for Saturn Cloud. Today, Saturn Cloud is the enterprise AI platform for any GPU infrastructure.
Anaconda is a popular distribution of Python and R for scientific computing. It’s a fantastic tool for data scientists, but there may come a time when you need to uninstall it. This blog post will guide you through the process of cleaning up your system after uninstalling Anaconda on Windows 10.
Table of Contents
- Uninstalling Anaconda
- Cleaning Up After Uninstalling Anaconda
- Removing Anaconda from the PATH
- Conclusion
Uninstalling Anaconda
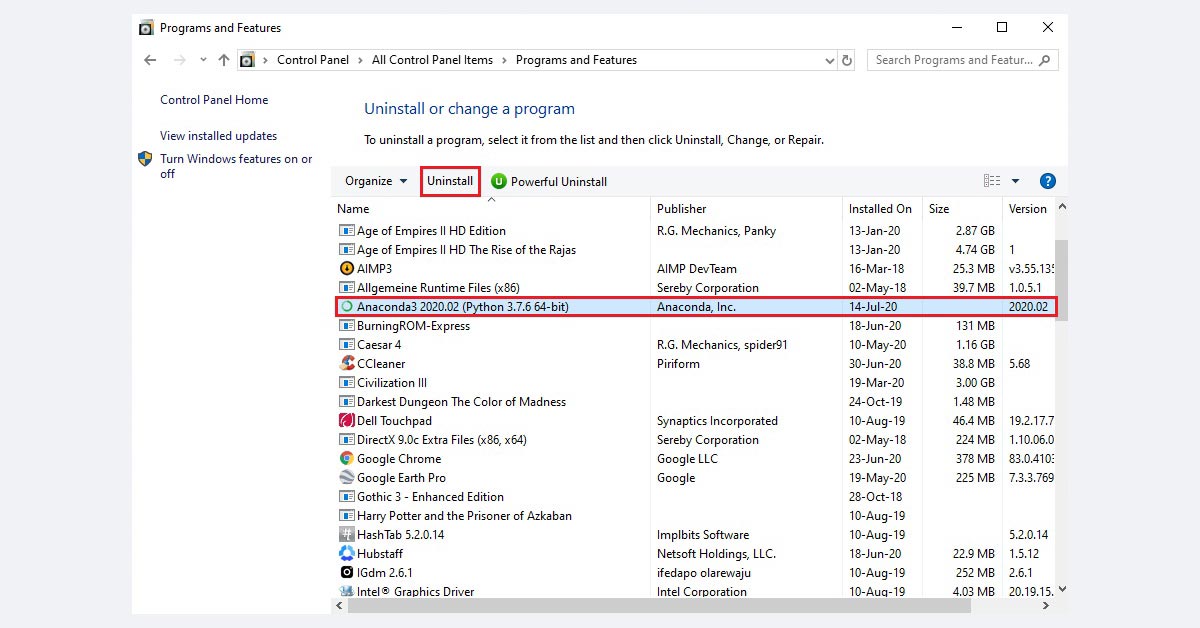
Before we dive into the cleanup process, let’s briefly touch on how to uninstall Anaconda. You can do this through the Windows 10 Add or Remove Programs feature:
- Open the Start menu and type Add or Remove Programs.
- Scroll down until you find Anaconda.
- Click on Anaconda and then click Uninstall.
- Follow the prompts to complete the uninstallation process.
Cleaning Up After Uninstalling Anaconda
Even after uninstalling Anaconda through the ‘Add or Remove Programs’ feature, some files and folders may still be left behind. These residual files can take up valuable space on your hard drive and may cause conflicts with other programs. Here are the folders you should consider removing:
Anaconda Install Directory: This is the main folder where Anaconda was installed. The default location is
C:\Users\<YourUsername>\Anaconda3. If you chose a custom location during installation, you’ll need to navigate there instead.Anaconda’s Scripts Directory: This directory contains scripts for launching Anaconda and its tools. It’s located in the Anaconda install directory under
Scripts.Anaconda’s pkgs Directory: This directory contains packages that Anaconda has downloaded. It’s located in the Anaconda install directory under
pkgs..anaconda_backup: When you uninstall Anaconda, a backup of your settings is created in your home directory. This is typically located at
C:\Users\<YourUsername>\.anaconda_backup..conda and .condarc: These directories contain Conda’s settings and environments. They are located in your home directory at
C:\Users\<YourUsername>\.condaandC:\Users\<YourUsername>\.condarc..ipython and .jupyter: These directories contain settings for IPython and Jupyter. They are located in your home directory at
C:\Users\<YourUsername>\.ipythonandC:\Users\<YourUsername>\.jupyter..keras and .matplotlib: These directories contain settings for Keras and Matplotlib. They are located in your home directory at
C:\Users\<YourUsername>\.kerasandC:\Users\<YourUsername>\.matplotlib.
Before deleting these folders, make sure to back up any data or settings you want to keep. Once you’ve done that, you can delete the folders by right-clicking on them and selecting Delete, or by using the del command in the Command Prompt.
Removing Anaconda from the PATH
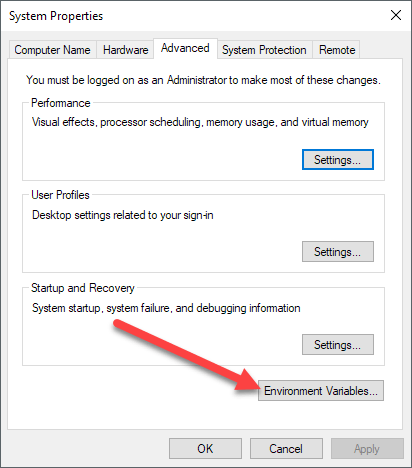
Anaconda adds itself to the PATH environment variable during installation. To remove it:
- Right-click on This PC and select Properties.
- Click on Advanced system settings.
- Click on Environment Variables.
- Under System variables, scroll down until you find Path and click on Edit.
- Remove any entries that reference Anaconda.
Conclusion
Uninstalling Anaconda and cleaning up residual files is a straightforward process. By following these steps, you can ensure that your system is clean and ready for your next adventure in data science.
