
This article was published when data science tooling like Dask and R was a primary focus for Saturn Cloud. Today, Saturn Cloud is the enterprise AI platform for any GPU infrastructure.
Data scientists often find themselves juggling between different tools and environments to streamline their workflow. One such powerful combination is the Anaconda environment and Visual Studio Code (VSCode). In this blog post, we’ll walk you through the process of activating an Anaconda environment in VSCode, a popular code editor among data scientists.
Why Use Anaconda Environment with VSCode?
Anaconda is a free and open-source distribution of Python and R programming languages for scientific computing. It simplifies package management and deployment, making it a go-to choice for data scientists. On the other hand, VSCode is a lightweight but powerful source code editor that runs on your desktop. It comes with built-in support for JavaScript, TypeScript, and Node.js, and has a rich ecosystem of extensions for other languages.
Combining these two can significantly enhance your data science workflow. Here’s how to get started.
Step 1: Install Anaconda and VSCode
Before we can activate an Anaconda environment in VSCode, we need to have both installed on our system. You can download and install Anaconda from the official website and VSCode from the VSCode website.
Step 2: Create an Anaconda Environment
Once you have Anaconda installed, you can create a new environment using the conda command. Open your terminal or Anaconda prompt and type:
conda create --name myenv python=3.8
Replace myenv with the name of your environment and 3.8 with the Python version you want to use.
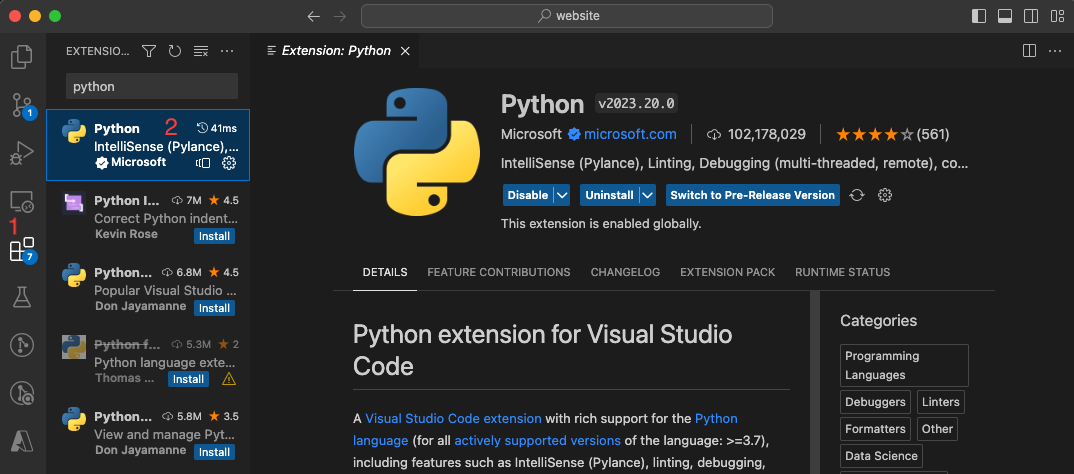
Step 3: Install the Python Extension in VSCode
VSCode uses the Python extension to provide features like IntelliSense, linting, debugging, code navigation, and more. To install it, open VSCode, go to the Extensions view by clicking on the Extensions icon in the Activity Bar on the side of the window, and search for Python. Click Install to add it.
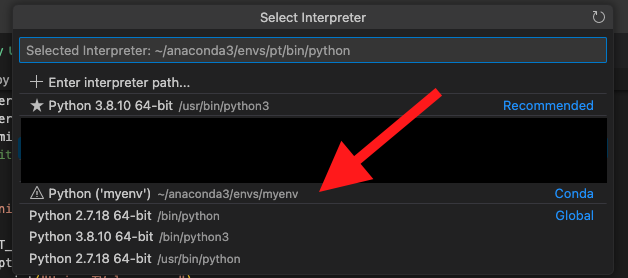
Step 4: Select the Anaconda Environment as Your Python Interpreter
To activate the Anaconda environment in VSCode, you need to select it as your Python interpreter. Open the Command Palette (Ctrl+Shift+P), type Python: Select Interpreter, and hit Enter. A list of available interpreters will appear. Select the one that corresponds to your Anaconda environment.
Step 5: Verify the Environment Activation
To verify that the Anaconda environment is activated in VSCode, open a new terminal in VSCode (Ctrl + `). The terminal should show the name of your Anaconda environment before the prompt, indicating that the environment is active as shown in the figure below.

Common Errors and Troubleshooting:
- ModuleNotFoundError: Ensure that you have activated the correct Anaconda environment in the VSCode terminal.
- CondaCommandNotFoundError: Make sure that Anaconda is added to your system’s PATH variable.
- Kernel Not Found in Jupyter Notebook: Install the Jupyter package within your Anaconda environment using
conda install -c anaconda ipykernel. - No Python interpreter is selected: Follow Step 4 to select the Anaconda interpreter.
Conclusion
Activating an Anaconda environment in VSCode can significantly streamline your data science workflow. It allows you to leverage the power of Anaconda’s package management and deployment capabilities, along with VSCode’s rich feature set for code editing. With this setup, you can focus more on your data science tasks and less on managing your tools.
